





How to Record Vocals Without Headphones (Speakers, Mic Nulls and the Bleed-Track Trick)

Quick summary
Yes, you can record vocals without headphones, and for some singers it’s the key to a great take. Play a quiet mono mix of the song through ONE speaker. Use a cardioid or figure-8 mic (never an omni) and point its null, the dead spot, at that speaker: the back of a cardioid, the side of a figure-8. Keep the singer close to the mic, filter the lows and highs out of the cue mix, and lock everything in place. After the vocal take, record a take of the music alone with the singer still standing at the mic, flip that bleed track’s polarity and combine it with the vocal. That cancels a good part of the bleed, mostly in the lows and mids. It isn’t perfect, but what’s left usually hides in the mix.
Updated : completely rewritten and expanded with new diagrams of mic nulls, the speaker setup and how much bleed phase cancellation really removes, plus a polar pattern table, a troubleshooting table and FAQs. Originally published October 22, 2018.
What’s In This Article
- Can You Record Vocals Without Headphones?
- Which Microphone Pattern Rejects Speaker Bleed Best?
- How Do You Set Up the Speakers and the Mic?
- How Do You Record and Cancel a Bleed Track?
- How Much Bleed Does Phase Cancellation Really Remove?
- How Can EQ and Room Tricks Reduce Bleed Even More?
- What If the Bleed Track Doesn’t Cancel?
Recording vocals in a studio is a very different experience from performing live. Many vocalists aren’t used to wearing headphones and hearing their own dry voice fed back to them. That discomfort can lead to a weaker performance, more takes and bigger studio bills. In the worst cases, the great performance never happens at all.
Can You Record Vocals Without Headphones?
So why are engineers so against recording vocals without headphones? The answer is simple: they believe the bleed from the speakers will ruin the vocal recording. In my experience that just isn’t true. Some bleed always gets in, but with the right setup it stays low, and most of what remains disappears under the music once the song is mixed.
I’m not the only one who thinks so. Sound On Sound ran a full test of tracking vocals to speakers instead of headphones with a real band, and found the spill on their first takes was lower than they expected. Their singer, Vik, put the reason to do it perfectly: he’s “a live act at heart and it simply feels more natural, and more like a performance singing to the speakers.” Some big records were made this way too. Producer Andy Barlow told PSNEurope that Bono “really loved singing in front of speakers with a SM58” during the U2 Songs of Experience sessions.
The whole strategy comes down to three things: reject as much bleed as possible at the microphone, keep the bleed that does get in identical from take to take, and then cancel out what you can. Here’s how to do each one.
Which Microphone Pattern Rejects Speaker Bleed Best?
Every directional microphone has a null: a direction where it picks up very little sound. The first job is to place the mic so its null faces the studio monitor that’s playing the music for the vocalist.
- Cardioid: place the back of the microphone towards the speaker. The null is directly behind it.
- Figure-8: place the side of the microphone towards the speaker. The nulls are at 90°, and they are very deep.
- Super- and hypercardioid: the nulls sit off to the sides of the rear, not straight behind, so angle the mic until the speaker lines up with one of them.
- Omni: do NOT use one for this. It hears every direction equally, so there’s nothing to aim at the speaker.
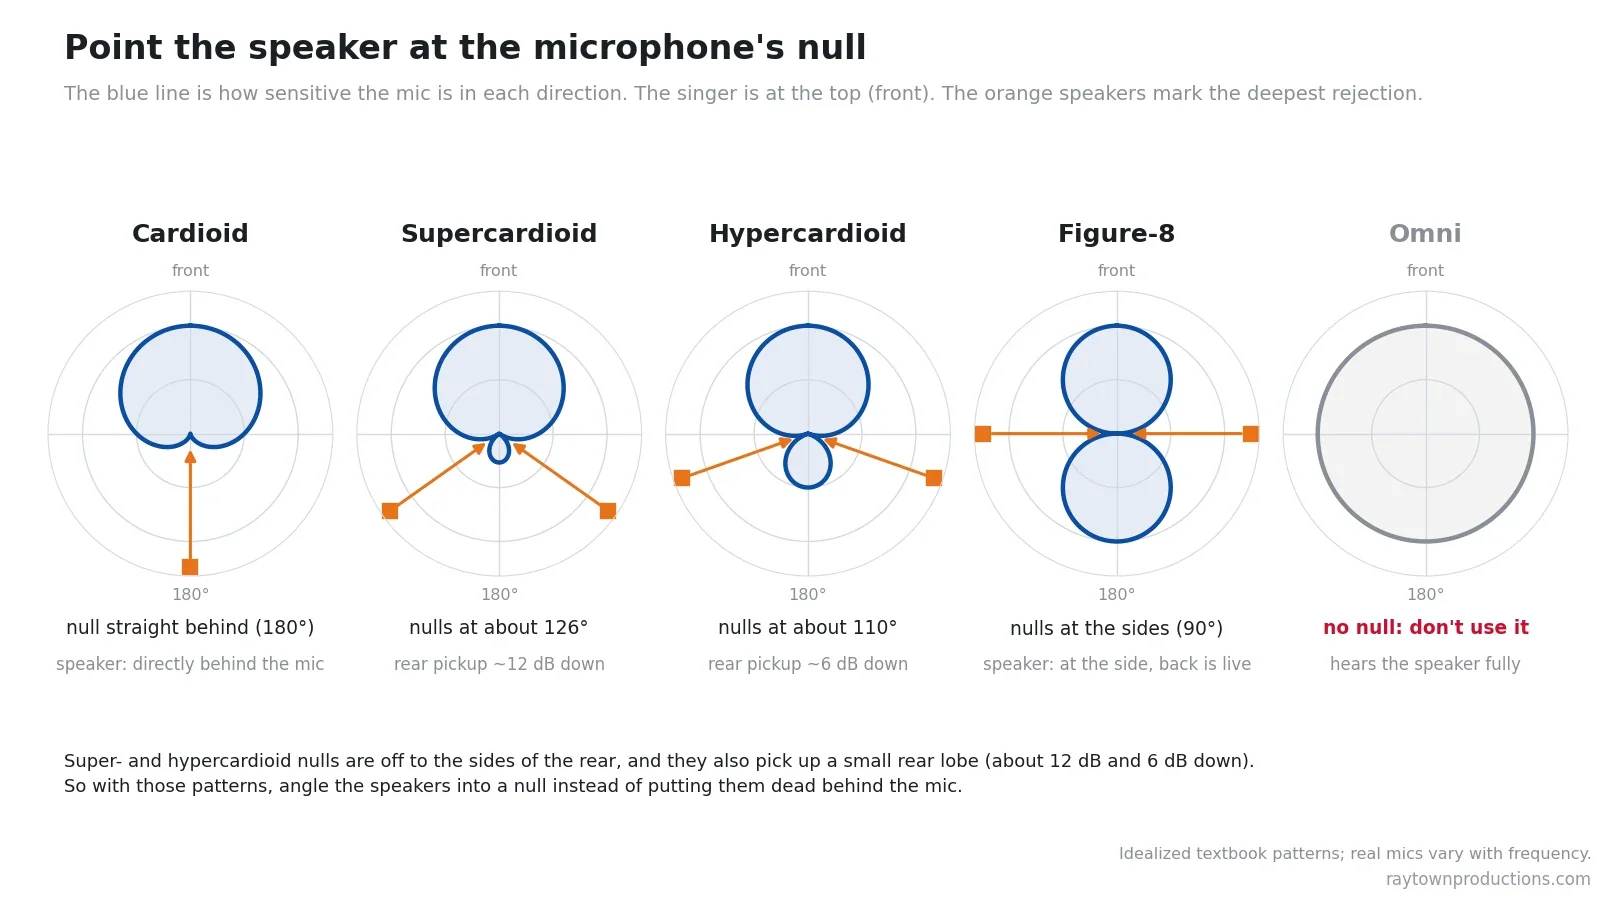
| Pattern | Where the null is | Where to put the speaker | Watch out for |
|---|---|---|---|
| Cardioid | Directly behind (180°) | Straight behind the mic | Rejection is best right at 180° and falls off as the speaker moves off-axis |
| Supercardioid | About 126° off-axis | Behind and to one side, in the null | A small rear lobe, roughly 12 dB down |
| Hypercardioid | About 110° off-axis | Further to the side, in the null | A bigger rear lobe, roughly 6 dB down |
| Figure-8 | The sides (90°) | To the side of the mic | The back is as live as the front, so treat the wall behind the mic |
| Omni | None | Nowhere works | Picks up the speaker as much as the voice |
In Sound On Sound’s test, the figure-8 setting gave a worthwhile extra reduction in spill over cardioid. It also has quirks: the singer ends up facing sideways to the speaker, and the live back of the mic hears more of the room, which changed the vocal tone in their test. A cardioid is the easiest place to start.
How Do You Set Up the Speakers and the Mic?
Step 1: find the lowest volume where the vocalist can still “get into” the performance. Every decibel you take off the speaker is a decibel less bleed. Don’t go so low that the singer is straining to hear the song, though. The performance is #1. Sound On Sound landed on a level “just above the point at which you could comfortably have a conversation across the room,” which is a sensible starting point.
Step 2: place the mic so its null faces the speaker. Make a mono mix of the song for the vocalist and play it from only one speaker instead of both. With a single source of bleed, you can position the null right on it for maximum rejection. With a stereo pair, at least one speaker always sits off the null.
Get the singer close to the mic, too. The closer the voice is to the capsule, the louder it is compared with the bleed, which barely changes. Halving the distance from the mouth to the mic makes the voice roughly 6 dB louder relative to the speaker. I talk more about close-miking for an up-front sound in my guide to in-your-face rap vocals. A handheld dynamic mic right at the lips is the extreme version of this, and it’s why that setup works so well for singers who perform to speakers.
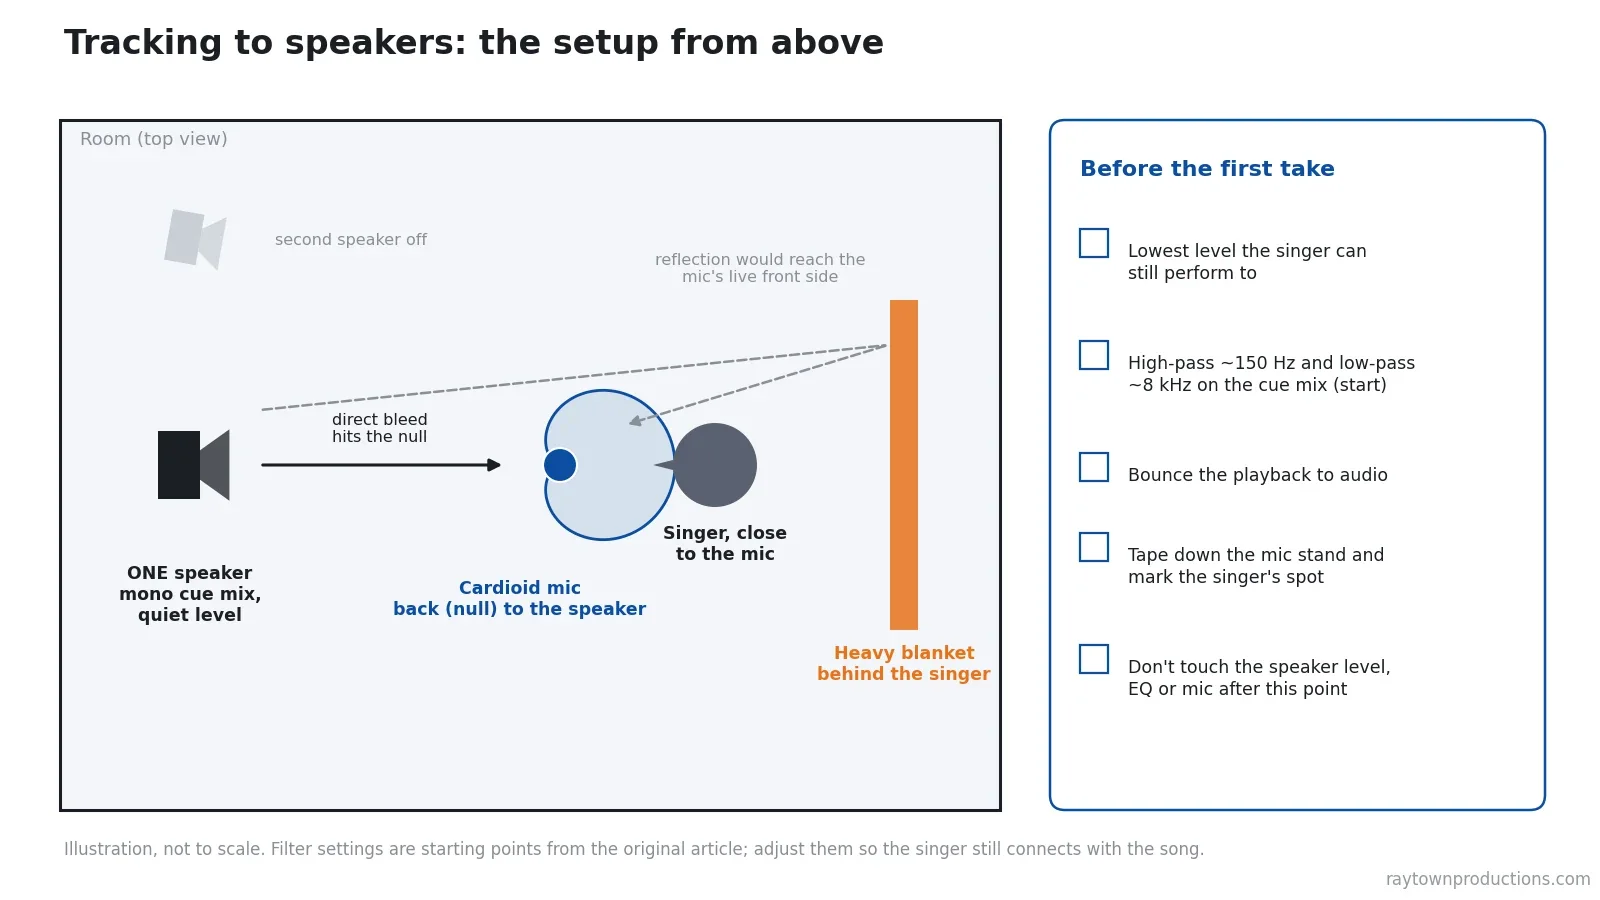
Step 3: once the level is set and the mic is placed, DO NOT MOVE OR CHANGE ANYTHING. Not the speaker volume, not the EQ, not the mic stand. If you need to, tape stuff down to keep it from moving, and mark the floor where the singer stands. Everything in the next section depends on it.
How Do You Record and Cancel a Bleed Track?
Here’s the trick that makes this work. The bleed on the vocal track is the song, played through the same speaker into the same mic. If you record that bleed on its own and flip its polarity, it cancels against the bleed on the vocal take.
- Step 4: record the vocal takes, bleed and all.
- Step 5: record the bleed by itself. While the vocalist is still in front of the mic, record only the music playing back. In other words, have the singer stand in position without singing or rapping. Their body reflects and absorbs sound, so the bleed changes if they walk away. Nobody talks in the room during this take.
- Step 6: phase invert the bleed track. Use the polarity button on the channel (often labelled Ø or “phase”) or a utility gain plugin. This cancels out a lot of the bleed recorded during the vocal take.
- Step 7: combine the two right away. Mix down or consolidate the vocal track and the inverted bleed track into a single file before you edit or mix anything. Both faders must be at exactly the same level, with no plugins, panning or automation on either track.
Combine before you edit. The two tracks only cancel while they line up to the sample at the same level. Comp, nudge, tune or compress the vocal first and the cancellation is gone. Bounce each vocal take with its bleed track first, then edit the clean file.
Keep the bleed track only as long as the vocal. If there are no vocals in a section, remove the bleed track there too. Leaving it in will only ADD bleed to the recording. Recording several takes? The same bleed take works for each of them, as long as nothing in the room has changed. Copy it under every take. Once each take is combined, it’s a normal vocal track, ready for editing and comping.
How Much Bleed Does Phase Cancellation Really Remove?
That’s the part most tutorials skip, so let’s be honest about it: the bleed track removes a lot, not everything. Cancellation only works if the two copies of the music are identical. The DAW plays the song back exactly the same way every time, so the weak link is the room: the mic, the singer’s body and the speaker level.
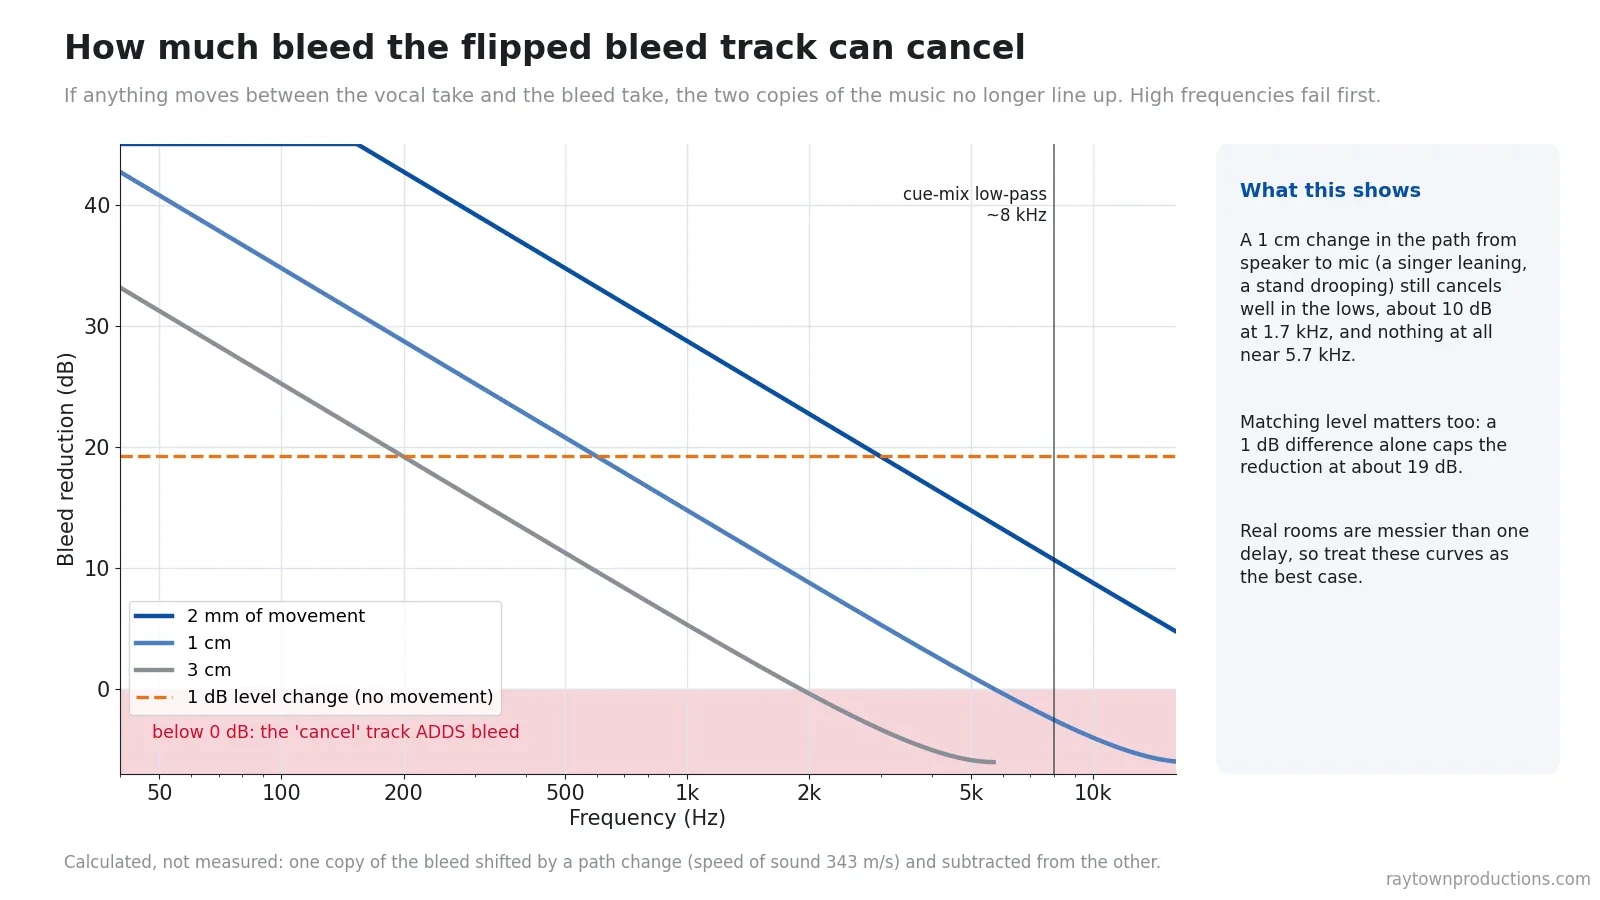
I worked out the graph above from simple physics. If the sound path from the speaker to the mic changes by just 1 cm between the vocal take and the bleed take, cancellation is still excellent in the low end, about 10 dB at 1.7 kHz and zero around 5.7 kHz. Above that, the “cancel” track actually adds bleed. Level matters just as much: a 1 dB difference caps the reduction at about 19 dB even if nothing moves. A real room is messier than one clean delay, so treat these numbers as the best case.
That matches what Sound On Sound heard: phase cancellation dealt well with the low and mid spill, the high frequencies cancelled less precisely, and snare hits stayed audible. With EQ added, the remaining spill was comparable to a singer slipping a headphone off one ear. That’s a realistic target. A singer who doesn’t stand still will get less, and at loud playback levels the leftovers get louder too.
One side effect: the bleed take also carries its own mic and room noise, which doesn’t cancel. Summing two uncorrelated noise floors raises the noise by about 3 dB. In a quiet room you won’t notice, but it’s another reason to trim the bleed track wherever the singer isn’t singing.
How Can EQ and Room Tricks Reduce Bleed Even More?
Because the high frequencies are the hardest to cancel, the best plan is to keep them out of the speaker in the first place. Remove some of the unnecessary low and high end with a high-pass and a low-pass filter on the master bus or main output that feeds the speaker, not on the vocal. Take out as much as you can, but don’t make the song so thin the vocalist can’t connect to it.
| Move | Starting point | Why |
|---|---|---|
| High-pass the cue mix | Around 150 Hz | Less low-end energy from the speaker reaching the mic, where a directional mic’s rejection is often weakest |
| Low-pass the cue mix | Around 8 kHz (12 dB/octave) | High frequencies are the hardest bleed to cancel; Sound On Sound found this didn’t hurt the performance |
| Dip the snare region | 3–4 dB around 5 kHz | Snare transients survive cancellation; this region also holds vocal detail, so only touch the cue mix |
| Turn it down | Just above conversation level | Every dB off the speaker is a dB less bleed |
| Mono, one speaker | One speaker on the mic’s null | One source of bleed you can aim the null at |
Then work on the room. Hang a heavy blanket or towel on the wall behind the vocalist, or drape it from a mic stand set up in a “T” position. Sound from the speaker passes the singer, bounces off that wall and comes back into the FRONT of the mic, its most sensitive side. The blanket soaks up the problematic high-frequency part of that reflection. I cover more cheap room fixes in my budget home studio guide.
Bounce the playback to audio first. Virtual instruments with random round-robins, free-running LFOs or humanize settings can play back slightly differently every pass, which breaks the cancellation. Print the cue mix to a stereo or mono file and play that instead.
What If the Bleed Track Doesn’t Cancel?
If you flip the bleed track and barely hear a difference, something changed between the two takes. Here’s where I’d look first.
| Symptom | Likely cause | Fix |
|---|---|---|
| Little or no cancellation anywhere | Something moved, or the takes aren’t aligned | Re-record the bleed take without touching anything; check that both clips start at the same sample |
| Lows cancel, highs don’t | Normal: small movements shift the highs | Low-pass the cue mix, add the blanket, keep the singer still |
| Cancellation fades over a long session | The mic stand drooped or the singer’s spot drifted | Tighten and tape the stand, mark the floor, record a fresh bleed take |
| Bleed gets louder after combining | Polarity not flipped, or a level mismatch | Check the polarity button and set both faders to unity |
| Different every playback | Live virtual instruments with random variation | Bounce the cue mix to audio before tracking |
If you’re using a condenser up close, you’ll also be dealing with plosives. Whether a pop filter helps or hurts the sound is a question I tested in Are Pop Filters RUINING Your Vocal Clarity?.
That’s it: you now have a relatively quiet vocal track with minimal bleed. While it’s not perfect, it works pretty well, and more often than not the slight bleed that remains is easily hidden in the mix. Have you ever recorded vocals without headphones? How did it sound? Let me know in the comments!

Learn my TOP Vocal Delay SECRETS!
Key takeaways
- Bleed won’t ruin the vocal if you control it, and a better performance is worth far more than a little spill.
- Aim the null: back of a cardioid or side of a figure-8 to the speaker. Never use an omni.
- One quiet, mono, filtered speaker (about 150 Hz to 8 kHz as a starting point) and the singer close to the mic.
- Lock everything down, record a bleed-only take with the singer in place, flip its polarity and combine it with the vocal before editing.
- Expect a real reduction, not silence: the lows and mids cancel well, the highs much less, and any movement makes it worse.
Frequently asked questions
Can you record vocals without headphones?
Yes. Play the song quietly through one speaker, aim the null of a cardioid or figure-8 microphone at that speaker, and keep the singer close to the mic. Some bleed always gets into the vocal track, but at a sensible level it is usually low enough to hide in the mix, and a phase-inverted bleed track can remove a good part of what’s left.
Does flipping the phase of a bleed track really remove speaker bleed?
It removes part of it, mostly in the low and low-mid frequencies, as long as nothing changes between the vocal take and the bleed take: same mic position, same singer position, same speaker level and identical playback. High frequencies cancel poorly, because a movement of a centimeter or two already shifts them out of line. Treat it as a trick that helps, not as a way to make the bleed disappear.
What is the best microphone pattern for recording vocals to speakers?
A cardioid is the easiest: its null is directly behind the mic, so put the speaker there. A figure-8 rejects even more from its sides, but its back is just as sensitive as its front. Super- and hypercardioids have nulls off to the sides of the rear and a small rear lobe. Don’t use an omni, which picks up the speaker as well as the voice.
Should I use one speaker or two when recording vocals without headphones?
Use one. Make a mono mix of the song and play it from a single speaker, so you can point the microphone’s null straight at the only source of bleed. With two speakers, at least one of them is always off the null.
Why do some singers prefer recording without headphones?
Many singers perform better when they hear their own voice naturally in the room, the way they do on stage, instead of a dry voice in headphones. If the headphones make the performance worse, the bleed is usually the smaller problem.
Recorded a vocal this way and not sure if the bleed will be a problem in the mix? Send me a message through my contact form or ask for a mix critique, a custom video review of your song with my feedback. And if you’d rather hand the mix off, the services FAQ covers turnaround times and revisions.
Ready to Have Your Song Mixed or Mastered?
I mix and master songs for independent artists, bands and producers. Tell me about your project and I’ll reply with a plan and a quote. Or learn to do it yourself in my courses.