


Make Better Sounding Records Without Breaking the Bank

Get your discounted Waves plugins courtesy of Raytown Productions!

Studio equipment is expensive. Every day we are told by companies that their products will allow us to make better sounding records. But is that really true? It’s so easy to fool ourselves into thinking, “If I only had that $1000 microphone preamp…” or “I’d have the perfect vocal sound if I had a $3400 Neumann U87 microphone.” At least 99.9% of these beliefs are completely false! Investments into unnecessary pieces of studio gear offer very little value and return on your hard earned money! When it comes to record making, there are more significant considerations than buying the most expensive microphones and preamps. I promise you, great sounding songs can be made on budget microphones and recording gear! The trick is to pay attention to detail. Below I discuss the most important factors that NEED to be focused on first, before these studio luxuries will impact your recording.
Learn Your Room
Room treatment is paramount. If you want to make better sounding records, treating your room is number one! EVERY decision you make will be impacted by your room acoustics. The geometry and the materials used to make the room greatly affects the sound within it. You can prove this by playing bass-heavy music (or just a generated low frequency sine wave) in your recording area and walk around. In the corners of the room, the bass will be significantly louder. In some spots, almost all of the bass will be gone. This is completely normal and due to the physics of a room. These large changes in sound happen because sound waves bounce around the room and cancel out other sound waves. Acoustically treating a room absorbs these sound waves and stops them from canceling out. This makes your speakers sound flatter and more accurate.
In some rooms, it’s not uncommon for certain frequency bands to be heavily reduced. I have tested my studio and found dips in frequencies over 15 dB! Before I acoustically treated my studio, I saw as much as 30 dB dips in some frequencies. This dramatically affected my mixing decisions because I over emphasized these frequencies in my mix. When my mix was played back on other sound systems or in my car, it did not translate well! If your mixes sound very different when played on speakers outside of the studio, try treating your studio with some of the suggestions below.
Again, I cannot emphasize this enough: this is the single most important thing you can do to your studio to make professional, better sounding records! Putting $400 towards acoustic treatment in your studio will give you more value because your room will sound better for recording instruments and vocals, AND improve the accuracy of your speakers so you can make the right mixing and mastering decisions! The improvements from acoustic treatment vastly outweigh the benefits of any other major purchase in your studio (unless, of course, you have a computer from the early 2000’s running windows 98 – then the money might be better spent on a computer).
Add bass traps in the corners of the room (most effective spot).
Bass frequencies require large, dense materials to absorb bass so adding something like a roll of carpeting or 4″ or 6″ thick sound panels to the corners or your room are great, cost-effective options. Next, add some acoustic panels (or “egg carton” foam) at the first reflection points. The first reflection point is the direct line where the sound leaves the speakers, bounces off an object like a wall or ceiling and goes to your ears. You can find these spots by sitting at your mixing or recording position and having a friend slide a mirror back and forth on the wall. The spot where the mirror is on the wall where you can see your speakers from your mixing/recording position is the primary reflection point. Place acoustic foam or sound panels at this point to absorb the sound. Don’t forget about the primary reflections on your ceiling and rear wall. Your mixes will now sound cleaner and more balanced because flutter echos and bass build-up in your room are reduced,
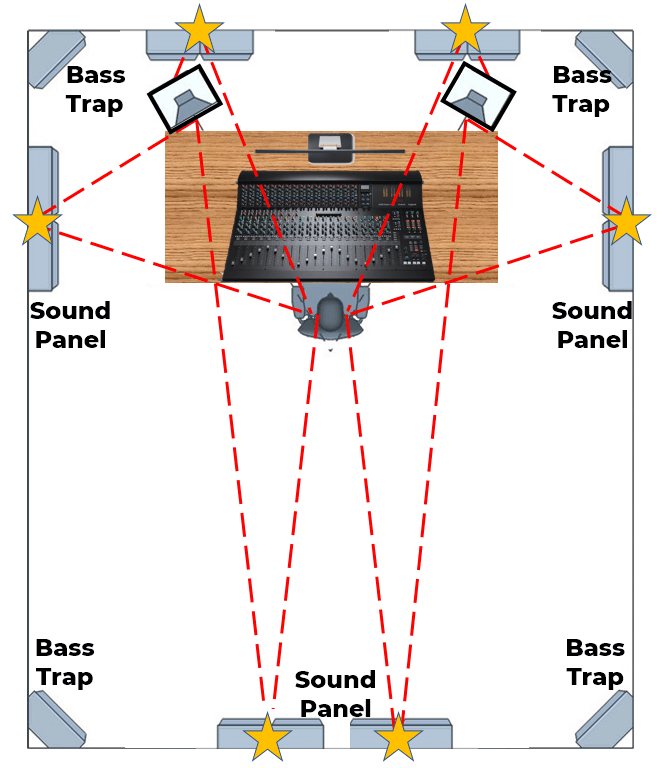
Top-down view of a studio showing proper placement of acoustic panels and bass traps. The yellow stars are the primary reflection points from the speakers and the red dashed lines show the path sound travels from the speakers to the primary reflection points. Placing sound absorbing material at the primary reflection points reduces these reflections. The ceiling also has 2 primary reflection points which should also be treated (not shown).
Don’t go crazy with “egg carton” foam!
While I have some in my studio to tame the flutter echo, make sure you don’t cover your entire room with it. The foam only absorbs certain frequencies (mostly the higher frequencies about 1 kHz and up), which leaves the deeper frequencies untouched. This can skew your perception of the clarity or brightness of a mix. Using dense sound absorption panels is a good way to fix this.

Acoustic foam is great for removing flutter echo from a studio, but too much can make it overly dead and sound unnatural.
Make your own acoustic panels to save money!
There are lots of information available online that show you step by step how to make your own acoustic panels for your studio. For a quick fix, this tutorial shows you how to make panels out of old towels for about $5. For a more professional look, check this video (cost per panel is $25). If you don’t feel like getting dirty, there are companies online like ATS Acoustics (cost per panel is $69) that offer relatively inexpensive, but high quality acoustic panels.
Budget and Quick DIY Acoustic Panel Tutorial
More Professional DIY Acoustic Panels Tutorial
Now if putting up acoustic panels doesn’t work for your situation, try mixing on a decent pair of STUDIO headphones. Do not attempt to every mix anything on consumer headphones like Bose or Dr. Dre headphones, unless they are specifically designed for studio mixing. Typically, consumer headphones have more bass and top end brightness compared to studio headphones to give the music a sense of power. This is not good for studio mixing, because your mixes will have a false sense of power and not sound great on other speakers or headphones. Some good starting headphone options are: Beyerdynamic 770Pro, Audio-Technica ATH-M50x , or the more affordable Sony MDR-7506. I find that mixing with headphones can lead to mixes that don’t translate well to other playback systems UNLESS YOU FREQUENTLY REFERENCE OTHER MIXES THAT YOU KNOW SOUNDS GREAT WHILE MIXING YOUR MUSIC. Referencing other mixes while mixing is important for maintaining your perspective. I would highly recommend mixing with studio monitors (speakers) if possible because my mixes have always translated better with less effort. This doesn’t mean you can’t get great sounding mixes on headphones – there are a number of very well-known producers and mixing engineers that do EXCELLENT work on headphones. Try them both out and see what works best for your workflow. You can always return the speakers or headphones if they don’t help your mixing or recording decisions!
Focus on the Source
No amount of secret mixing tricks or expensive gear will make out of tune or damaged instruments sound great. The same goes with all the elements in your recording and mixes. Take the time to properly set up each instrument and replace all consumable products like guitar strings or drum heads before you ever push record! It’s also just as important to check the tuning on your instruments frequently. You should be re-tuning your guitar and bass every few minutes! New strings can quickly get out of tune until they are fully stretched. Make sure the instruments are set up properly and sound great! This means your guitar and bass should be properly intonated and not have string or fret buzz. These small details stack up in recordings very quickly and take away from the feeling and emotion of the performance. If you don’t know how to do these things yourself, take it to an expert or local guitar shop and have them do it – you will be happy you did!
If you are a vocalist, warm up before going to the mic. Vocal cords are very sensitive so try to minimize or completely avoid smoking and dairy products – both of these may cause a phlegm buildup. Warm liquids are good to drink because the steam can coat the vocal cords and help keep them moist. This is very important – especially with extending vocal recording sessions. Also, don’t try to overdo it. If your voice starts feeling dry or hoarse, STOP recording. Take a long break or go on voice rest for the rest of the day and give it another shot the following day. At this point, your performance and tonality will begin to suffer and you will be capturing a sub par vocal performance.
Minimize Ambient Noise
The noise floor can creep up in your recordings if you don’t manage it properly. Small things like computer fans or a dehumidifier can dramatically affect your recording quality. What might seem unnoticeable in the raw recordings can quickly become overwhelming in the mixing phase when compressing and manipulating audio. The computer fan that you thought wasn’t being picked up in the microphone will become audible and distracting. So let’s go over a quick list of ways to record cleaner audio tracks!
Record audio as far away from your computer if possible.
Your computer makes a significant amount of sound from the fans that keep it cool. Don’t record a vocalist standing next to your computer! Run a mic cable as far away as possible to minimize the amount of noise that will bleed into the microphone during recording. You can also try to absorb the sound of the computer by covering it in towels or blankets, but keep in mind that your computer can become very hot and quickly overheat! If you do cover your computer, make sure you aren’t covering the vent or inlet ports for the fans! In the near future, we will publish an article about how to build a silent recording computer.
Turn off/unplug any sources of noise.
I’ve listed a few common things that make lots of background noise when recording. Try your best to make sure these are off before you hit the record button:
- Cell phones
- TVs
- Fans
- Air conditioner
- Furnace
- Dehumidifier
- Mini fridge
Some of these are easier to turn off than others. By all means, turn your air conditioner, refrigerator, or fans back on when recording is done! A hot sweaty and maybe somewhat smelly studio is the last thing you want for you and your clients! Make a checklist of anything that makes sound and form a habit to turn these things off every time you record. One rule that should be followed in every studio is that all cell phones must be on silent. I’ve had so many great vocal takes get ruined by a phone that was on vibrate.
What about outside noise?
Sometimes outside noises like noisy neighbors or traffic can be distracting as well. Adding acoustic panels will not really help to reduce this noise – you really need to create acoustic barriers within the walls of your studio. This can be very expensive and isn’t an option for the majority of home studio owners. The only real option here is to record at times where this sound is at a minimum. Some good times are before and after lunch and again in the early evening (before it gets too late). If you want more tips and tricks to get drier vocal recordings, check out our 6 Industry Secrets to Get In Your Face Rap Vocals Article.

6 Industry Secrets to Get in Your Face Rap Vocals [Quick Tips]
Closing Thoughts
Hopefully this article made you realize the importance of paying attention to detail when recording, how crucial it is to learn how your room sounds, and how to properly treat it. Without this foundation, it doesn’t matter how expensive of gear you buy – your recordings will not sound as good as someone that has paid attention to these small details that add up across many tracks. Don’t ever believe the hype you hear about a particular product or that a $1000 microphone will make your records better. Following these tips will minimize distractions in your productions and clarify your mixes, which in the end, makes it easier for your listeners to connect to your music.

![Get Better Mixes Faster [Part 2/3]: How to Write the Best Mix Notes for Online Mixing and Mastering](/blog/s/img/wp-content/uploads/2018/10/RP-Blog-Get-Better-Mixes-Faster-Part-2-Writing-Best-Mix-Revision-Notes-440x264.jpg)
![Get Better Mixes Faster [Part 3/3]: What NOT to Do When Having Your Music Mixed Online](/blog/s/img/wp-content/uploads/2018/10/RP-Blog-Get-Better-Mixes-Faster-Part-3-What-Not-To-Do-When-Mixing-Mastering-Online.jpg-440x264.jpg)


Trackbacks/Pingbacks