











Transparent Vocal Tuning: How to Tune Vocals Without the Auto-Tune Sound (Any DAW)

Quick summary
To tune a vocal transparently, don’t correct the whole note. Cut the start of each note (the transition, where the voice slides into the pitch) into its own segment and leave it alone. Then snap only the held part of the note to the right pitch and straighten it part of the way, stopping while you can still see the note waver a little. The singer’s natural slide into the note survives, the sustained pitch is steady, and nobody hears the tuning. I show it in Cubase VariAudio in the video below, and the same idea works in Melodyne, Logic Flex Pitch, Auto-Tune’s Graph Mode and Waves Tune.
Updated : completely rewritten and expanded from the original video post, with step-by-step instructions, three new illustrations, how to do the same trick in other tuning tools, a table of starting points and FAQs. Originally published February 1, 2019.
What’s In This Article
- How Do You Tune Vocals Without the Auto-Tune Sound?
- Why Does Pitch Correction Sound Robotic?
- What Is the Split-Note Tuning Trick?
- How Far Should You Straighten the Pitch?
- How Do You Do This in Melodyne, Logic, Auto-Tune or Waves Tune?
- Should You Fix Timing Before Tuning?
- Which Notes Should You Leave Alone?
Key moments in the video
Enjoying the Video?
Get more home-studio tutorials, mixing breakdowns, and gear deep-dives every week.
Modern music production expects vocals to be in tune. The problem is that pitch correction can take away the unique character of a voice, or make it sound obviously tuned. If you don’t want that “autotuned” voice and just want to correct the pitch without anyone knowing, this is the trick I use all the time when I tune vocals for my clients.
How Do You Tune Vocals Without the Auto-Tune Sound?
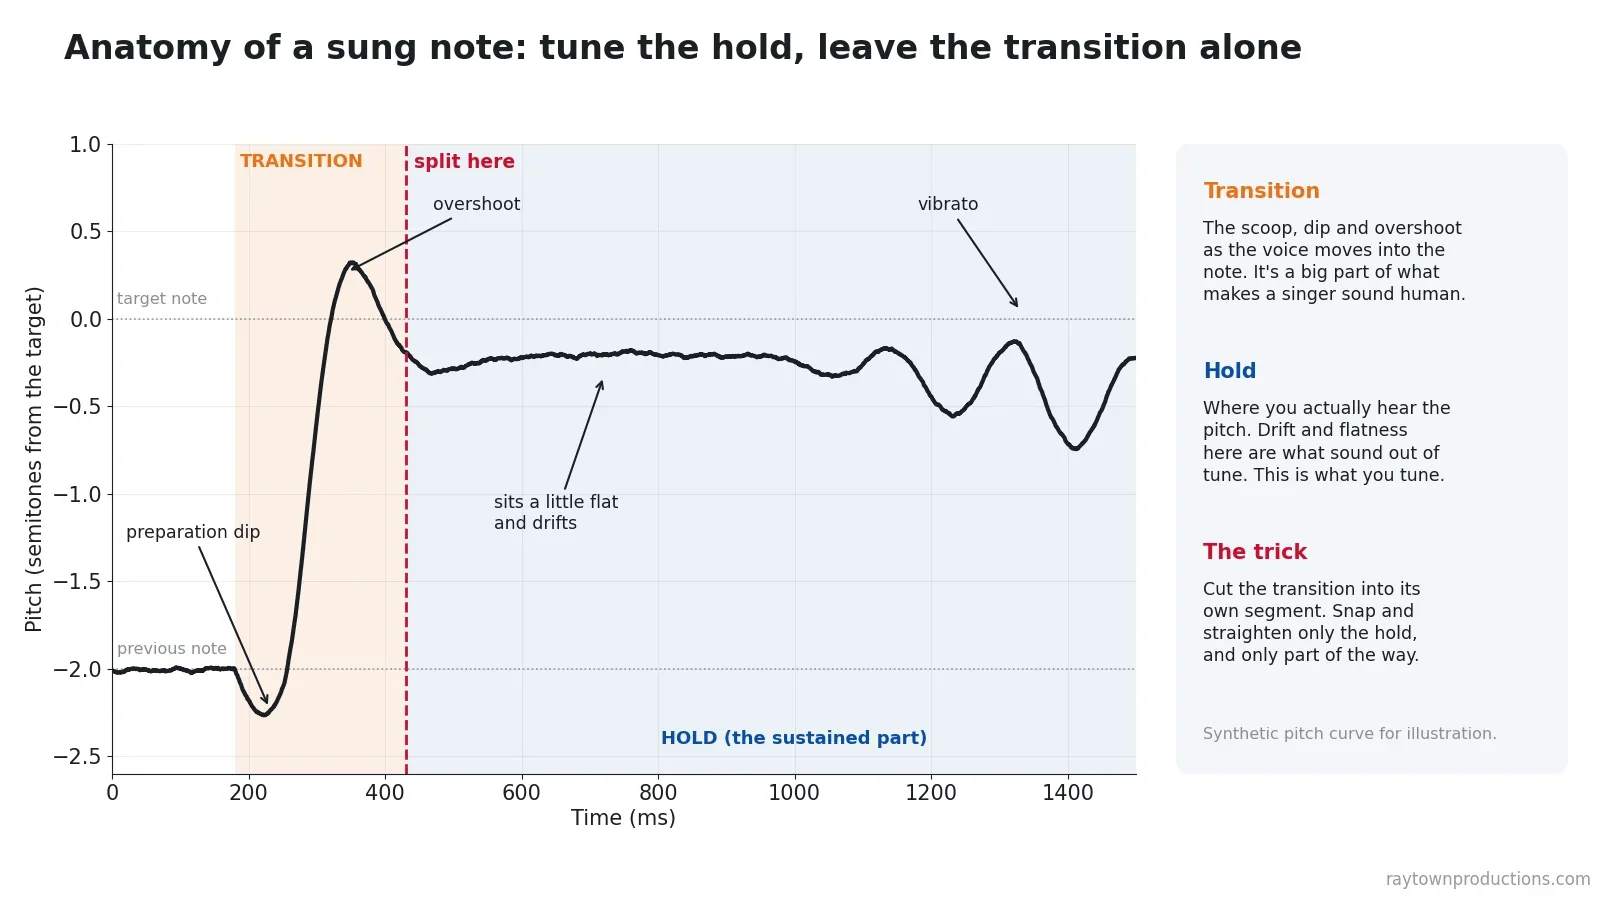
Tune the part of the note you actually hear as pitch, and protect the part that makes it sound human. Every sung note has two parts:
- The transition: the first moment of the note, where the voice scoops, dips or overshoots on its way into the pitch. This is the note’s transient, and it carries a lot of the singer’s character.
- The hold: the sustained part after that. If a note sounds flat or sharp, it’s almost always the hold you’re hearing.
Most tuning artifacts come from treating those two parts the same. So separate them, leave the transition natural, and tighten only the hold.
Why Does Pitch Correction Sound Robotic?
In the video I first do what most people do: select every note, push the quantize all the way to the right, and straighten the pitch all the way. Take a listen at 1:11. It has that T-Pain, Auto-Tune kind of vibe, which is great if you want it as an effect. This was a pop-punk song, though, and an obviously tuned vocal was the last thing it needed.
Here’s why it happens. A real voice never jumps instantly from one pitch to the next. Research on singing voices describes several kinds of natural pitch movement, including a small “preparation” dip before a note, an overshoot past the target, vibrato and fine fluctuation, and finds that they affect how natural a singing voice sounds (Saitou, Unoki and Akagi, Speech Communication, 2005).
When a tuner snaps the whole note, it erases that movement at the start. The slide into the note becomes an instant step, and the hold becomes a perfectly flat line. Voices don’t do that, and that’s the robotic sound. Built-in editors like VariAudio don’t give you much control over the attack or onset of the correction, which is exactly why I use this trick.
What Is the Split-Note Tuning Trick?
Here are the steps in Cubase VariAudio, using the names from Cubase 9.5 in the video. Newer versions moved the controls into the VariAudio section of the Sample Editor’s Inspector, but the steps are the same (see Steinberg’s VariAudio documentation).
- Analyze the vocal. Double-click the vocal event to open it, open the VariAudio tab and choose Pitch & Warp. Cubase analyzes the audio and shows each note as a segment with its pitch curve.
- Lock the note centers. Select everything and raise Quantize Pitch so each segment’s average pitch lands on the note. Leave Straighten Pitch at zero for now, so the natural movement inside each note is still there.
- Split off the start of every note. Switch to Segments mode. Hover along the bottom edge of a segment until the cursor turns into scissors, and click just after the voice has arrived on the pitch. Do the same where the pitch moves up or down to a new note in the middle of a phrase.
- Select only the held parts. Back in Pitch & Warp, Shift-click every hold, skipping the short transition segments you just cut.
- Tighten the hold. Quantize and straighten only those selected segments, and stop before the line goes flat (more on that below).
- Listen in context, with the music playing.
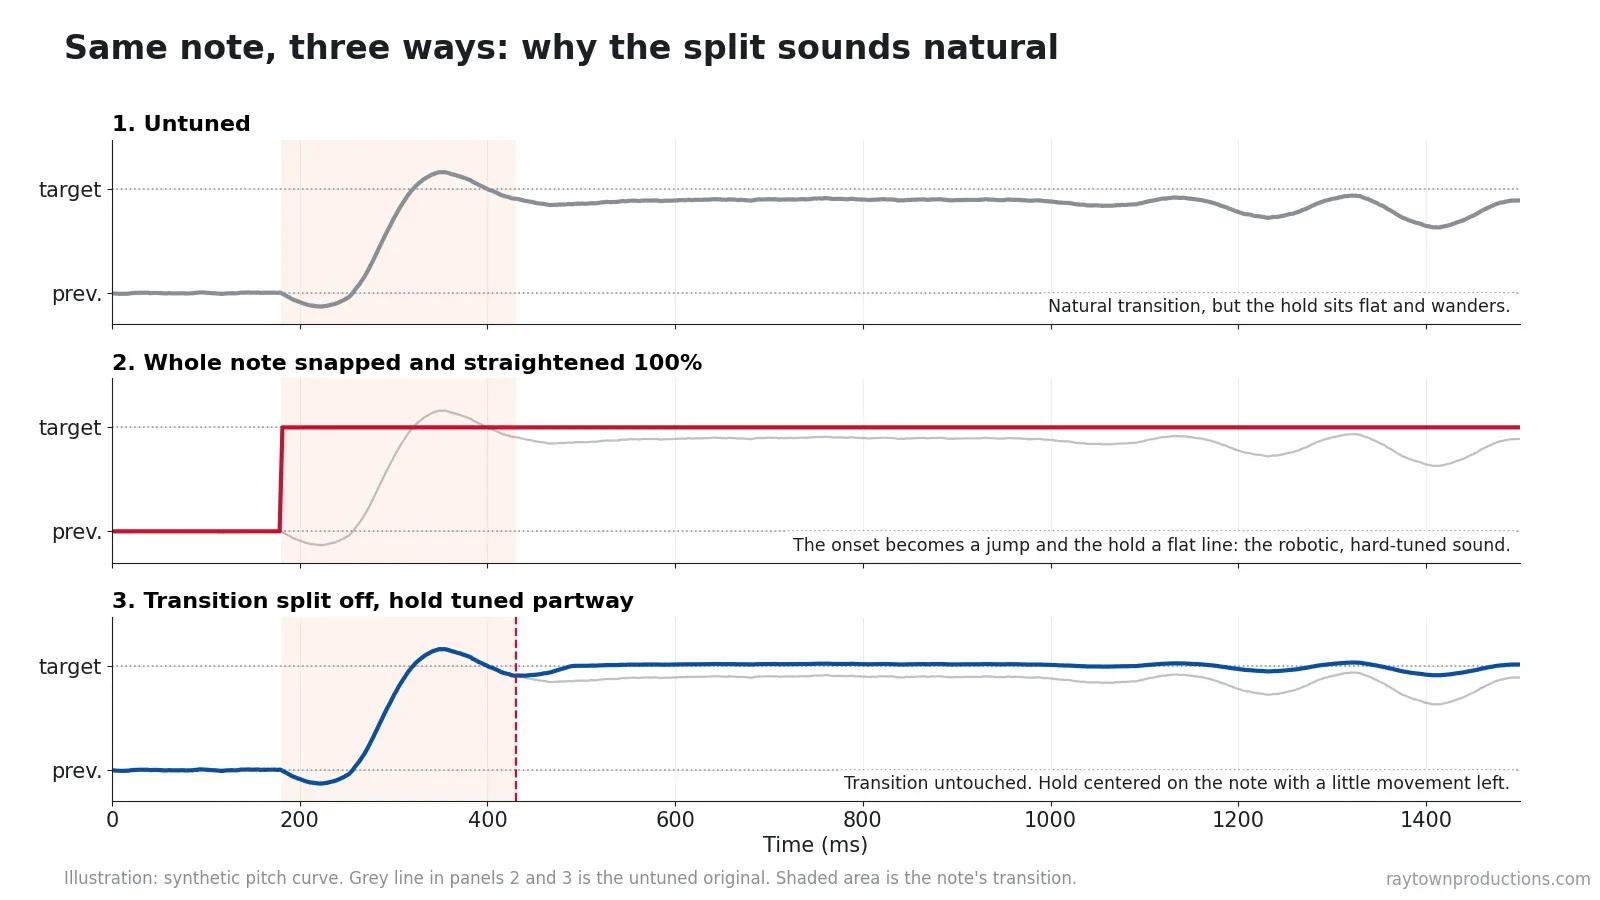
Preserving that initial transition is what makes it sound natural. Once the note is established, the tuning holds it. At 3:38 in the video you can hear it: way more natural than tightening everything all the way.
Where exactly to cut: on the pitch curve, the transition is the fast rise or fall at the start of the segment. Cut where the curve levels off near the note. Too early and part of the slide gets corrected; too late and the hold you tune is too short to matter.
How Far Should You Straighten the Pitch?
Not all the way. I never suggest straightening the pitch to 100%. Bring it up just until you can still see the note waver a little on the pitch curve. That small amount of movement is what keeps the note sounding like a person holding it, not a test tone.
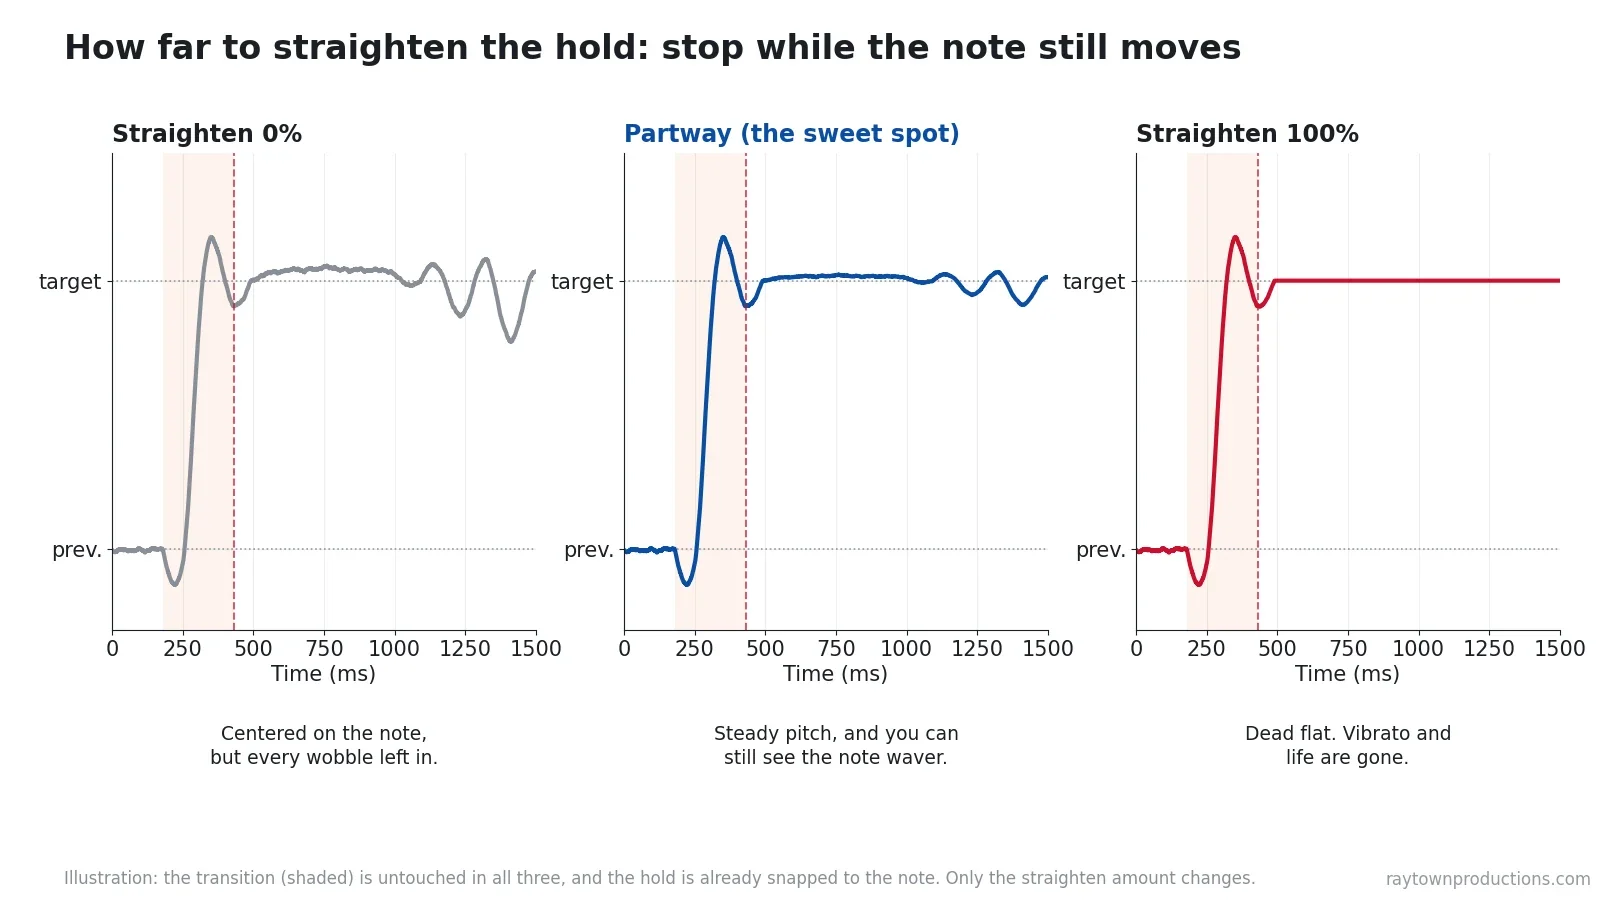
Quantize is a different decision. It moves the segment’s average pitch onto the note, so on the holds it can usually go most or all of the way. Straighten flattens the movement inside the segment, and that’s the control that sounds robotic when overdone.
| Step | Starting point | What to listen for |
|---|---|---|
| Note centers (quantize) | Most or all of the way, on the holds | Notes land in tune without a jump at the join |
| Transitions | Untouched (0% quantize and straighten) | The slide into each note sounds like the singer, not a step |
| Holds (straighten) | Partway: stop while the curve still wavers | Steady pitch, no “flat-line” buzz on long notes |
| Vibrato | Leave most of it in | Vibrato that sounds even, not frozen or exaggerated |
| Final check | Compare with the untuned take at the same level, with the music | You notice the pitch got better, not that it was tuned |
How Do You Do This in Melodyne, Logic, Auto-Tune or Waves Tune?
The principle doesn’t depend on Cubase. Any tuning tool that lets you treat the start of a note and its sustain differently can do this.
| Tool | Separate the transition | Tighten the hold |
|---|---|---|
| Cubase VariAudio | Segments mode: scissors on the bottom edge of a segment | Quantize Pitch and Straighten Pitch on the hold segments only |
| Celemony Melodyne | Note Separation tool | Pitch tool for the center; Pitch Drift tool (or the Correct Pitch macro’s drift slider) for the hold |
| Logic Pro Flex Pitch | Scissors tool on the note | Drag the note to pitch; the drift hotspots edit the start and end of a note separately |
| Auto-Tune Graph Mode | Separate objects or drawn lines for the transition and the hold | Per-object Retune Speed: slower on the transition, firmer on the hold |
| Waves Tune | Note Transition control (how fast correction moves into a note) | Speed and correction amount per note |
In Auto-Tune’s automatic mode, the Humanize control applies a slower correction to the sustained part of longer notes, an automatic version of the same idea. I compare the tuning tools themselves in 4 reasons to stop using Auto-Tune, so I won’t repeat that here.
Should You Fix Timing Before Tuning?
Yes. Line up the timing first, then tune. If a note starts late, its transition is in the wrong place and you’ll cut it in the wrong spot. Doubles and harmonies are much easier to tune once they’re aligned to the lead, too. I walk through the whole editing order, from timing to tuning to printing the tracks, in my vocal editing tutorial, and I tested automatic alignment of doubles in my Revoice Pro 5 review.
Print the tuning before you mix. Render the tuned vocal to a new file and mix that. Compression and EQ make pitch problems more obvious, so tuning belongs to editing, not to the mix.
Which Notes Should You Leave Alone?
Transparent tuning also means knowing when to stop. Some pitch movement is the performance, and correcting it makes the vocal worse:
- Intentional slides and bends, such as a scoop into a chorus or a fall-off at the end of a line. Treat the whole gesture as a transition and leave it alone.
- Vibrato, unless it’s uneven. Straightening it away is the fastest way to make a long note sound fake.
- Short, fast notes. Most of a quick note is transition. Fix the center if it’s clearly off and leave the rest.
- Breaths, noises and consonants. They have no stable pitch, so don’t let the tool force one on them.
After the vocal is tuned, it still has to be mixed. For a clean, clear and crispy rap or hip-hop vocal, follow my rap vocal chain. And if tuning is taking forever because the takes themselves are rough, it pays to fix the source: my guide to making better records without breaking the bank covers the recording side. If you want to learn editing and tuning in depth, my Learn to Edit Like a Pro course covers vocals, drums and guitars.

What do you use to tune your vocals? Have you ever wished they sounded more natural? Leave a comment below and I’ll help you out.
Plugins Mentioned
Some of these are affiliate links. If you buy through them, Raytown Productions may earn a small commission at no extra cost to you. It helps keep these tutorials free.

Learn my TOP Vocal Delay SECRETS!
Key takeaways
- Split every note into the transition (the slide into the pitch) and the hold (the sustained part).
- Leave the transition alone. It’s the note’s transient and a big part of the singer’s character.
- Tune only the hold: snap its center to the note, and straighten it partway, stopping while it still wavers a little.
- Never straighten 100% unless you want the hard-tuned effect.
- Works in any tool: VariAudio, Melodyne, Flex Pitch, Auto-Tune’s Graph Mode and Waves Tune all let you treat the start and the sustain differently.
- Fix timing first, print the tuning, then mix, and always judge it with the music playing.
Frequently asked questions
How do I make pitch correction sound natural?
Split each note into its transition (the first part, where the voice slides into the pitch) and its hold (the sustained part). Leave the transition untouched, snap the hold to the right note and straighten it only part of the way, so a little natural movement stays. Then listen in the context of the song rather than solo.
Why does my tuned vocal sound like Auto-Tune?
Usually because the correction is too fast and too complete. When the whole note, including its start, is snapped and flattened, the natural slide into the note turns into an instant jump and the sustained part becomes a dead-flat line. That jump-and-flat-line shape is the classic hard-tuned sound.
Does Cubase VariAudio have a retune speed setting?
Not in the way a real-time tuner like Auto-Tune does. VariAudio works on segments with Quantize Pitch and Straighten Pitch controls, so the way to protect the start of a note is to cut it into its own segment and only correct the segment that holds the note.
Should I tune vocals before or after mixing?
Before. Tune (and time-align) the vocals during editing, print or render the result, and mix the printed tracks. Compression and EQ make pitch problems more obvious, not less, and you don’t want a tuning plugin reacting to a vocal that’s already been processed.
Is Melodyne better than VariAudio for natural tuning?
Both can sound completely transparent. Melodyne has separate controls for a note’s pitch center and pitch drift, which makes this trick a little faster. VariAudio is built into Cubase Pro, so there’s no extra plugin to buy. The technique matters more than the tool.
Want a second pair of ears on your vocals? Send me a message through my contact form or ask for a mix critique: a custom video review of your song with my feedback. You can also hire me to mix or master it (answers to common questions are in the FAQ).
Want Your Vocals Edited, Tuned and Mixed?
I edit, tune, mix and master songs for independent artists, bands and producers, with vocals that sound in tune and still sound like the singer. Or learn the whole process yourself in my courses.