









4 Synthesizer Basics You Need to Know to Make Mind-Blowing Sounds (and Fit Them in a Mix)
Quick summary
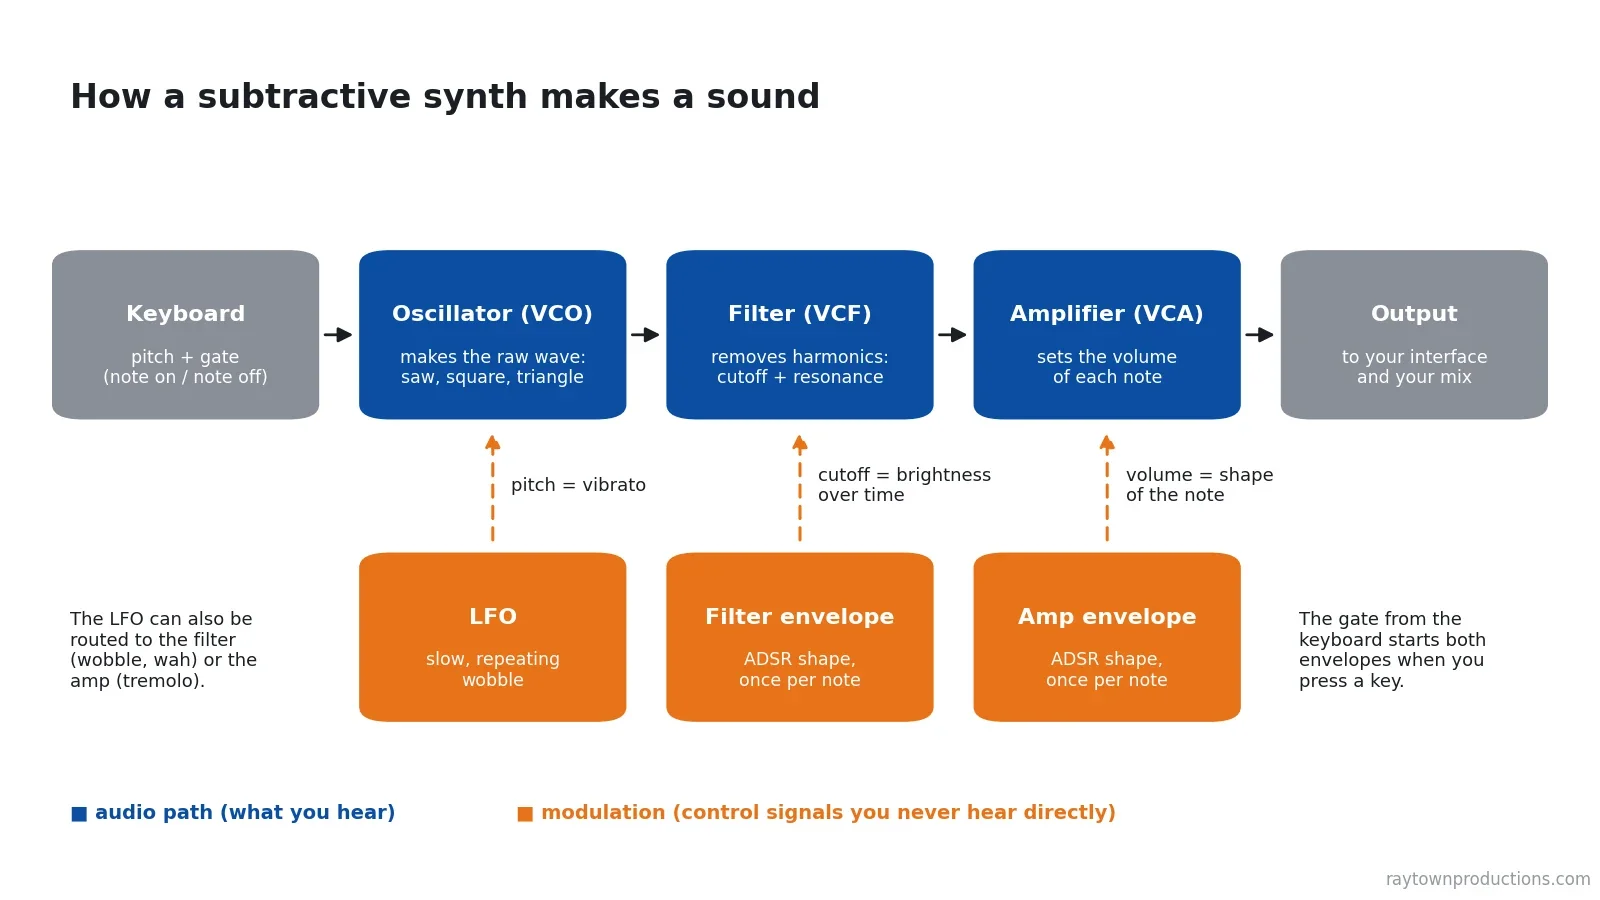
Almost every synth sound is built from four parts. An oscillator creates a raw, harmonically rich wave. A filter removes some of those harmonics to set the tone, which is why it’s called subtractive synthesis. An envelope (ADSR: attack, decay, sustain, release) shapes each note over time, and an LFO adds repeating movement like vibrato and tremolo. This guide explains all four in plain language with diagrams, then shows how I use the same controls to make synths sit in a mix.
Updated : completely rewritten and expanded with new diagrams, a waveform chart, a section on mixing synths, FAQs and a video walkthrough. Originally published February 1, 2018.
What’s In This Article
Key moments in the video
- 3:31: Side-chaining the kick to the bass
- 20:57: Mixing the synths
- 22:51: Making organs sound bigger with SoundToys MicroShift
- 24:52: Settings for a widening ping-pong delay
- 26:53: The importance of making some parts feel small
- 28:01: How to deal with lots of elements in the mix
- 29:59: EQing pads
- 38:04: Balancing the midrange of synths with vocals
- 38:41: Trick to clearing up space for vocals
- 52:39: Mixing elements in the context of the song
Enjoying the Video?
Get more home-studio tutorials, mixing breakdowns, and gear deep-dives every week.
Analog synthesizers have made a real comeback. Korg, Arturia, Roland and Moog have all released new analog synths and reissues of vintage gear (Korg’s MS-20 mini, a scaled-down remake of its 1978 classic, arrived in 2013). Maybe you want to try one but have no idea what you’re getting into. One of my favorite things about many analog synths is that every control is laid out in front of you instead of being hidden in digital menus behind a few knobs. That can look overwhelming, but nearly all of those knobs belong to just four building blocks, and the same four run the software synths in your DAW. Learn them once and you can drop acronyms like VCO, VCF and ADSR on your gear-head buddies too.
I’m a mixing and mastering engineer, so I’ll also cover the part most synth guides skip: how to use those controls so the sound fits in a song. In the video above I mix a full pop track, synths included.
What Is Subtractive Synthesis?
Subtractive synthesis means starting with a complex waveform and filtering frequencies out of it to create new sounds. The signal runs in a straight line: the oscillator makes the wave, the filter shapes its tone, and the amplifier sets its volume. Envelopes and LFOs sit off to the side. You never hear them directly; they turn the knobs for you while a note plays.
1. The Source: What Does an Oscillator (VCO) Do?
Anything that produces sound needs something that creates a wave. Think of a guitar string: sound is produced as it vibrates back and forth. In a synth, it’s an electrical signal swinging back and forth instead. The circuit that generates it is the Voltage Controlled Oscillator, or VCO. I won’t go into the electronics. All you need to know is that you feed it a voltage (by pressing a key) and it puts out an oscillating signal at a certain frequency. Higher voltage, higher pitch. Because we want to hear it, that frequency sits in the audible range, roughly 20 Hz to 20 kHz.
You’ll also see synths, like the Roland Junos, with digitally controlled oscillators (DCOs). A DCO still produces an analog waveform, but its pitch is timed by a digital clock instead of a control voltage. That makes its output much more stable: a VCO can drift out of tune as the circuit warms up, and a DCO doesn’t.
Most oscillators have selectable waveforms such as square, triangle and sawtooth. Each has its own timbre, or character, because each contains a different set of harmonics:
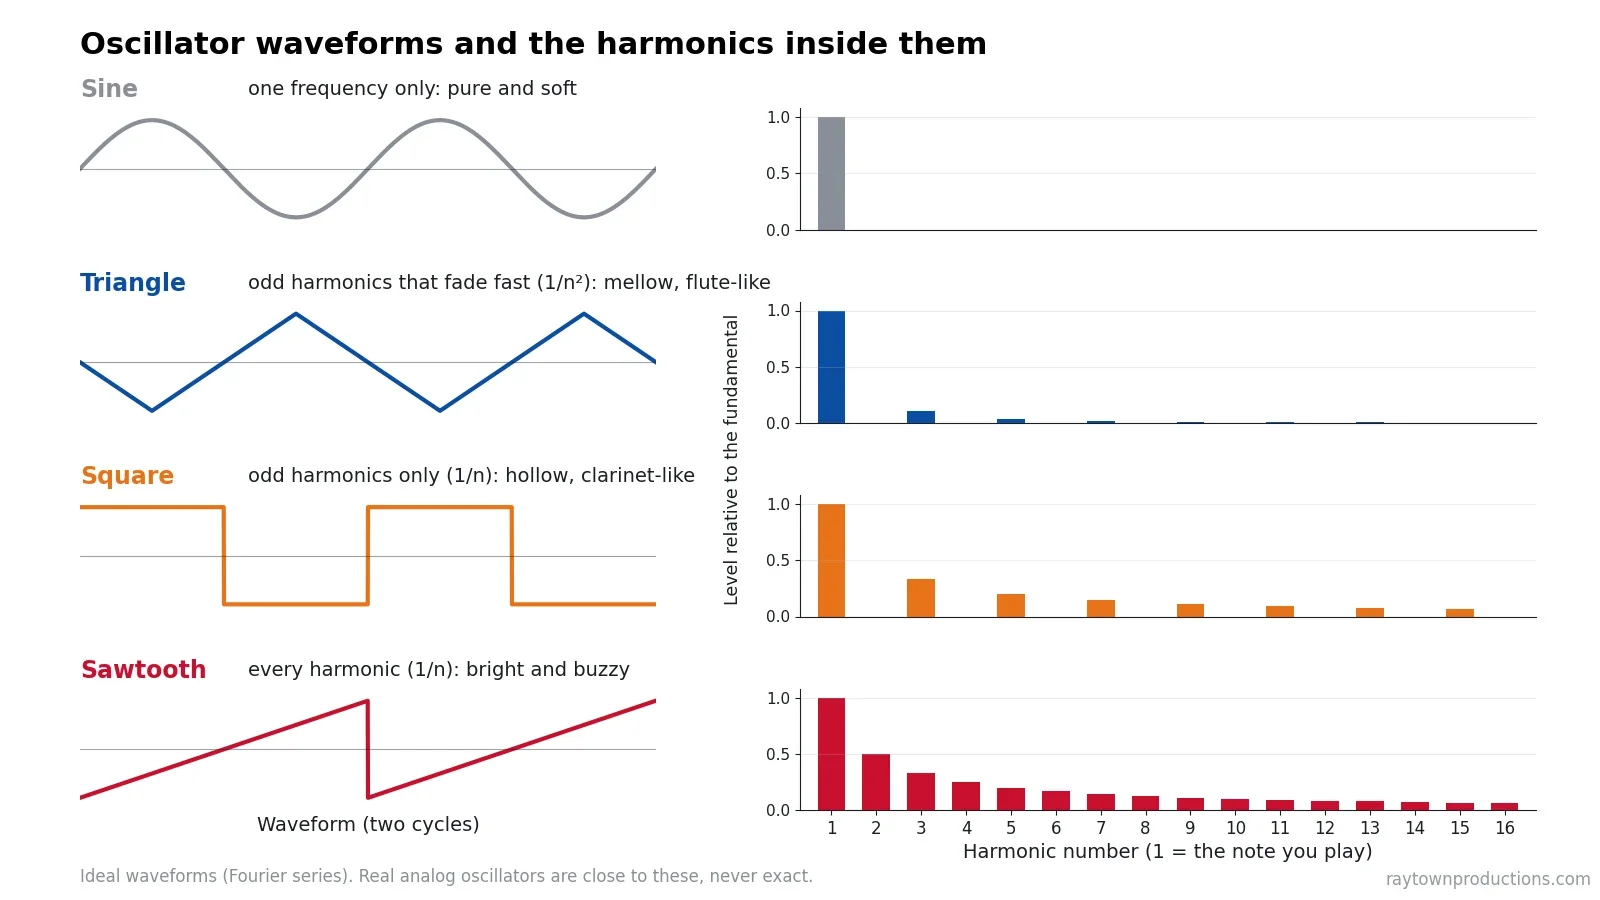
| Waveform | Harmonics | Sounds like | Typical uses |
|---|---|---|---|
| Sine | Only the fundamental | Pure, soft, round | Sub bass, 808-style lows, soft bells |
| Triangle | Odd harmonics that fade quickly | Mellow, flute-like | Soft leads, gentle pads, sub layers |
| Square / pulse | Odd harmonics only | Hollow, woody, clarinet-like | Retro leads, video-game sounds, hollow basses |
| Sawtooth | Every harmonic, odd and even | Bright, buzzy, full | Brass, strings, big pads, aggressive basses |
If all you had was an oscillator, the sounds you could make would be pretty limited and bland: a static buzz that starts and stops. To create different timbres, the oscillator’s output is typically run through a filter.
2. The Filter: What Do Cutoff and Resonance Do?
To create different flavors of sound, you filter frequencies out of your oscillator. Most analog synths do it with a Voltage Controlled Filter, or VCF.
You might be wondering why there are multiple frequencies to filter if you’re only playing one note. A pure tone is a sine wave with a single frequency. Every other waveform your oscillator can make is a combination of LOTS of frequencies: the note you play (the fundamental) plus a stack of quieter harmonics above it at 2, 3, 4 and more times that frequency. In fact, any periodic waveform (square, triangle, sawtooth) can be built by adding up an infinite series of sine waves. It sounds like magic, but it’s just math. Look up the Fourier series if you don’t believe me. The bar charts above show the first 16 harmonics of each wave.
A filter does just what its name implies: it filters out certain frequencies. They come in four main types:
- Low-pass: lets the lows through and removes the highs. This is the classic synth filter.
- High-pass: lets the highs through and removes the lows.
- Band-pass: keeps a band in the middle and removes what’s above and below it.
- Notch: removes a narrow band and keeps everything else.
Many synths have just one type, most commonly a low-pass filter. You’ll typically find two main controls on it. The cutoff frequency sets the upper limit of what gets through. With the filter all the way open you hear every harmonic, so the sound is complex and harsh. As you lower the cutoff, harmonics disappear from the top down and the wave gets gentler, approaching a pure sine. Resonance boosts the frequencies right around the cutoff, which adds a nasal, vocal or whistling edge and makes filter sweeps much more obvious. On many filters, turning resonance all the way up makes the filter ring on its own (self-oscillate) and produce a sine-like tone. How these two controls are set has a major impact on the timbres you can produce.
Filter slope: you’ll see filters described as 12 dB or 24 dB per octave (2-pole or 4-pole). That’s how steeply they cut above the cutoff. A 24 dB/octave filter, the Moog ladder filter being the famous example, removes highs more aggressively than a 12 dB/octave one.
3. The Envelope: What Is ADSR?
So far we have pitch (the VCO) and timbre (the VCF). The other big piece of any sound is how its intensity, or volume, behaves over time. That brings us to ADSR: attack, decay, sustain, release. ADSR is a type of Envelope Generator (EG). Its four controls set the amplitude of your sound over time, relative to when you press and release a key. On a synth they work together with the Voltage Controlled Amplifier (VCA): the envelope draws the shape and the VCA turns the volume up and down to follow it.
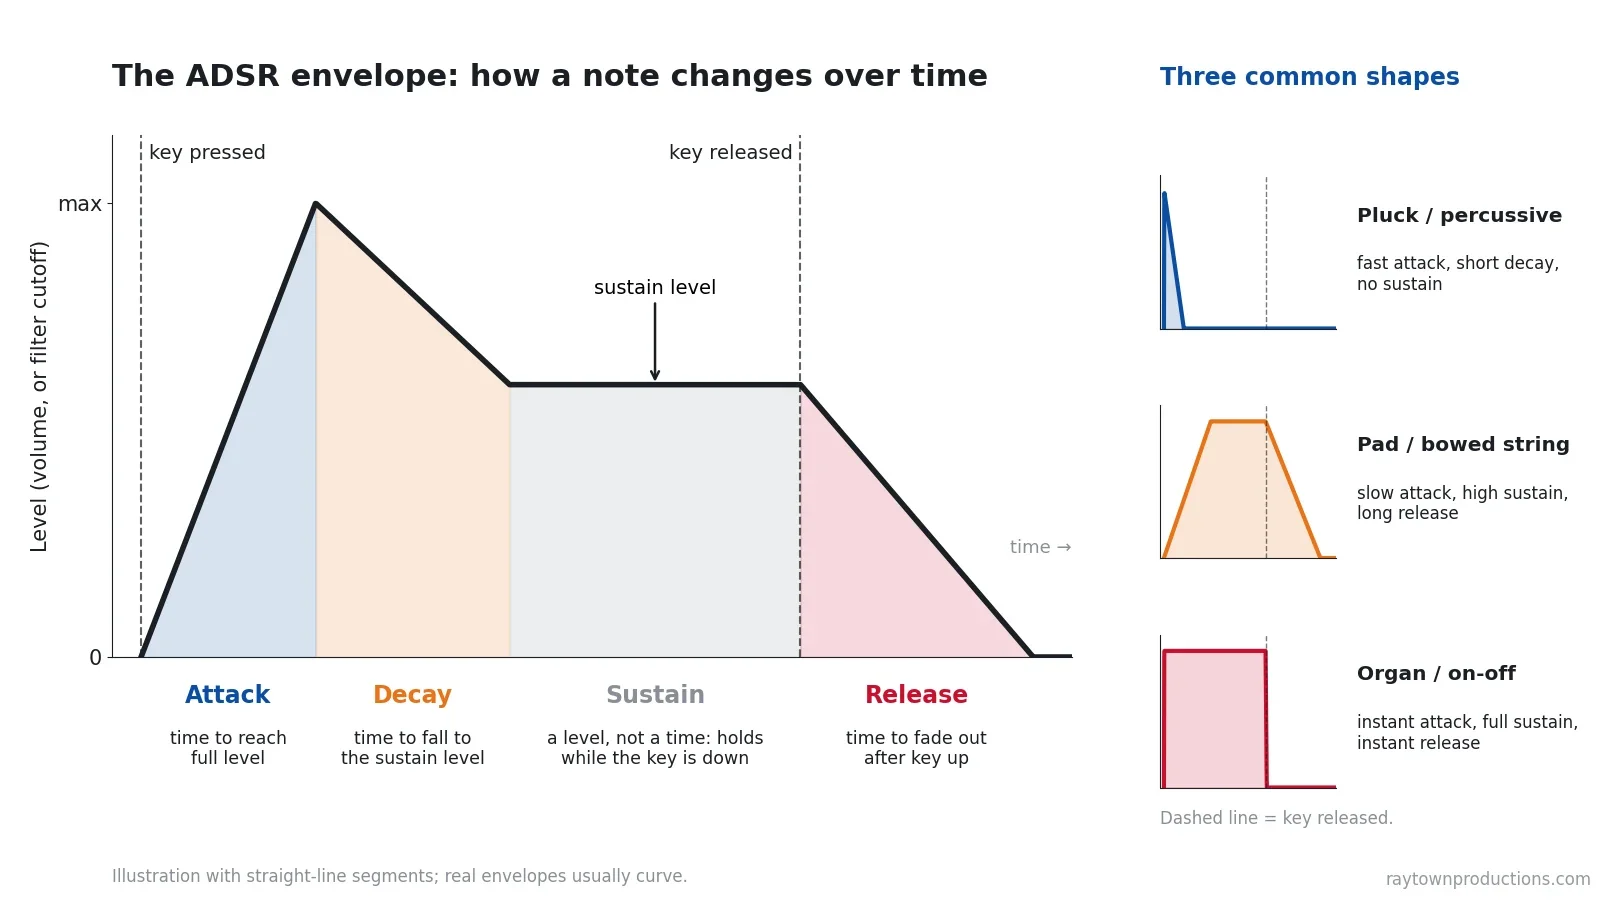
- Attack (A) controls how quickly the sound reaches its maximum volume once a key is pressed. You’d use a very short attack if you were creating a snare drum, and a longer attack if you were synthesizing a bowed string instrument like a violin.
- Decay (D) controls how quickly the volume then drops to its long-term level.
- Sustain (S) controls that long-term volume level while the key is held down. It’s the only one of the four that is a level instead of a time.
- Release (R) controls how long the sound persists once the key is released.
ADSR doesn’t have to be used just for volume. You can also use an envelope to control the filter, so every note opens bright and closes down as it rings out. That one move is behind most plucks and punchy synth basses. In fact, many synths come with two envelopes for exactly this purpose, one for the amp and one for the filter. Others have a single EG that can be applied to more than one destination, such as the oscillator and the filter.
Hear it for yourself: hold one note and move only one envelope control at a time. Attack and release are obvious right away. Decay only does something when sustain is below maximum, which trips up a lot of beginners.
4. Modulation: What Does an LFO Do?
Modulation just means one part of the synth moving a control on another part. There are several kinds, and the envelope above is one of them, but the most common is the Low-Frequency Oscillator, or LFO. An LFO is similar to a VCO in that it creates an alternating signal, but its purpose is different. It isn’t used to create a sound. It modulates one, at frequencies below or at the very bottom of the audible range, usually under about 20 Hz.
Point it at the oscillator’s frequency and the pitch wobbles up and down: vibrato. Point it at the volume and you get tremolo. Point it at the filter cutoff and you get anything from a slow sweep to a rhythmic wobble. Like the EG, the LFO can affect different things, so your synth may let it modulate the VCO, the VCA or the VCF.
- Rate: how fast the LFO cycles. Many synths and plugins can sync it to the song’s tempo.
- Depth (amount): how far it moves the control. A little is usually plenty.
- Shape: LFOs have waveforms too. Sine and triangle sweep smoothly; square jumps between two values, which gives a trill on pitch or a chopped, gated effect on volume.
Software synths follow the same rules. If you’re building a plugin toolkit, grab my free plugin guide:

Grab All My Favorite FREE Plugins!
How to Make Synths Sit in a Mix
Here’s where the four basics pay off. A synth is the only instrument where you get to design the tone, the note length and the movement before a single mix plugin goes on. When a synth won’t sit in a mix, I go back to those controls first and reach for EQ and compression second.
- Too bright or fighting the vocal? Lower the filter cutoff. A wide-open sawtooth has strong harmonics all the way up the spectrum, right where vocals, guitars and cymbals live. Closing the filter is often cleaner than piling on EQ afterwards (see the unintended consequences of EQ boosts).
- Muddy or smeared? Shorten the release. Long release times make notes overlap, and so do long reverb and delay tails. Tightening the amp envelope cleans up a busy arrangement fast.
- Clashing with the drums? Slow the attack. A slightly slower attack on a pad tucks it behind the kick and snare transients. For plucks and basses that need to punch, keep it fast.
- Resonance poking out? Back it off. A resonant peak can jump out at one frequency as the filter moves. Turn it down, or catch the peak afterwards with EQ or a little compression (my Compression 101 guide covers the settings).
- Need movement? Sync the LFO to the tempo. A tempo-synced LFO on volume or cutoff makes a pad pulse with the groove, which works a lot like the pumping people chase with sidechain compression.
After that it’s normal mixing, with a few synth-specific habits. Treat these as starting points, not rules, and adjust by ear:
| Synth role | At the synth | In the mix (starting points) |
|---|---|---|
| Sub / synth bass | Sine or triangle for the sub; add a filtered saw or square layer if it needs to be heard on small speakers | Keep it mono and centered; make room for the kick with EQ or by side-chaining the bass to the kick |
| Pad | Slower attack, longer release, filter partly closed | High-pass until it stops clouding the bass; pan or widen it; dip the mids where the vocal sits |
| Lead | Brighter filter, a little vibrato from the LFO | Treat it like a vocal: control the level, and use delay instead of heavy reverb to keep it upfront |
| Pluck / arp | Fast attack, short decay, low sustain, filter envelope for the snap | Watch the peaks; pan away from the vocal; tempo-synced delay adds width and rhythm |
For the delay on leads and plucks, you want repeats that add space without clouding the dry note. That’s what I built Clarity Delay for, but any tempo-synced delay with a filter on the repeats will do the job.
The middle of a mix is already crowded: the kick, snare, bass and lead vocal all live there. That’s why I pan or widen pads, organs and keys instead of stacking them in the center. In the video I side-chain the bass to the kick at 3:31, widen the organs with SoundToys MicroShift at 22:51, EQ the pads at 29:59 and balance the synth midrange against the vocal at 38:04. If you use wideners, chorus or detuned unison voices, check the mix in mono afterwards, because wide synths can thin out or partly cancel when the channels are summed.
For low end, a pure sine sub can vanish on phones and laptops because it has no harmonics for small speakers to reproduce. Layering a filtered saw or adding a little saturation gives it some. Resonant sweeps and plucky attacks can also throw spiky peaks that eat headroom. A clean clipper such as my HardStop (the Basic version is free) shaves them off before they hit your bus compressor or limiter.
Don’t judge a synth in solo. A patch that sounds huge by itself is usually too wide, too bright and too bassy for a full arrangement. Set the cutoff, envelope and level with the whole song playing.
Your First Patch: Putting the Four Basics Together
Try this on any subtractive synth, hardware or software:
- Oscillator: pick a sawtooth and hold a note. Bright and buzzy.
- Filter: sweep the low-pass cutoff down and hear the harmonics disappear. Park it about halfway and add a little resonance.
- Envelope: fast attack, medium decay, low sustain, short release. That’s a pluck. Raise the attack, sustain and release and it becomes a pad.
- LFO: send a slow LFO to the cutoff, or a faster, shallow one to pitch for vibrato.
- Check it in a song: play it against a track you’re working on and readjust the cutoff and release. They almost always need to come down.
This has been a quick overview of synthesizer basics. It isn’t exhaustive and isn’t meant to be complete, but if you went out and bought a synth today, you’d have a good starting point. To see and hear synths being worked into a real mix, watch the video above.
Plugins and Freebies Mentioned
- My FREE guide to the best free plugins
- SoundToys MicroShift (the widener I use on organs and synths in the video)
- SoundToys Decapitator (saturation for synth bass)
- FabFilter Pro-Q 4 (EQ for carving space)
- Wavesfactory Trackspacer (ducks synths out of the vocal’s way)
- Clarity Delay: my clean delay plugin
- HardStop: my clean, anti-aliased clipper (Basic is free)
Some of these are affiliate links. If you buy through them, Raytown Productions may earn a small commission at no extra cost to you. It helps keep these tutorials free.
Key takeaways
- A subtractive synth is four building blocks: oscillator (the raw wave), filter (the tone), envelope (the shape over time) and LFO (repeating movement).
- Waveforms differ in their harmonics: a sine has none, triangle and square have odd harmonics, and a sawtooth has them all.
- On a low-pass filter, cutoff sets how bright the sound is and resonance emphasizes the frequencies around the cutoff.
- ADSR: attack, decay and release are times; sustain is a level. Envelopes can drive the filter as well as the volume.
- To make a synth sit in a mix, fix it at the source first: lower the cutoff, shorten the release, then EQ, pan and sidechain in the context of the whole song.
Frequently asked questions
What is subtractive synthesis?
Subtractive synthesis starts with a harmonically rich waveform from an oscillator, such as a sawtooth or square wave, and uses a filter to remove (subtract) frequencies until you get the tone you want. An envelope and an LFO then shape how the sound changes over time. It is the method used by most classic analog synths.
What is the difference between a VCO and a DCO?
Both are analog oscillators. A VCO (voltage controlled oscillator) sets its pitch from a control voltage, so it can drift out of tune as it warms up. A DCO (digitally controlled oscillator), like the ones in the Roland Juno synths, still makes an analog waveform but its pitch is timed by a digital clock, so it stays in tune.
What does ADSR stand for?
Attack, decay, sustain and release. Attack, decay and release are times; sustain is a level. Together they describe how a note’s volume (or its filter cutoff) rises when you press a key, settles while you hold it, and fades after you let go.
What is the difference between an LFO and an oscillator?
They are the same kind of circuit doing different jobs. A normal oscillator runs in the audible range and is the sound you hear. An LFO (low-frequency oscillator) runs much slower, usually below about 20 Hz, and is used to move another control: pitch for vibrato, volume for tremolo, or filter cutoff for a wobble.
How do I get a synth to sit in a mix?
Fix it at the source first: lower the filter cutoff if it is too bright, and shorten the release if it is smearing. Then high-pass synths that do not need low end, keep the bass centered, pan or widen pads and keys away from the lead vocal, and cut a little midrange where the vocal needs to be heard.
Want Your Synths and Vocals to Sit Together Like a Record?
I mix and master songs for independent artists and producers every week. Send me your tracks and I’ll make them clear, punchy and release-ready. Or learn the whole process yourself in my courses.