



Pro Mastering Engineer Reveals Full Plugin Mastering Chain
Quick summary
A professional mastering engineer walks through his complete master bus plugin chain from start to finish, breaking down exact settings for EQ, bus compression, stereo widening, dynamic resonance control, tape saturation, adaptive clipping, and limiting.
What’s In This Article
- Evaluating the Pre-Master Mix
- Step 1: Corrective & Dynamic EQ (FabFilter Pro-Q 3)
- Step 2: Bus Glue Compression (Waves SSL G-Master Buss)
- Step 3: Low-End Anchor (FabFilter Pro-MB)
- Step 4: Mid/Side Stereo Expansion (Abbey Road RS124)
- Step 5: Tonal EQ Gut Check (Waves Curves AQ)
- Step 6: Vocal Balance Utility (iZotope Ozone Master Rebalance)
- Step 7: Perceived Loudness & Sub Density (Sonnox Oxford Inflator)
- Step 8: Taming Harsh Resonances (oeksound soothe2)
- Step 9: Midrange Transient Snap (Waves Trans-X Multi)
- Step 10: Psychoacoustic Sub Boost (Waves MaxxBass & Master EQ 432)
- Step 11: Analog Tape Saturation (Waves Kramer Master Tape)
- Step 12: Peak Shaving & Adaptive Clipping (RP HardStop)
- Step 13: Final Peak Catching & Metering (FabFilter Pro-L 2)
- Before vs. After: Mastering Results
Key moments in the video
- 0:00 — Mastering Chain Overview
- 0:26 — Pre-Master Mix Audition
- 1:31 — Subtractive EQ & Ultrasonic Filtering (Pro-Q 3)
- 6:23 — Dynamic EQ for Snare Attack at 2kHz
- 7:02 — SSL Master Bus Compression Setup
- 9:50 — Multiband Bass Control (Pro-MB)
- 10:57 — RS124 Mid/Side Width Trick
- 12:45 — Waves Curves AQ Profile Gut Check
- 15:15 — Ozone Master Rebalance on Lead Vocals
- 15:35 — Oxford Inflator Sub Fill
- 16:41 — De-Harshing with soothe2
- 18:35 — Snare Crack with Trans-X Multi
- 18:54 — Harmonic Sub Bass Boost (MaxxBass + EQ 432)
- 20:10 — Kramer Tape Saturation & Bias Settings
- 21:23 — RP HardStop Adaptive Clipper Walkthrough
- 26:23 — Dual-Mono Unlink Stereo Width Trick
- 27:22 — Final Limiter Ceiling (Pro-L 2)
- 28:06 — Final A/B Comparison and -4 LUFS Metering
Enjoying the Video?
Get more home-studio tutorials, mixing breakdowns, and gear deep-dives every week.
To build a professional mastering plugin chain that delivers loud, punchy, wide, and commercially competitive results, arrange your processing in a deliberate logical sequence: start with subtractive corrective EQ to filter rumble and tame resonant frequencies, followed by glue compression, multiband low-end control, and subtle Mid/Side stereo widening. Next, introduce tonal balancing, targeted resonance suppression, low-frequency psychoacoustic enhancement, and tape saturation before hitting an adaptive clipper and a true-peak ceiling limiter. In this complete walkthrough, I break down every single plugin, parameter setting, and decision on my master bus using the track “Alligator Fears Crocodile Tears” by the rock band Followship. Whether you own these exact tools or are using alternative options from my free mixing and mastering guide, this step-by-step framework will teach you how to achieve maximum loudness without sacrificing punch or clarity.

Grab All My Favorite FREE Plugins!
Evaluating the Pre-Master Mix
Before touching a single plugin, you must audition your mix critically to diagnose what it needs and what it does not. On our demonstration track by Followship, the mix is already punchy and well-balanced, but a commercial master demands strict quality control across three critical dimensions:
- Rhythm section impact: Ensuring the kick drum and snare retain transient punch without collapsing into mud or getting swallowed by heavy guitars.
- Top-end brightness vs. harshness: Matching modern commercial top-end air while ruthlessly carving out abrasive high-mid build-ups or harsh aliasing.
- Low-end stability: Checking that the sub-bass and bass guitar feel focused, deep, and consistent rather than flabby or headroom-consuming.
Mastering is about refinement and translation across diverse listening systems. If a fundamental balance issue exists—such as an egregiously buried vocal or completely masked kick drum—address it in the mix first whenever possible.
Step 1: Corrective & Dynamic EQ (FabFilter Pro-Q 3)
I start virtually every mastering chain with an equalizer to clean up unnecessary energy before audio hits downstream dynamic processors. Because compressors and clippers react directly to input levels, feeding them cleaner audio preserves headroom and prevents unwanted pumping.
First, I apply a gentle high-pass filter around the subsonic range (below 25–30 Hz). While sub-30 Hz energy might work in EDM, in rock and metal it simply eats headroom that our kick and bass need. Next, I set a gentle low-pass filter positioned way up at 24 kHz. Even though 24 kHz is outside human hearing, the slope gently rolls off ultra-high non-musical fizz, aliasing artifacts, and harsh accumulation from distorted guitars.
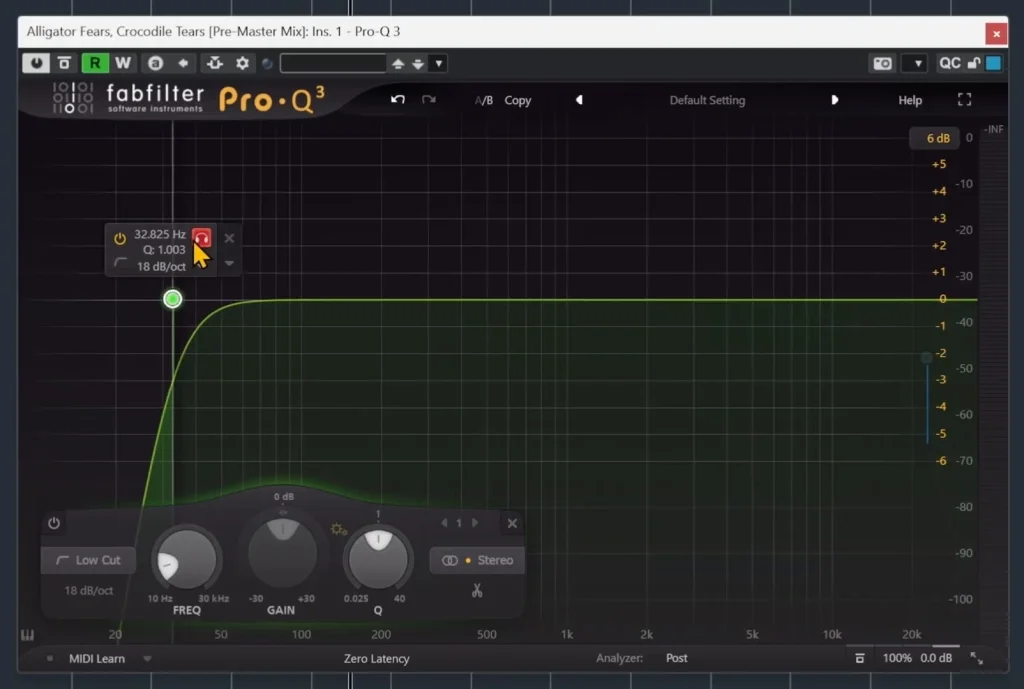
To address the midrange, I switch from my primary stereo monitors to a single mono Avantone MixCube. Collapsing the mix to a small mono speaker exposes masking and midrange mud instantly. Using a narrow bell filter boosted by 3 to 5 dB, I sweep the midrange to hunt for problem spots. In this track, mud from the guitars was smothering vocal clarity in the lower mids, which I trimmed back by around 1 dB using a responsive ‘bouncy’ cut technique.
Around 2 kHz, where ear fatigue easily builds up, I located a pokey resonance. However, cutting 2 kHz with a static EQ hollowed out the snare drum snap. I engaged dynamic mode on the 2 kHz band in FabFilter Pro-Q 3, setting the resting point down for general smoothing, while transient snare hits dynamically push the band upward to retain attack.
Step 2: Bus Glue Compression (Waves SSL G-Master Buss)
Next comes bus glue. An SSL-style VCA compressor is a staple for rock because it unifies the rhythm section and tightens the relationship between the kick, snare, and bass.
To dial in the Waves SSL G-Master Buss Compressor, I start aggressively to clearly hear the compression envelope, then dial it back to taste:
- Attack: Set to 30 ms. A slow attack lets the initial transients of the kick and snare poke through completely unhindered before gain reduction clamps down.
- Release: Set between 0.1 and 0.3 s (settling on roughly 0.3 s). A fast release sounds aggressive, while a slightly longer release glues the elements into a cohesive wall of sound.
- Ratio & Gain Reduction: A gentle 2:1 or 4:1 ratio pulling merely 1 to 2 dB on peak moments.
- Mix Knob (Parallel Processing): Dialing the internal mix knob back slightly re-introduces dry uncompressed transients, ensuring the master never feels flat.
Always gain-match your compressor output before evaluating! Because human ears perceive louder audio as superior, level-matching the bypassed and active states is the only way to know if your compression settings are genuinely improving the groove.
Step 3: Low-End Anchor (FabFilter Pro-MB)
After broad bus compression, the low-end energy around 100 Hz to 110 Hz felt slightly uneven, with the bass guitar lunging forward during specific notes. To lock this down without flattening the entire track, I inserted FabFilter Pro-MB.
I engaged a single band focused strictly across the bass guitar body. The parameters are surgical: a gentle ratio below 2:1, a relatively slow attack to preserve initial bass string pluck, and a medium release. If you clamp this area down too hard, you destroy the punch of the kick drum; if you cross too high above 150 Hz, you hollow out the body of the snare. Keep the gain reduction subtle—just enough to anchor the low end.
Step 4: Mid/Side Stereo Compression (Abbey Road RS124)
To make a master sound larger than life, conventional stereo widening plugins often cause phase cancellation or wash out the center image. Instead, I use a dedicated Mid/Side dynamic technique with the Waves Abbey Road RS124 compressor.
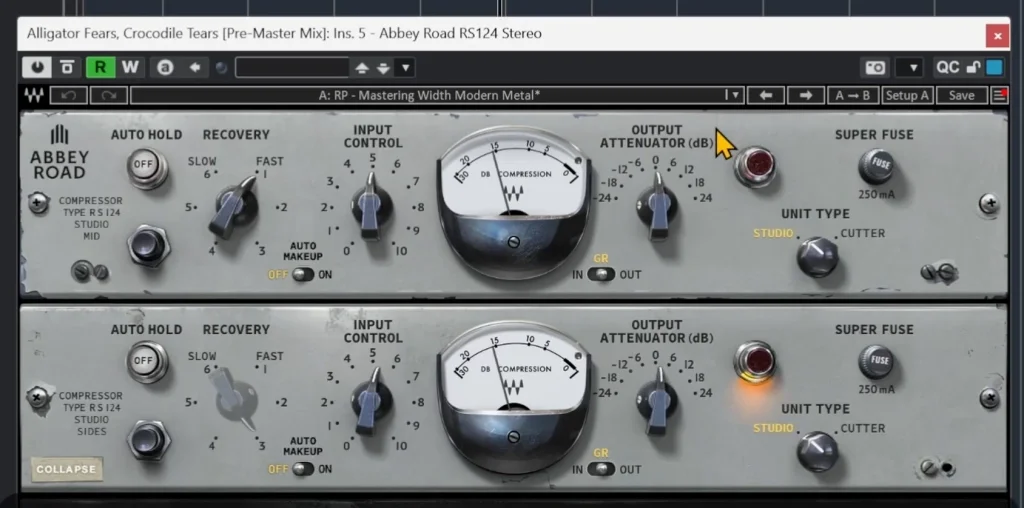
Here is how to set up this stereo trick:
- Open the RS124 expanded panel and toggle mode to MS (Mid/Side).
- Unlink the channels and bypass compression on the Mid channel completely.
- Engage the compressor strictly on the Side channel, engage Superfuse mode to heavily squash the side information, and set the internal sidechain to 140 Hz so sub energy does not trigger pumping.
- Set the plugin’s parallel mix control to 0%, then slowly blend it up until the mix blooms outward (typically between 15% and 30%).
As explained in iZotope’s guide to mid/side processing, dynamically manipulating the side channel controls perceived width dynamically without destabilizing center-panned lead elements like vocals, kick, and bass.
Step 5: Tonal EQ Gut Check (Waves Curves AQ)
When spending hours inside a master, ear fatigue makes objective tonal evaluation difficult. I use Waves Curves AQ as an intelligent ‘gut check’ to audit my overall frequency curve against commercial profiles.
I let the plugin listen to the chorus in ‘Mix’ mode to identify genre-appropriate target shapes. While its fully dynamic algorithm can sound over-processed, leaning toward the static side provides valuable reference curves. After auditioning profiles, I identified one that brought out gorgeous detail on the ride cymbal while tightening the lower mids. Rather than taking the full suggestion, I pulled the intensity slider way back, blending in just a subtle percentage to nudge the track’s overarching tonal balance in the right direction.
Step 6: Vocal Balance Utility (iZotope Ozone Master Rebalance)
If you have access to the original multitrack session, opening the project and nudging the vocal fader by 0.5 dB is always the best solution. However, when working from a flat stereo bounce, iZotope Ozone’s Master Rebalance is a lifesaver.
In this master, the lead vocal had incredible emotion but sat slightly recessed behind the heavy guitars. I applied a tiny +0.5 to +1.0 dB bump to the vocal channel in Master Rebalance. It brings the vocal forward with pristine separation and zero noticeable artifacts.
Step 7: Perceived Loudness & Sub Density (Sonnox Oxford Inflator)
The Sonnox Oxford Inflator is a legendary psychoacoustic tool capable of increasing perceived loudness, warmth, and fullness without eating up headroom or causing obvious clipping distortion.
I engaged the Band Split mode, which distributes processing across frequency zones to minimize intermodulation distortion. Pushing the effect between 5% and 25% added weight to the kick drum and brought the whole mix forward. Beware: the Inflator does not level-compensate automatically. When testing it, gain-match the output rigorously to ensure you are adding genuine body rather than falling for an increase in sheer volume.
Step 8: Taming Harsh Resonances (oeksound soothe2)
With the loudness and presence pushed forward, harsh high-frequency resonances can quickly become fatiguing. To smooth things out, I inserted oeksound soothe2.
Using soothe2 on a master bus requires extreme restraint. Heavy processing sucks out the natural bite and aggression of rock guitars and cymbals, leaving the mix sounding like a blanket was thrown over the speakers. To prevent this, use these critical settings:
- Delta Monitoring: Audition in Delta mode so you hear only what is being removed. If you hear notes, chords, or core transients, back off. Only non-musical rings, whistle tones, and harsh cymbal spikes should appear.
- Long Attack Time (6.5 to 7): A slower attack allows transient drum strikes and guitar picks to pass through untouched before dynamic notch filtering clamps down.
- Subtle Wet/Dry Mix: Keep the overall mix around 15% to 20%, shaving off at most 1 dB of harshness.
Step 9: Midrange Transient Snap (Waves Trans-X Multi)
Because resonance suppression and bus compression can slightly soften snare crack, I rely on a multiband transient designer: the classic Waves Trans-X Multi.
By isolating the midrange band where the snare drum’s body and snap live (around 1 kHz to 3 kHz), I dialed in a subtle transient boost. This injects bite right back into the snare, ensuring the drum cuts effortlessly through thick walls of distorted guitars without elevating overall track volume.
Step 10: Psychoacoustic Sub Boost (Waves MaxxBass & Master EQ 432)
A common mistake when mastering heavy tracks is simply boosting 50 Hz with a shelf EQ, which rapidly eats up limiter headroom and creates a muddy, unmanageable low end. Instead, I combine psychoacoustic harmonic synthesis with analog-modeled EQ.
First, I loaded Waves MaxxBass. MaxxBass analyzes deep low frequencies and generates upper harmonic overtones that trick the brain into hearing lower bass notes—even on smaller speakers. I set the input to around -15 dB with a conservative ratio of 1.2 to inject subtle perceived depth.
To give the physical sub-frequencies a final polished weight, I paired this with the IK Multimedia T-RackS Master EQ 432, dialing in a surgical +1.5 dB boost right around 42 Hz. This gave the kick drum massive sub-impact while remaining completely tight.
Step 11: Analog Tape Saturation (Waves Kramer Master Tape)
Before pushing into final loudness stages, analog tape simulation delivers natural compression, harmonic complexity, and low-end thickening. My longtime staple is Waves Kramer Master Tape.
Here are my exact mastering settings for Kramer Tape:
- Speed: 15 IPS (Inches Per Second) for a rounder, thicker low end and sweet high-end rolloff.
- Bias: Set to Over-bias slightly to create smooth, pleasing harmonic distortion.
- Noise & Flutter: Turn tape noise off completely. Keep wow and flutter dialed down to prevent pitch modulation across sustained notes.
- Record/Playback Levels: Drive the input gently until you hear the low end glue together, adding dense harmonic weight to the kick drum.
Step 12: Peak Shaving & Adaptive Clipping (RP HardStop)
Here is the linchpin that allows this chain to hit ultra-competitive loudness without collapsing: hard clipping before the final limiter. Limiters struggle with fast transient peaks, dragging down surrounding audio and creating audible pumping. A clipper, by contrast, shaves transient spikes instantaneously.
To accomplish this without harsh digital distortion, I developed my own plugin: RP HardStop.
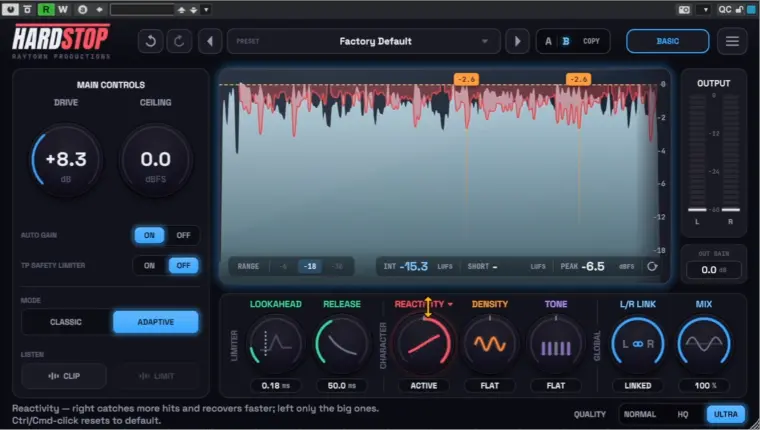
HardStop is engineered specifically for heavy, transient-rich music using several advanced features:
- Ultra Quality Mode: Runs ultra-clean processing equivalent to 40x oversampling with minimal CPU overhead to eliminate aliasing.
- Delta/Listen Mode: Auditions strictly what the clipper is removing. We dial the ceiling and drive so that only the transient peaks of the kick and snare crackle through, leaving guitars, vocals, and bass untouched.
- Adaptive Reactivity: HardStop dynamically adjusts its response based on incoming transients. Setting reactivity to ‘Balanced’ and recovery to ‘Medium’ allows it to dance with the music, preventing grinding distortion.
- Density Mode (Punch): Switching the density circuit to ‘Punch’ adds impact to drum transients rather than rounding them off like traditional clippers.
- Tone Shaper: I tilted the internal tone knob slightly toward the warm side to tame transient edge introduced by hard driving.
- Dual-Mono Unlinking (The Secret Weapon): By unlinking the left and right detectors, the clipper processes transient peaks independently per channel. As noted by mix engineers discussing dual-mono bus processing, unlinking prevents a loud transient on one side from pulling down the opposite channel, instantly expanding perceived stereo width.
Step 13: Final Peak Catching & Metering (FabFilter Pro-L 2)
Because HardStop already absorbed 3 to 4 dB of peak transients transparently, our final peak limiter does almost no heavy lifting. I open FabFilter Pro-L 2 purely as a safety ceiling and final transparent leveler.
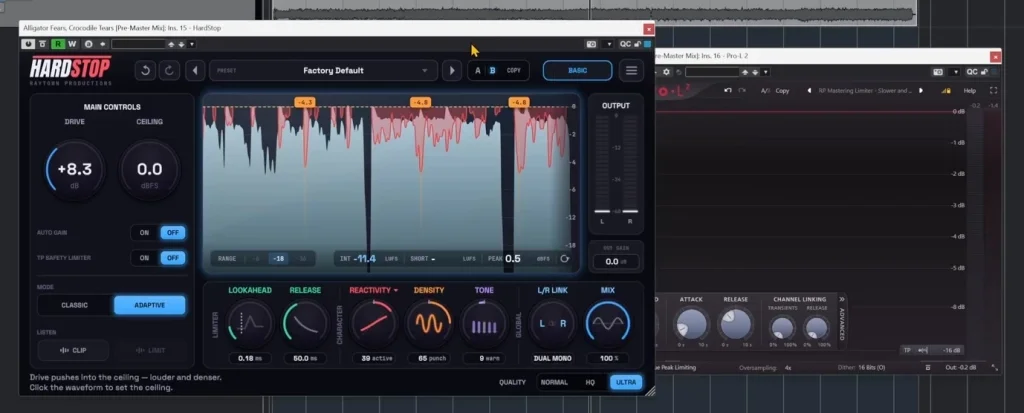
I set the output ceiling to -0.2 dB True Peak to prevent inter-sample clipping on streaming services, driving input gain just enough to catch about 1 dB of gain reduction on the loudest chorus peaks. The limiter glides smoothly without pumping because the unruly transients were already handled.
Before vs. After: Mastering Results
When we A/B the mastered track against the original unmastered mix, the transformation is dramatic. Gain-matching the unmastered mix highlights just how muddy, flat, and narrow it felt by comparison.
With the entire mastering chain active, the master achieved an incredible -5.5 to -4.0 LUFS during the climax of the chorus, while retaining massive low-end weight, snappy drum transients, and an open stereo field. If -4 LUFS is more aggressive than your genre requires, you can simply back off the clipper drive—the tonal balance, glue, and depth remain fully intact.
Want To Go Deeper?
Conquer the Master Bus is my complete home-studio mastering course for rock and metal, built for producers who want loud, punchy masters without crushing the life out of their mixes. I walk you through my full master-bus chain step by step, so you know what every move does and why. By the end, you’ll be mastering your own songs with confidence instead of guessing.
Big takeaways:
- A repeatable master-bus chain you can use on every rock and metal song
- How to get competitive loudness while keeping your transients and punch
- When to use clipping, limiting and compression, and in what order
- How to tame harsh guitars and keep low end tight and controlled
- Mastering for streaming: LUFS, true peak, and what actually matters
Check out Conquer the Master Bus →
Key takeaways
- Subtractive EQ should always precede dynamic processing to prevent low-end rumble and ultrasonic fizz from triggering compressors.
- Dynamic EQ at 2 kHz can smooth out harshness across sustained vocals and guitars while preserving the transient crack of the snare.
- Parallel compression on the Side channel using an RS124 creates massive stereo width without compromising mono compatibility.
- Always gain-match your processors when making decisions—perceived volume jumps easily trick the brain into thinking a worse tone sounds better.
- Clipping transients before your final limiter is the key to reaching modern commercial loudness (-6 to -4 LUFS) without sacrificing punch.
Frequently asked questions
Why put a clipper before a limiter in a mastering chain?
A clipper slices off ultra-fast transient peaks (like the initial attack of kick and snare hits) instantaneously without altering the sustain of the audio. If you force a limiter to absorb those fast peaks, its detector clamps down and pumps the entire mix. Shaving 2–4 dB of peaks with an adaptive clipper lets the limiter operate transparently with under 1 dB of gain reduction.
How does Mid/Side compression widen the master without phase issues?
By switching a compressor to Mid/Side mode, unlinking the channels, and heavily compressing only the Side channel (which contains stereo difference information), you bring up low-level ambient details and panned guitars. Blending this in parallel adds stereo spread while leaving center-channel elements (kick, lead vocal, bass) completely punchy and phase-coherent.
Why roll off frequencies above 20 kHz if humans can’t hear them?
Modern digital productions accumulate ultrasonic noise, aliasing, and high-frequency build-ups from heavily distorted guitars, synthesizers, and saturation plugins. While inaudible directly, this ultrasonic garbage forces downstream limiters and clippers to work harder. A gentle high-cut slope around 24 kHz cleans up this non-musical energy and smooths the top end.
What attack and release settings are best for bus compression on rock music?
A slow attack time (around 30 ms) is ideal because it allows the initial punch of the kick and snare drums to pass through unaffected before compression begins. A medium-fast release (0.1 to 0.3 s) allows the compressor to breathe in rhythm with the tempo without causing sluggish pumping.
Grab All My Favorite FREE Plugins!
Want to see the whole walkthrough? Watch the full video on YouTube.