

Your Limiter Sounds Better With This One Simple Trick
Quick summary
Discover why pushing a mastering limiter flattens drum transients and causes your mix to collapse. Learn how placing a hard clipper before your limiter preserves punch, maintains dynamic depth, and unlocks cleaner, louder masters. Plus: what makes the best free clipping plugin for mastering.
What’s In This Article
- Why Limiters Kill Drum Punch and Mix Energy
- The Mechanics: Lookahead, Release Envelopes, and Gain Droop
- The Solution: Clipping Before Limiting
- Hard Clipping vs. Soft Clipping on the Master Bus
- What to Look for in the Best Free Clipping Plugin
- Step-by-Step: Setting Up Your Pre-Limiter Clipper
- A/B Testing the Results: Restoring Space and Impact
Key moments in the video
- 0:00 — The 30-second trick to punchier mixes
- 0:43 — Why limiters alone flatten aggressive mixes
- 1:16 — Gain-matched listening test on Waves L2
- 3:45 — How limiter lookahead and release cause gain droop
- 5:45 — Introducing hard clipping for transient preservation
- 6:25 — HardStop clipper setup and anti-aliasing quality
- 11:37 — Hard clipping vs soft clipping comparison
- 12:47 — Calibrating the clipper before the limiter
- 14:35 — A/B audio comparison: hearing the restored punch
- 16:09 — Advanced transient shaping and wrap up
Enjoying the Video?
Get more home-studio tutorials, mixing breakdowns, and gear deep-dives every week.
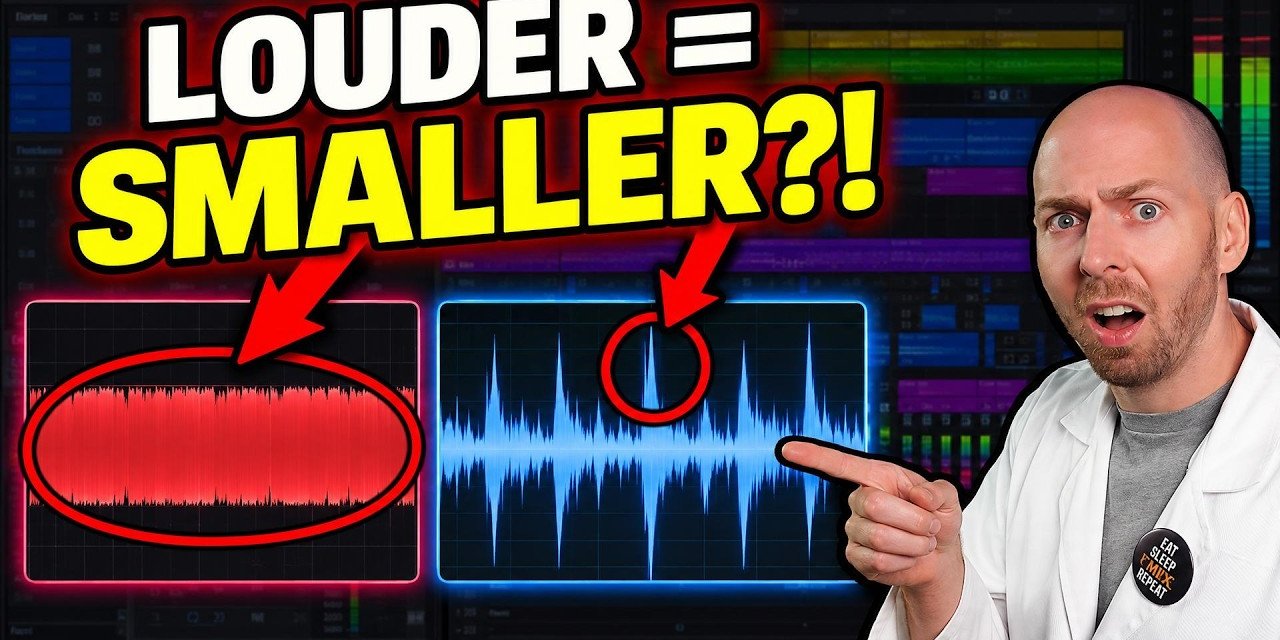
If your mix instantly feels smaller, softer, and weaker the moment you push your limiter for competitive loudness, you are not alone. Pushing a limiter too hard forces its lookahead detection and time-based release envelope to aggressively clamp down on every kick and snare transient, collapsing the center image and draining the life out of your rhythm section. The secret to solving this in under 30 seconds is simple: clipping before limiting. Place a hard clipper directly before your limiter. Instead of demanding that a single brickwall limiter manage massive peak spikes and sustain volume at the same time, a hard clipper cleanly shaves off extreme microsecond transients without dragging down the surrounding audio. In this guide, I will show you exactly how limiters compromise drum punch, why instantaneous hard clipping fixes the issue, and how to calibrate both tools together for a loud, punchy, professional master. The fix is a hard clipper in front of your limiter, and it doesn’t have to cost anything: below I’ll cover what to look for in the best free clipping plugin and how I set it up.

Grab All My Favorite FREE Plugins!
Why Limiters Kill Drum Punch and Mix Energy
When finalizing a rock or metal master, such as the track Alligator Fears Crocodile Tears by Followship that I worked on, reaching commercial loudness is usually the final hurdle. The standard workflow is straightforward: insert a reputable brickwall limiter—like the classic Waves L2 Ultramaximizer—in the final slot on the master bus, set an output ceiling around -0.2 dBFS (or -1.0 dBFS for streaming services), and pull down the threshold.
However, human ears are easily deceived by sheer volume. As you lower the threshold, the track gets louder and initially seems more exciting. But when you gain-match the limited signal against the original unconstrained mix, the compromise becomes painfully obvious: the mix collapses, the stereo image feels smaller, and the snare drum loses its crack and body [1].
Gain-Matching Tip: In plugins like the Waves L2, link the threshold and ceiling faders together to pull them down simultaneously. This allows you to evaluate compression artifacts, tonal changes, and transient loss at equal loudness without being fooled by volume jumps.
The Mechanics: Lookahead, Release Envelopes, and Gain Droop
To understand why mixes lose their punch, we must examine the underlying mechanics of a digital limiter. A limiter is essentially a compressor operating at an infinite (or near-infinite) ratio with very fast attack and release times. However, because audio signals move rapidly, pure instantaneous compression would generate massive waveform distortion. To prevent this, limiters employ two primary mechanisms:
- Lookahead Detection: The limiter buffers incoming audio by 1 to 5 milliseconds to anticipate peaks before they occur. It begins turning the gain down before the transient actually strikes.
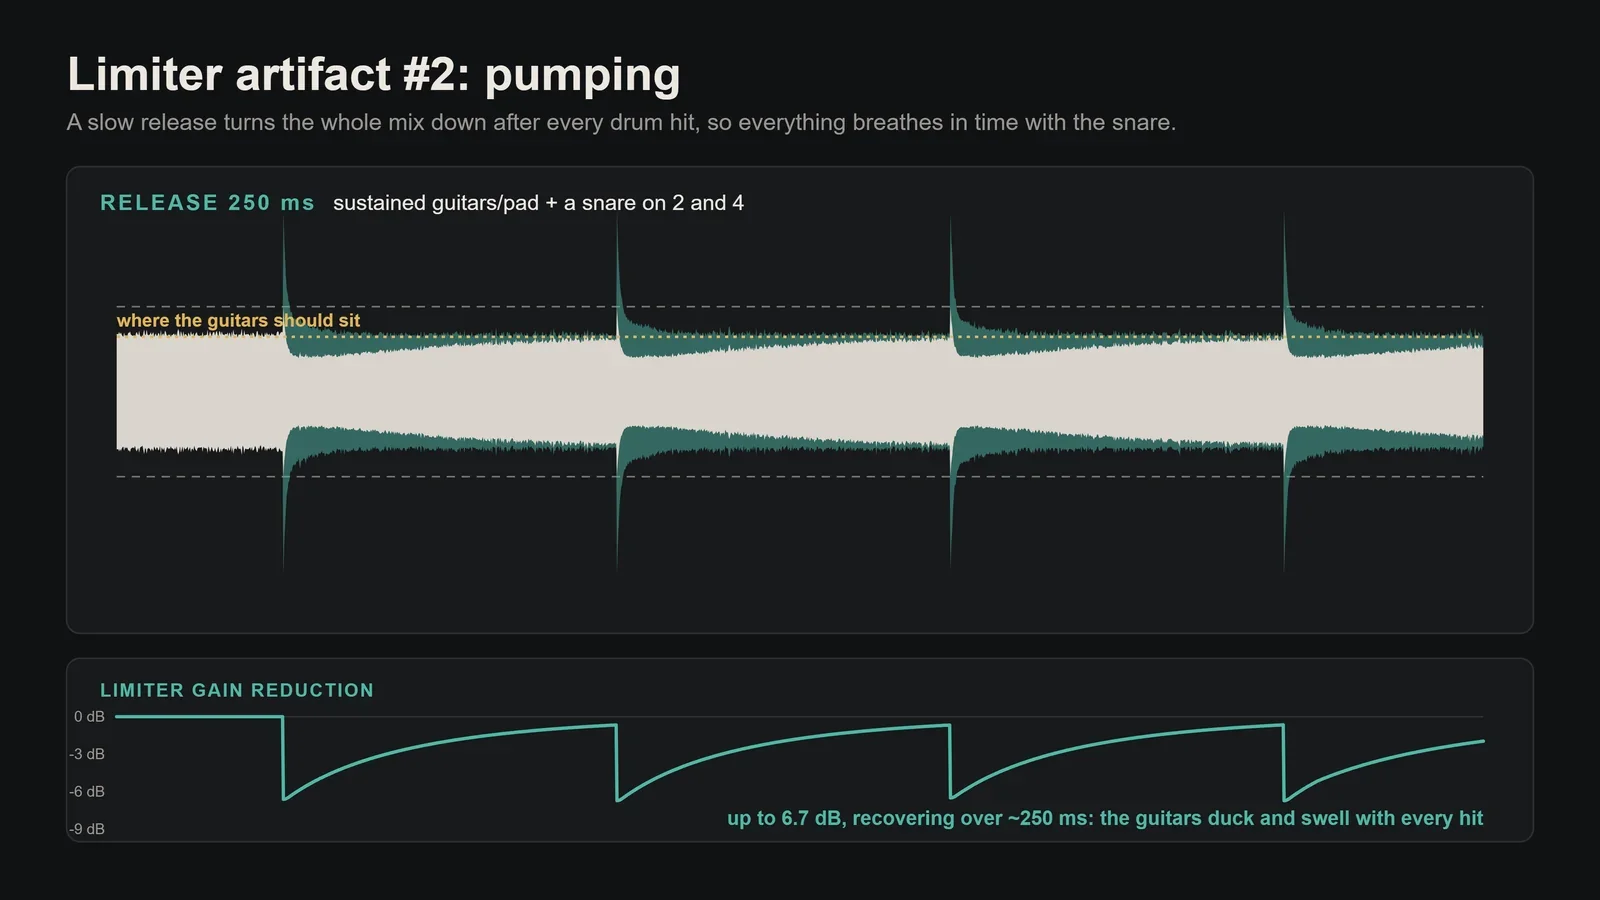
- Time-Based Release Envelopes: Once a peak triggers gain reduction, the limiter does not instantly snap back. It holds the signal down and releases it gradually over a set decay curve to avoid harsh clipping artifacts.
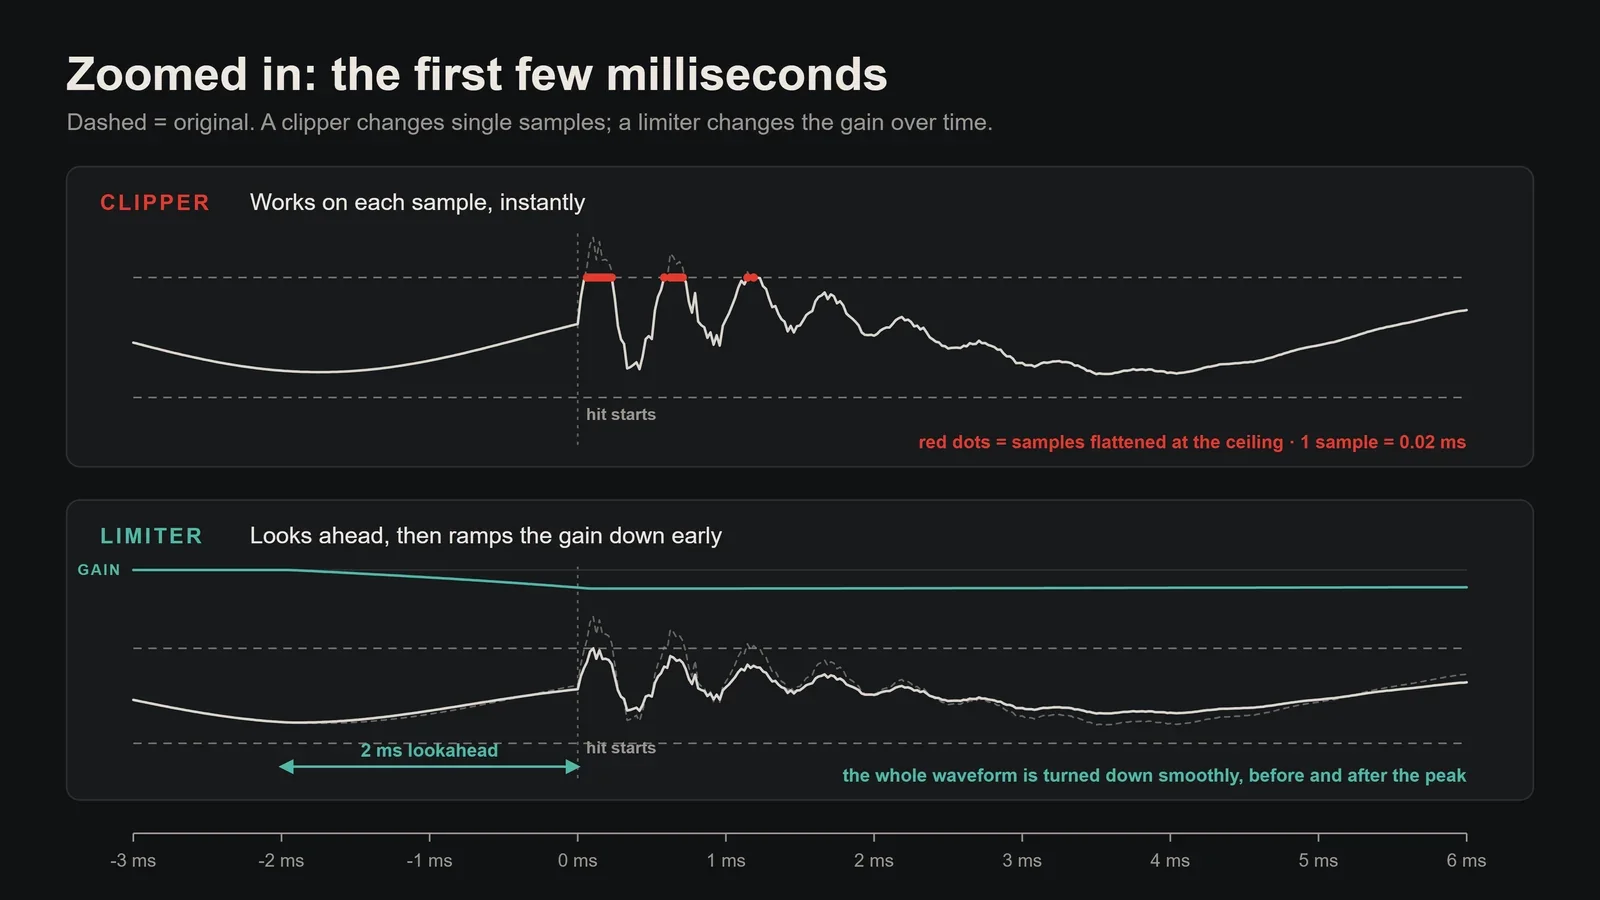
While these mechanisms ensure clean, transparent gain reduction on sustained passages, they spell disaster for percussive instruments. When a spiky snare transient hits, the lookahead attenuates the gain before the hit, rounding off the leading edge. Then, the release envelope keeps the audio suppressed after the hit, creating a prolonged “droop” in volume over the drum’s body [2]. The result? Soft, mushy drums that lack impact.
The Solution: Clipping Before Limiting
Instead of forcing your limiter to handle both high-energy transient spikes and overall dynamic control, you can split the workload. Placing a dedicated clipper immediately before your limiter changes the game completely.
A clipper performs instantaneous threshold truncation. If a signal exceeds the ceiling, the clipper cuts the excess waveform flat. Crucially, a clipper possesses zero lookahead and zero release time. The moment the waveform drops back below the threshold, the processing stops instantly. It does not drag down the body of the drum or duck the bass guitar sitting beneath the transient.
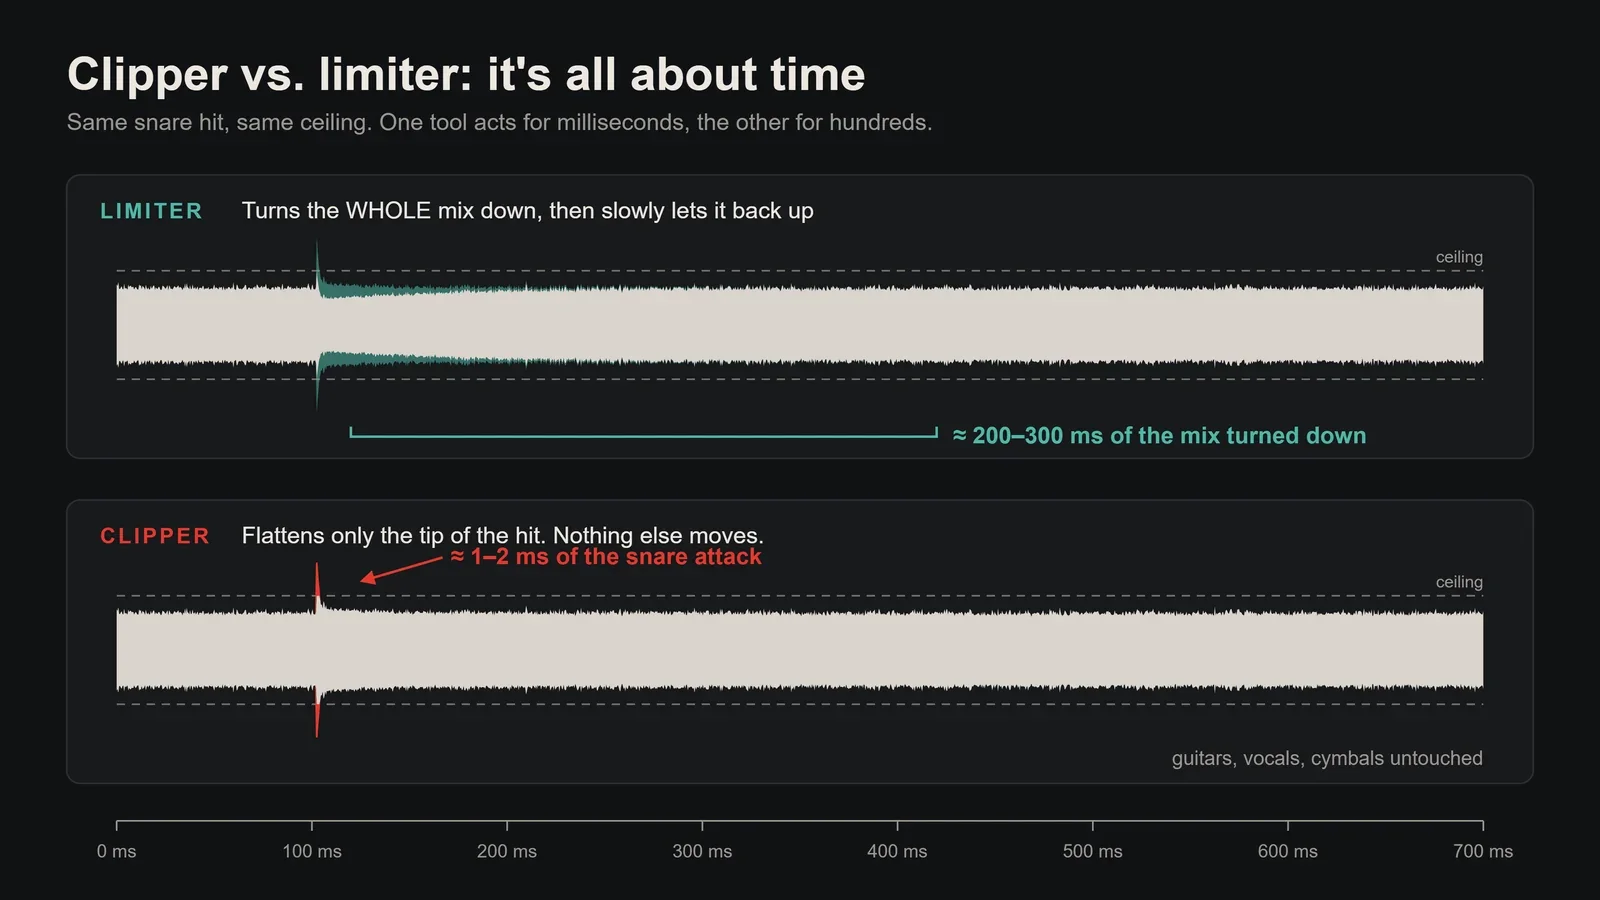
Why Clipping Sounds Clean on Drums: Hard clipping introduces odd-order harmonic distortion. While sustained notes (like bass or vocals) will buzz and sound harsh when clipped, drum transients last only 10 to 20 milliseconds. At that brief duration, our ears perceive the added harmonic burst not as distortion, but as enhanced punch, presence, and transient clarity.
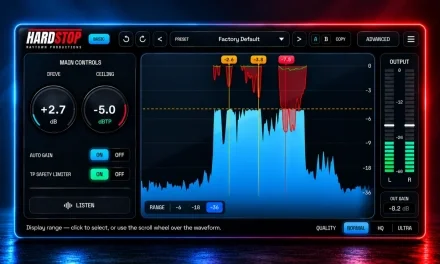
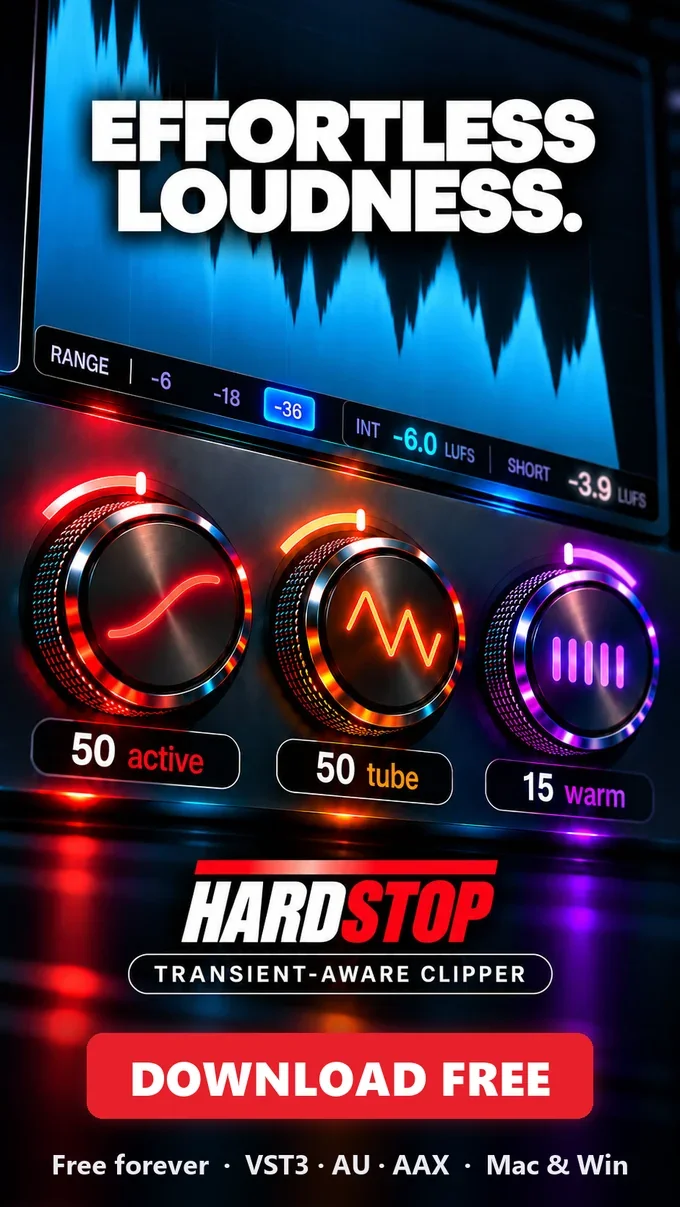
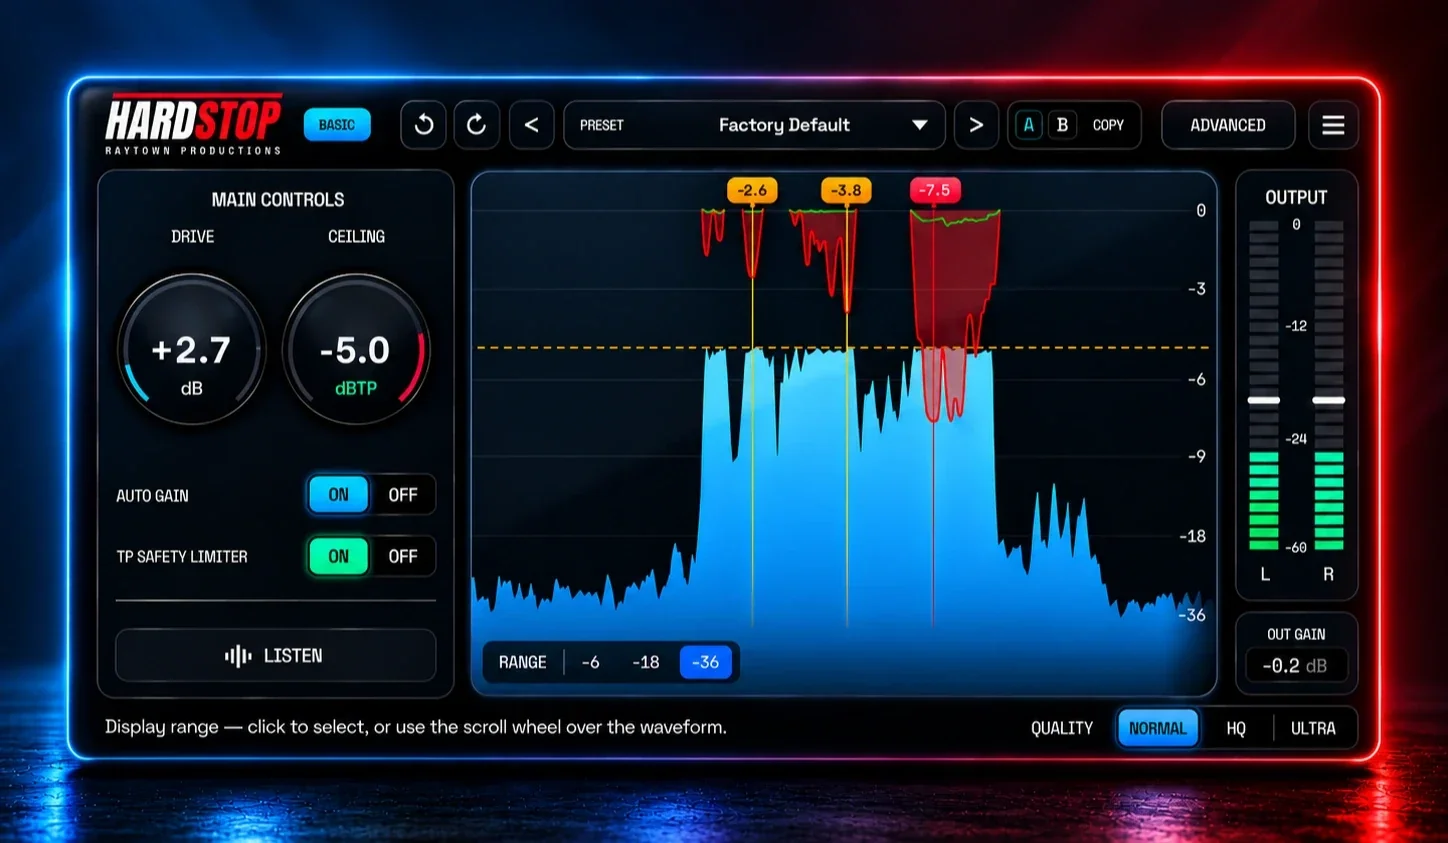
Try it free: HardStop. HardStop is the hard clipper and true-peak limiter I use for this trick. It’s free to download (just an email) and gives you the full clipping engine: Normal, HQ and Ultra anti-aliasing, a true-peak safety limiter, and a waveform that shows every peak you shave. Download HardStop free →
Hard Clipping vs. Soft Clipping on the Master Bus
A common mistake producers make is reaching for a soft clipper on their master bus instead of a hard clipper. While stock DAWs (like Cubase) frequently offer soft clippers, they are often the wrong tool for preserving transient attack.
- Hard Clipping: Maintains a strictly linear path right up to the threshold, where it chops the peak horizontally. This yields maximum transient preservation, razor-sharp aggression, and zero dynamic compression below the ceiling.
- Soft Clipping: Introduces a rounded “knee” before the ceiling. While this rounds the edges to reduce harsh harmonics and thicken a signal, it acts very much like a fast limiter, softening transients and making drums sound mushy.
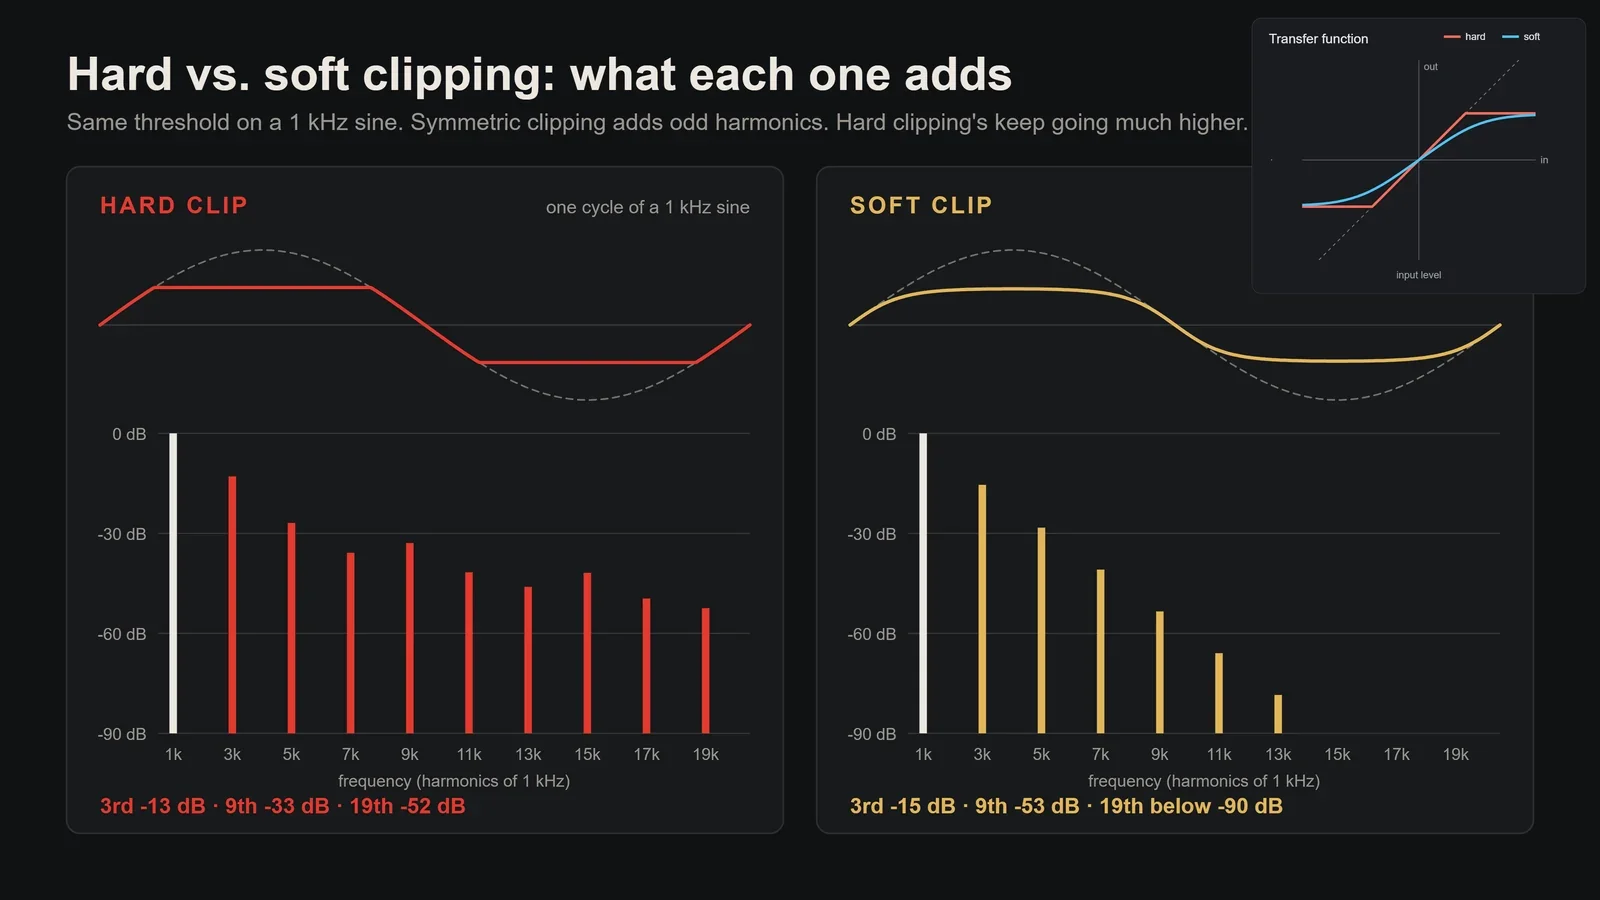
Save soft clipping for instrument buses where you want warm saturation or glue. For master bus peak management and competitive loudness, a high-quality hard clipper with robust anti-aliasing (a high-quality oversampling or custom anti-aliasing mode) is the superior choice.
What to Look for in the Best Free Clipping Plugin
You don’t need to spend money to get this result, but not every free clipper is up to the job. The best free clipping plugin for mastering should give you:
- True hard clipping, not a soft saturator, so the ceiling is exact and everything below it passes untouched.
- Anti-aliasing (oversampling), so the harmonics a clipper creates don’t fold back down as harsh, false tones.
- True-peak safety, so the clipped signal doesn’t overshoot your ceiling once it’s converted or encoded.
- Visual feedback, so you can see exactly which peaks you’re shaving and by how much.
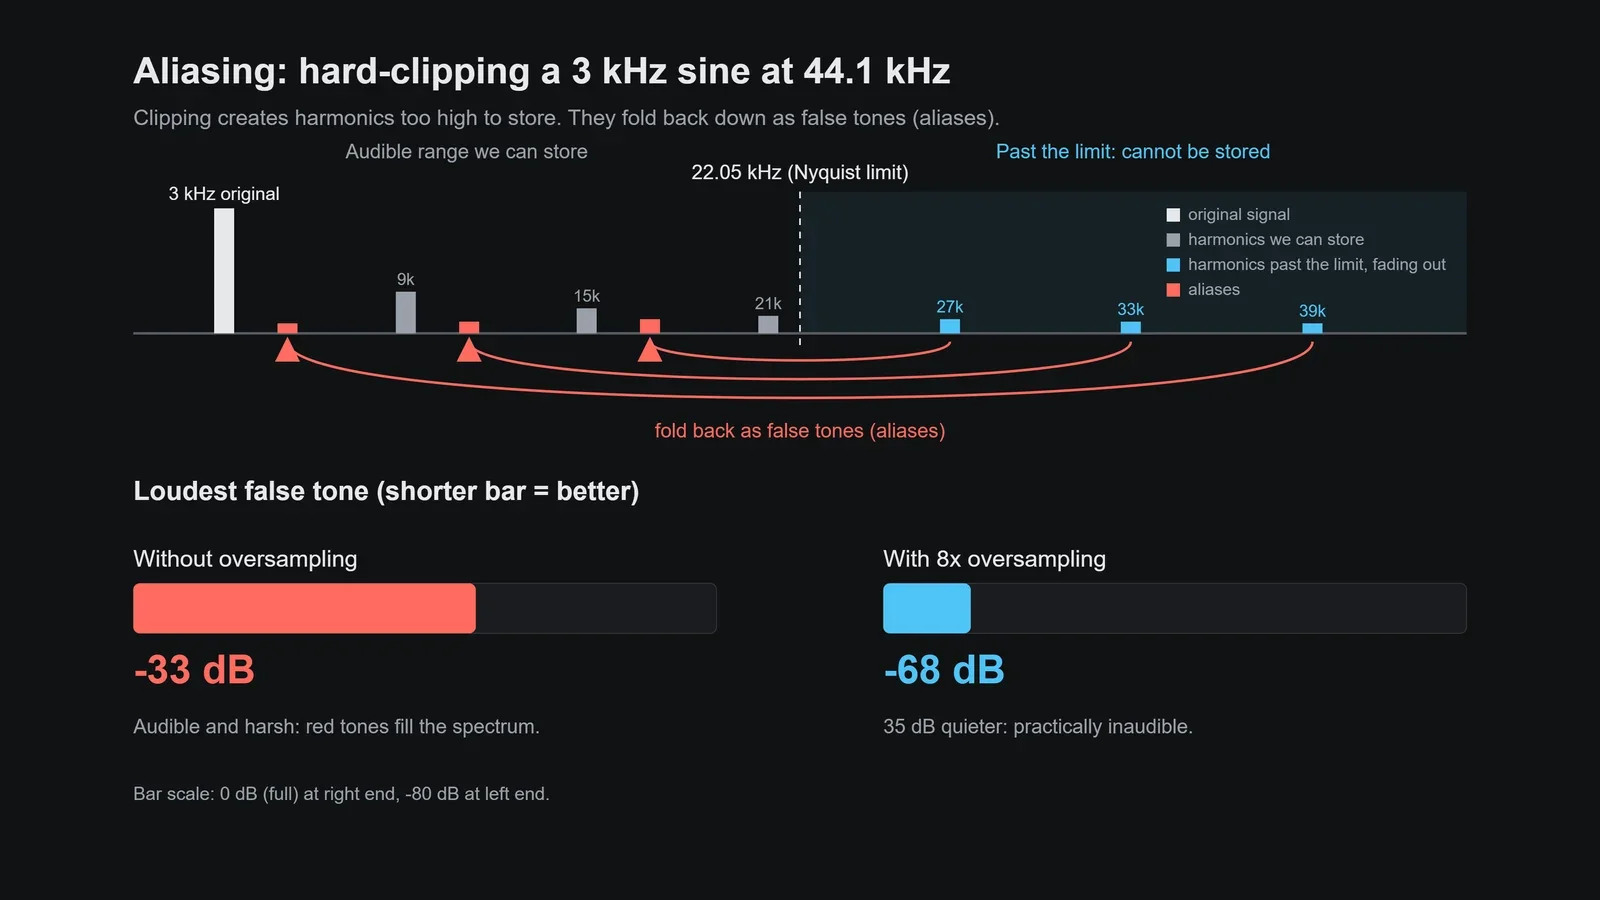
HardStop ticks every box, and it’s free: a Drive + Ceiling hard clipper with a hybrid, performance-optimized anti-aliasing engine (Normal, HQ and Ultra, with Ultra equal to ~40x oversampling at about 1/8 the CPU), a built-in true-peak safety limiter, and a waveform that marks every peak it removes. It runs on Windows and macOS as VST3, AU and AAX. Download HardStop, the free clipping plugin.
Step-by-Step: Setting Up Your Pre-Limiter Clipper
Integrating this technique into your mastering chain requires only a few minutes. Follow these practical steps to calibrate your chain:
- Insert the Clipper Before the Limiter: Place a dedicated hard clipper immediately upstream of your final limiter (e.g., Waves L2) on your master output channel.
- Determine Your Target Reduction: If your limiter was previously executing 4 to 6 dB of gain reduction to reach your desired integrated LUFS, note that target level.
- Shave Peaks With the Clipper: Lower the clipper’s ceiling (or increase input drive with auto-gain enabled) until the clipper shaves off 2 to 4 dB exclusively on drum peaks. In plugins with a delta/listen mode, engage it to confirm you hear only fast transient clicks, not musical program material.
- Engage the Limiter for Final Catching: Set your limiter to provide only 1 to 2 dB of gentle, transparent dynamic control. Because the aggressive spikes have already been removed, the limiter will no longer pump or droop.
- Verify Aliasing Protection: Ensure your clipper runs in high-oversampling or ultra-anti-aliasing mode to prevent inharmonic foldback distortion in the audible frequency spectrum.
A/B Testing the Results: Restoring Space and Impact
Once the chain is aligned, bypass and un-bypass the clipper while monitoring the master at matching playback volumes. When the clipper is bypassed, the limiter is suddenly forced to absorb all unfiltered drum peaks; the snare sinks backwards, the low end turns flabby, and the stereo image feels narrow.
Re-engaging the clipper restores instant clarity. The kick drum punches through with low-end authority, the snare retains its snappy crack, and the master sounds wider and more open. It often sounds as though an equalizer or transient designer was applied, yet it is purely the result of relieving the limiter from destructive over-compression.
Ready to clip before you limit? Grab the free HardStop clipper plugin for Windows and macOS (VST3, AU, AAX) and try this trick on your next master. Get HardStop →
Links to Plugins Shown in the Video
- Raytown Productions – HardStop (free hard clipper + true-peak limiter)
- Waves – L2 Limiter
Some links above are affiliate links — using them supports the channel at no extra cost to you.
Key takeaways
- Limiters compromise drum punch because lookahead detection and release envelopes suppress audio volume around fast transients.
- Hard clippers truncate peaks instantaneously with zero attack time, zero lookahead, and zero decay envelope.
- Placing a hard clipper before your limiter allows you to trim 2-4 dB of spiky transients, letting the limiter operate transparently with minimal gain reduction.
- The brief odd-order harmonic bursts generated by clipping drum hits reinforce transient punch rather than sounding like harsh distortion.
- Always gain-match your limiter auditions to ensure you are assessing dynamics and transient integrity rather than being fooled by raw loudness.
Frequently asked questions
What is the best free clipping plugin?
For mastering, look for a free clipping plugin that does true hard clipping with anti-aliasing and true-peak safety.
Why does a clipper make drums sound punchier than a limiter?
A limiter uses lookahead buffers and decay release envelopes that suppress audio volume before and after a drum hit, rounding off the transient and dulling the impact. A hard clipper acts instantaneously with zero lookahead and zero release, removing only the extreme peak and leaving the surrounding punch untouched while adding subtle, transient-reinforcing odd-order harmonics.
Where should the clipper sit in the mastering chain?
The clipper should sit directly before your final brickwall limiter. This allows the clipper to shave off fast, peaky transients so that the downstream limiter only needs to perform 1 to 2 dB of light, transparent dynamic control.
Why not use a soft clipper instead of a hard clipper?
Soft clippers utilize a rounded knee that compresses the waveform before reaching the ceiling. While this sounds warmer on sustained acoustic instruments, it introduces dynamic smoothing similar to a limiter, blunting sharp drum attacks. Hard clipping preserves the exact linear waveform right up to the ceiling cut.
Will hard clipping my master bus cause audible digital distortion?
Not if it is calibrated correctly. Drum transients typically last only 10 to 20 milliseconds. The human ear does not perceive brief bursts of clipping as ugly distortion; instead, it registers as added energy and presence. Audible distortion only occurs if you clip into sustained elements like vocals, bass, or keyboards.
Can I use a clipper alone without a limiter?
Yes, provided your clipper includes a high-quality True Peak limiter module or oversampled anti-aliasing to catch inter-sample peaks before exporting for digital distribution.
Grab All My Favorite FREE Plugins!
Want to see the whole walkthrough? Watch the full video on YouTube.