










Compression 101: How to Set a Compressor (Threshold, Ratio, Attack & Release Explained)
Quick summary
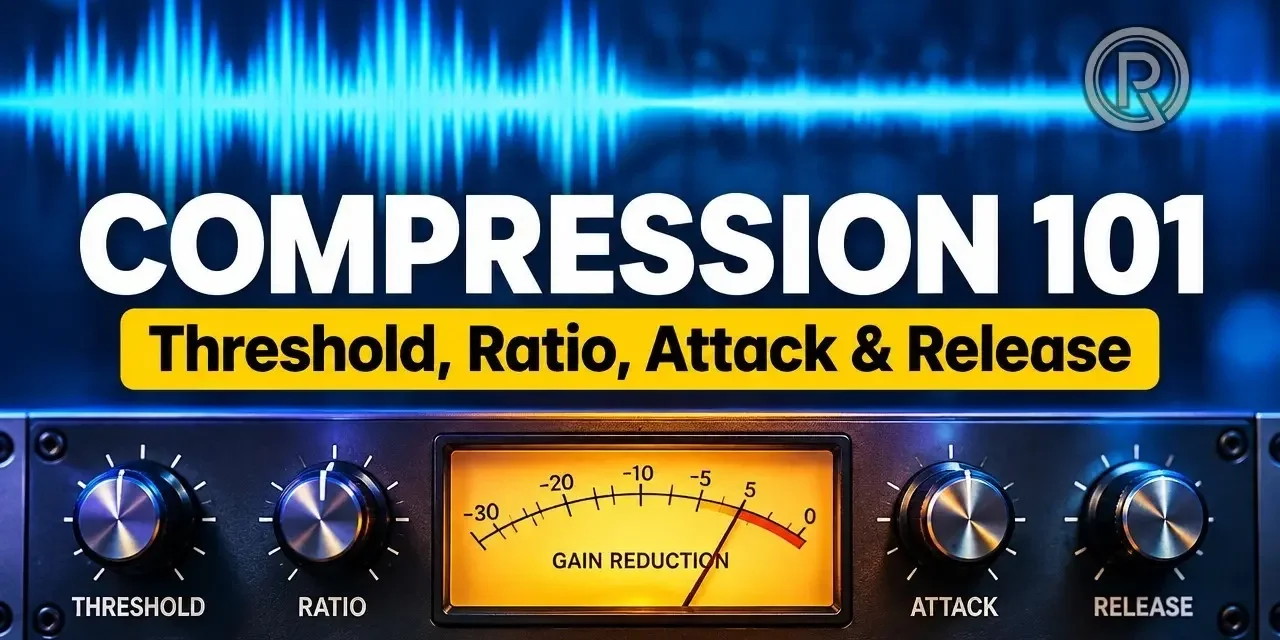
A compressor turns down any audio that rises above a level you set (the threshold) by an amount you choose (the ratio). Attack and release control how fast it reacts and recovers. This guide explains every control with diagrams, gives you starting settings for vocals, drums, bass and the mix bus, and shows the exaggerated-settings method I use to actually hear what a compressor is doing.
Updated : completely rewritten and expanded with new diagrams, a starting-settings cheat sheet, FAQs, and my video walkthrough. Originally published January 1, 2018.
What’s In This Article
- What a Compressor Actually Does
- Threshold and Ratio: When and How Hard
- Attack and Release: The Controls That Shape the Sound
- Knee, Make-Up Gain and the Gain Reduction Meter
- How to Dial In a Compressor So You Can Hear It
- Compressor Starting Settings Cheat Sheet
- Compressor Types and Why They Sound Different
- Common Compression Mistakes
Key moments in the video
- 0:42: Download my free Compression 101 eBook
- 1:04: The sound of a simple digital compressor plugin
- 3:46: How to dial in a compressor plugin
- 5:10: How to best set a compressor release
- 6:29: How to set the threshold
- 7:08: How to set the ratio
- 9:50: Going too far with compression
- 14:42: Digital vs. VCA vs. Vari-Mu compressors on a mix
- 18:47: Summary and key points
Enjoying the Video?
Get more home-studio tutorials, mixing breakdowns, and gear deep-dives every week.
There is a ton of information out there about using compressors to make music loud and punchy, but very little about how a compressor works or what to listen for when you set one. Without that, it’s easy to squash the life out of a performance and end up with a mix that’s flat and one-dimensional. I’ve been mixing and mastering music for over twenty years, and compression is the tool I see home-studio producers struggle with most. Here’s how every control works, in plain language, and a method that lets you hear exactly what your compressor is doing.
What a Compressor Actually Does
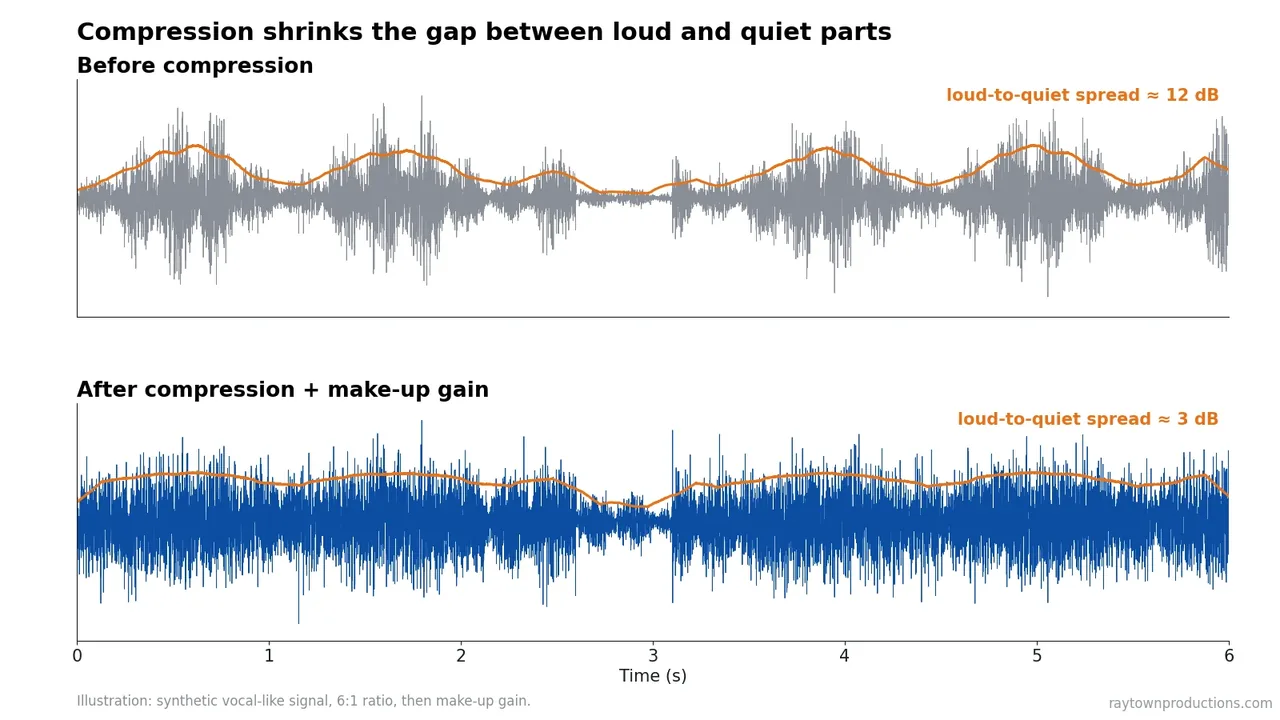
A compressor is an automatic volume control that changes the dynamic range of audio: the difference between the loudest and softest parts of a signal. Most of the time we use it to reduce dynamic range so a performance feels more consistent. For example, it can bring the loudest lines of a vocal closer to the quietest ones so every word is heard. With the right settings it can also emphasize punch, which we’ll get to with attack time.
My favorite way to picture it: imagine a person whose only job is to watch a meter and pull the fader down whenever the audio gets louder than a certain level, then push it back up when it drops below that level. That’s all a compressor is. Every control on it just changes how that person behaves.
Threshold and Ratio: When and How Hard
The threshold is the level where the compressor starts working. Anything below it passes through untouched; anything above it gets turned down. Lower the threshold and more of the signal gets compressed.
The ratio decides how much the signal above the threshold is turned down. Read it as “dB in : dB out.” At 2:1, a signal that goes 2 dB over the threshold comes out only 1 dB over. At 4:1, 4 dB over becomes 1 dB over, and 8 dB over becomes 2 dB over (6 dB of gain reduction). A 1:1 ratio means no compression at all, and at very high ratios (10:1 and up, or “∞:1”) the compressor behaves like a limiter. Most musical compression lives somewhere between 2:1 and 10:1.
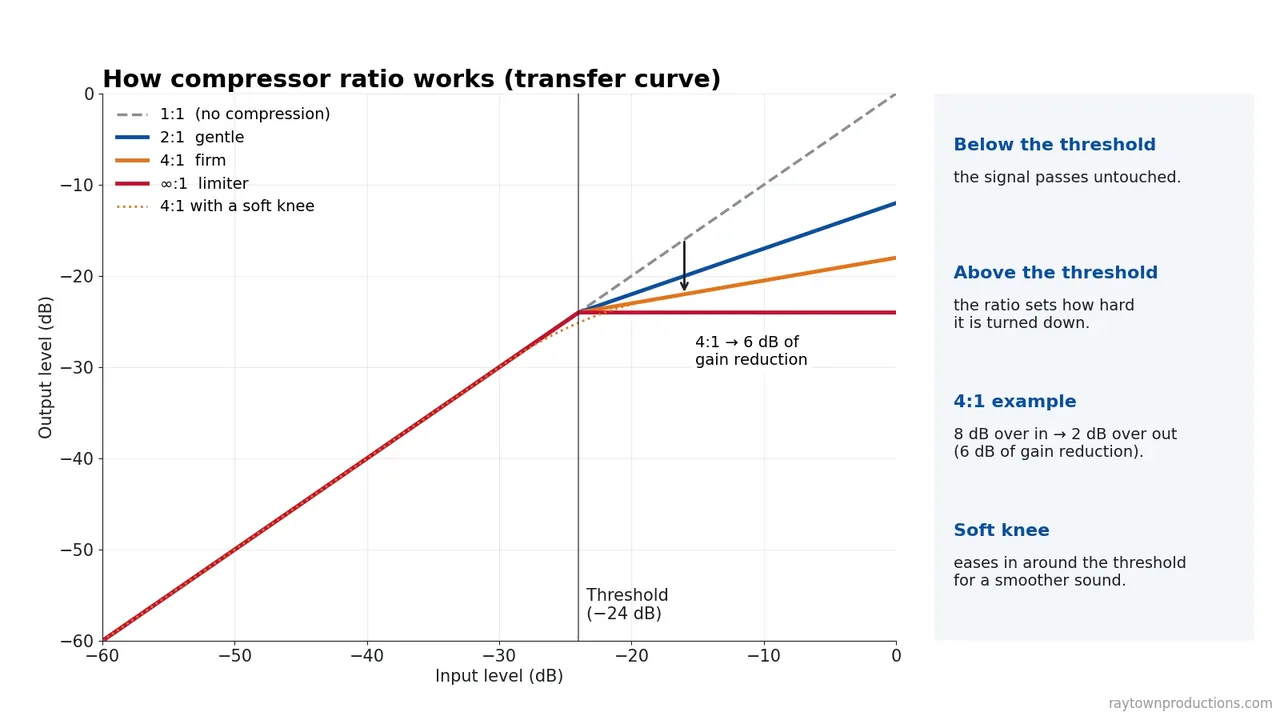
Threshold and ratio work together. A low threshold with a gentle 2:1 ratio can sound smooth and glue-like, while a high threshold with an 8:1 ratio only grabs the biggest peaks. Watch the gain reduction meter, not just the knob positions.
Attack and Release: The Controls That Shape the Sound
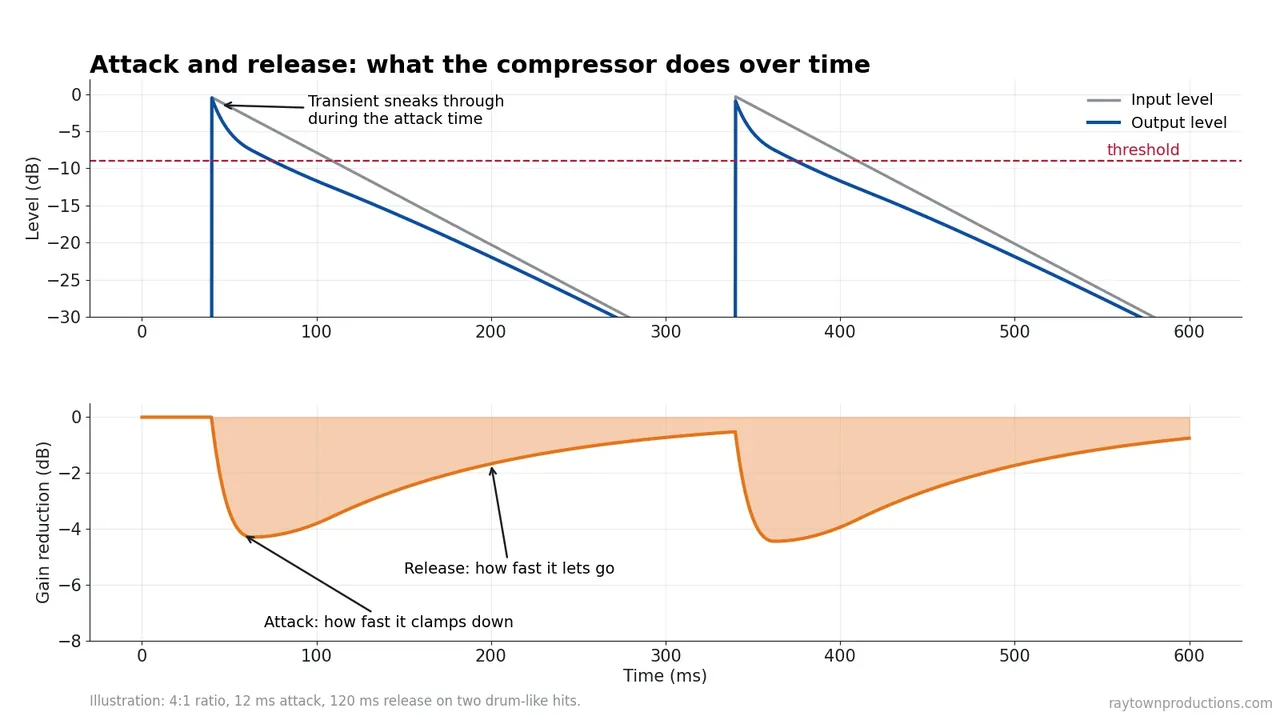
Threshold and ratio decide how much. Attack and release decide how fast, and they’re where most of a compressor’s character comes from.
Attack is how long the compressor takes to clamp down once the signal crosses the threshold. A slow attack lets the very first part of the sound, the transient, sneak through before the gain comes down. That’s why a slower attack (roughly 20–250 ms) can make drums and bass hit harder. A fast attack (roughly 0.1–20 ms) catches the transient, smooths out spikes, and gives tighter level control, but too fast and you’ll dull the punch.
Release is how long it takes to return to normal once the signal falls back below the threshold. A fast release recovers quickly and keeps things sounding close and energetic. A slow release (roughly 200–1000 ms) holds the gain down longer, which can make a track breathe or “pump” with the groove. That’s great on a dance mix or a drum bus, not so great on a delicate acoustic guitar. On the mix bus, a moderate release that moves with the tempo is what gives that “glued together” feel.
Knee, Make-Up Gain and the Gain Reduction Meter
- Knee: how gradually compression starts around the threshold. A hard knee kicks in right at the threshold, which sounds obvious and controlled. A soft knee eases in as the signal approaches the threshold, which sounds smoother and more natural, great for vocals and mix-bus glue.
- Make-up gain (output): compression lowers the overall level, so make-up gain turns the result back up. Level-match it to the bypassed signal; otherwise louder will always sound “better” and fool you.
- Gain reduction meter: shows how many dB the compressor is turning the signal down right now. It’s your best friend for setting the threshold. Watch it on the loudest parts of the song.
How to Dial In a Compressor So You Can Hear It
Charts and presets give you a starting point, but the fastest way to learn compression is to exaggerate it until it’s obvious, then back off. This is the method I’ve used for years and walk through in the video above:
- Go extreme: set the fastest attack, the fastest release, and the highest ratio.
- Push it hard: lower the threshold (or raise the input) until you see roughly 16–24 dB of gain reduction. Now the compression is impossible to miss.
- Find the groove with release: slowly lengthen the release and listen to the track start to pump. Set it so the pumping breathes with the rhythm of the song.
- Shape the punch with attack: lengthen the attack to let more of the transient through for punch, or shorten it for tighter control.
- Set the amount: bring the threshold back up and lower the ratio until the compression gels into the mix instead of sticking out.
- Level-match and A/B: use make-up gain so bypassed and active are equally loud, then compare.
If you can’t hear any difference with the compressor on and off at matched loudness, you probably don’t need it on that track. Compression should solve a problem or add a feeling, not just be there by habit.
Want to go deeper on the listening side? My ultimate guide to hearing and dialing in compressor plugins walks through this on synths, drums and a full mix.
Compressor Starting Settings Cheat Sheet
These are starting points, not rules. Every source, performer and compressor reacts differently, so use them to get in the ballpark and then trust your ears.
| Source | Ratio | Attack | Release | Gain reduction | Goal |
|---|---|---|---|---|---|
| Lead vocal | 3:1–4:1 | 5–15 ms | 40–100 ms | 3–6 dB | Consistent, upfront |
| Aggressive rap/pop vocal | 4:1–8:1 (or two in series) | 1–10 ms | 30–60 ms | 6–12 dB | Dead-steady, in your face |
| Kick drum | 4:1 | 20–40 ms | 50–100 ms | 3–6 dB | Keep the click, add punch |
| Snare | 4:1–6:1 | 10–30 ms | 60–150 ms | 4–8 dB | Snap and body |
| Bass guitar / 808 | 3:1–6:1 | 10–30 ms | 60–150 ms | 3–8 dB | Even, solid low end |
| Drum bus | 2:1–4:1 | 10–30 ms | Auto / timed to tempo | 2–4 dB | Glue and energy |
| Mix bus | 1.5:1–2:1 | 10–30 ms | Auto / 100–300 ms | 1–2 dB | Cohesion, not loudness |
Want all of this in one printable reference? Grab my free Compression 101 eBook. It covers these settings plus the listening exercises.
Compressor Types and Why They Sound Different
Two compressors with identical settings can sound completely different because of how they detect level and apply gain. In the video I compare a clean digital compressor against VCA and Vari-Mu styles on a full mix. Here’s the quick version:
- Digital / clean: precise and transparent. What you set is what you get.
- VCA (SSL-bus style): fast and punchy; the classic choice for drum-bus and mix-bus “glue.”
- FET (1176 style): very fast and aggressive with added color; a go-to for in-your-face vocals, drums and bass.
- Optical (LA-2A style): smooth, program-dependent and forgiving; great for vocals and bass.
- Vari-Mu (tube): gentle, warm and thick; loved on the mix bus and in mastering.
Common Compression Mistakes
- Judging by loudness: without level-matching, the louder version always seems better.
- Attack too fast on everything: it kills the transients that make drums, bass and vocal consonants feel alive.
- Release fighting the groove: pumping that doesn’t line up with the tempo sounds accidental.
- Compressing in solo only: set it in solo if you need to, but always finish in the context of the full mix.
- Using one compressor for everything: two gentle compressors in series often sound more natural than one working very hard.
Once you’re comfortable with the basics, explore upward compression, learn how to get loud without pumping, and see why a clipper before your limiter can sound better. Then put it all to work on vocals with my guide to in-your-face rap vocals.
Compressors, Plugins and Freebies Mentioned
- My FREE Compression 101 eBook
- Waves CLA-76 (1176-style FET compressor)
- Waves SSL G-Master Buss Compressor (VCA glue)
- Waves L1 Limiter
- HardStop: my clean, anti-aliased clipper
Some of these are affiliate links. If you buy through them, Raytown Productions may earn a small commission at no extra cost to you. It helps keep these tutorials free.

Grab My FREE Compression 101 Guide!
Key takeaways
- Threshold sets when compression starts; ratio sets how hard it turns the signal down (4:1 turns 8 dB over into 2 dB over).
- Attack decides how much transient punch gets through; release decides how the compressor breathes with the groove.
- Use make-up gain to level-match before judging. Louder always fools your ears.
- To learn to hear compression, exaggerate it (fast attack/release, high ratio, 16–24 dB of reduction), dial in release and attack, then back it off.
- Settings charts are starting points; the right settings depend on the source and the song.
Frequently asked questions
What is the best compressor ratio for vocals?
Start around 3:1 to 4:1 and lower the threshold until you see about 3–6 dB of gain reduction on the loudest words. Go higher (6:1 or more, or a second compressor) for aggressive pop and rap vocals that need to sit dead steady in front of a busy mix.
Should the attack be fast or slow?
Use a slower attack (roughly 20 ms and up) when you want to keep the punch of a drum hit, bass note or consonant, and a fast attack (under about 10 ms) when you need to catch peaks and control level. If a sound loses its snap when the compressor is on, the attack is too fast.
How much gain reduction is too much?
There’s no fixed number. A few dB is typical for gentle control, while some aggressive vocals and drum buses sound great with 10 dB or more. It’s too much when the sound gets dull, flat, or audibly pumps when you don’t want it to. Always compare bypassed and active at the same loudness.
What does make-up gain do?
Compression turns the loud parts down, so the overall level drops. Make-up gain turns the whole signal back up afterwards. Match the bypassed and compressed loudness so you judge the compression, not the volume change.
Is a limiter the same as a compressor?
A limiter is a compressor with a very high (effectively infinite) ratio and a fast attack, designed to stop peaks from going past a ceiling. A clipper goes further and chops the peaks off instantly.
Want a Mix That Hits Like a Record?
I mix and master songs for independent artists and producers every week. Send me your tracks and I’ll make them punchy, loud and release-ready. Or learn the whole process yourself in my courses.









Trackbacks/Pingbacks