










Rap Vocal Chain: The Plugin Order I Use and Why (With Starting Settings)

Quick summary
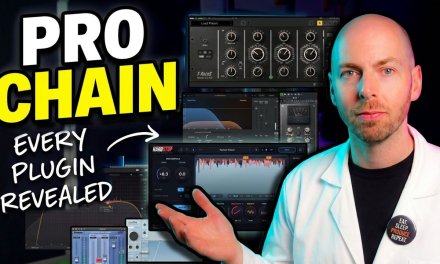
A rap vocal chain works best in this order: cleanup EQ, a multiband compressor to control mud and add air, a fast 1176-style compressor with a fast release, a de-esser, a thickener or saturation, a tone EQ to clean up what the thickener added, and a limiter or clean clipper to hold the vocal steady. Reverb, delay and modulation go on sends, not in the chain. The order matters because each plugin reacts to whatever the plugin before it sends out. Below I explain why each processor sits where it does, with a chain diagram, a table of starting settings and the video where I build this chain on a real song.
Updated : completely rewritten and expanded with the reasoning behind the plugin order, a chain diagram, two new illustrations, a table of starting settings, the effects sends I promised as a follow-up, and FAQs. Originally published June 18, 2018.
What’s In This Article
- What Is the Best Plugin Order for a Rap Vocal Chain?
- What Should the Vocal Sound Like Before the Chain?
- Why Does Cleanup EQ Go First?
- How Do You Use a Multiband Compressor for Air and Mud?
- What Compressor Settings Make Rap Vocals In-Your-Face?
- Where Does the De-Esser Go in a Vocal Chain?
- How Do You Thicken a Rap Vocal?
- Why Put a Limiter or Clipper Last?
- Rap Vocal Chain Starting Settings
- Where Do Reverb and Delay Go?
- When Should You Change the Order?
Enjoying the Video?
Get more home-studio tutorials, mixing breakdowns, and gear deep-dives every week.
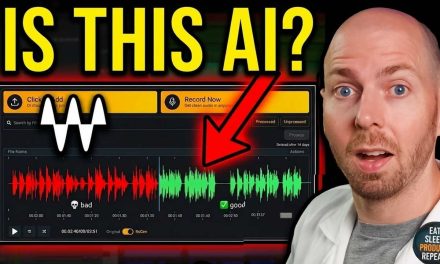
A lot of people have asked me how I mix rap vocals and what the secret is to my rap vocal chain. In the video above I show every plugin I used on a pop-rap song, “Girls of Summer” by Sydnee B., and why each one is there, to get an airy, thick vocal that holds its own in a big pop production.
Your results may vary, but nine times out of ten this chain works wonders. The video is a quick overview. This article goes deeper into the part that matters most: the order of the plugins and the reason for it. Once you understand the order, you can rebuild the chain with any plugins you own.
What Is the Best Plugin Order for a Rap Vocal Chain?
Here’s the order I start with. Inserts run in series, so every plugin hears the output of the one before it. Effects run in parallel on sends.
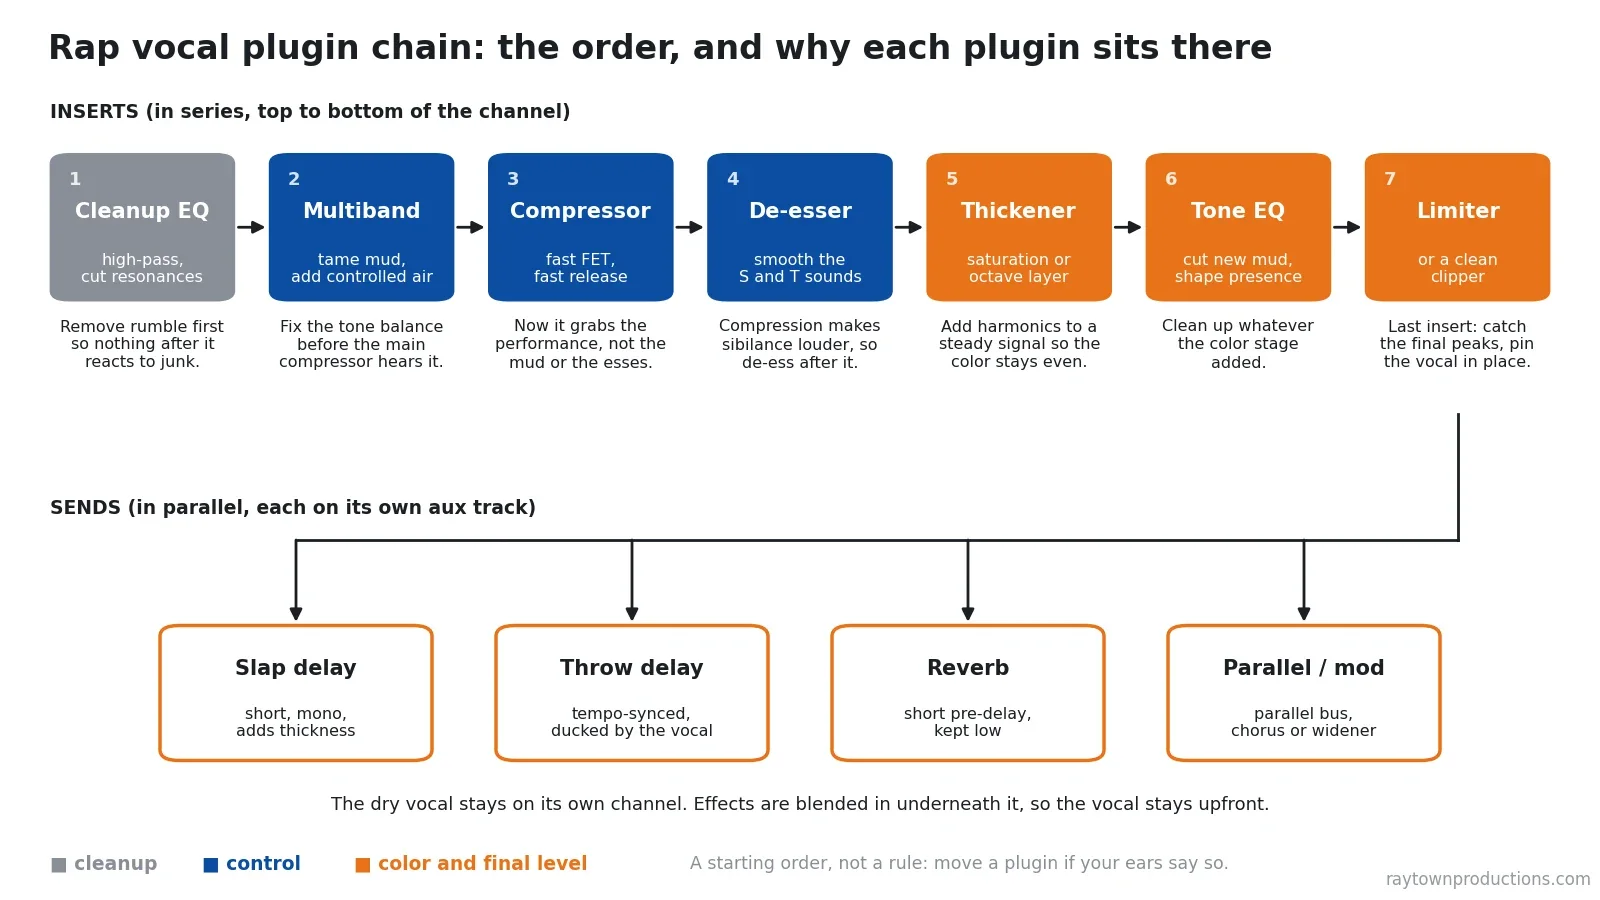
- Cleanup EQ: remove rumble and obvious problems.
- Multiband compressor: control the mud and add air that stays smooth.
- Main compressor: a fast, 1176-style compressor for aggression and consistency.
- De-esser: tame the S and T sounds the compressor just made louder.
- Thickener: saturation or a pitch-shifted layer for body.
- Tone EQ: cut any mud the thickener added and set the final tone.
- Limiter or clipper: catch the last peaks so every word lands at the same level.
The logic is simple: fix, then control, then color, then lock it in. A compressor can’t tell the difference between a loud word and a loud thump of low end. It just reacts to level. So anything you don’t want it to react to has to be dealt with earlier in the chain.
What Should the Vocal Sound Like Before the Chain?
At the start of the video I play the vocal with no processing so you can hear what a professionally tracked rap vocal sounds like as recorded. It’s a good starting point, but next to the mixed version it sounds bright, brittle and thin. Drop it into the beat untouched and the music overtakes it. It doesn’t sound like a big modern production.
After the chain, the same vocal is thicker, has a bigger space around it and is far more consistent from word to word. That’s the whole job of a vocal chain: thickness, space and consistency.
The chain can’t rescue a bad recording. Every stage here adds gain somewhere, so room echo, noise and clipping all get louder. If your raw vocal has those problems, start with my six secrets for in-your-face rap vocals, which covers the mic, the room and the recording side.
Why Does Cleanup EQ Go First?
Rappers work close to the mic, and that brings low-end thumps, plosives and rumble with it. If that energy reaches a compressor, the compressor turns the whole vocal down every time a plosive hits, and you hear the words duck for no obvious reason.
So the first plugin is a plain EQ doing boring work: a high-pass filter (around 80 Hz is a common starting point; go higher on a thin voice and lower on a deep one) and a narrow cut on any ringing frequency you can clearly hear. No boosts yet. Boosting before compression just makes the compressor work harder on the thing you boosted.
The vocal in the video was tracked well, so there the multiband compressor is the first plugin and its two lowest bands handle the low-frequency buildup. On most home recordings I’d still put a simple high-pass in front of it.
How Do You Use a Multiband Compressor for Air and Mud?
Almost all of my hip-hop and rap vocals start with a multiband compressor. In the video it’s the Waves C6. I use it to change the balance between the low-frequency and high-frequency content of the voice: more air and presence on top, less muddy buildup underneath.
The trick is on the top bands. I boost the high end by a lot (in the video, about 12 dB on one band and almost 6 dB on another, from roughly 4 kHz up). On its own that’s far too bright. Then I lower the threshold on those same bands and compress them heavily. The loud peaks that cross the threshold get knocked back down, and the quiet detail keeps the boost.
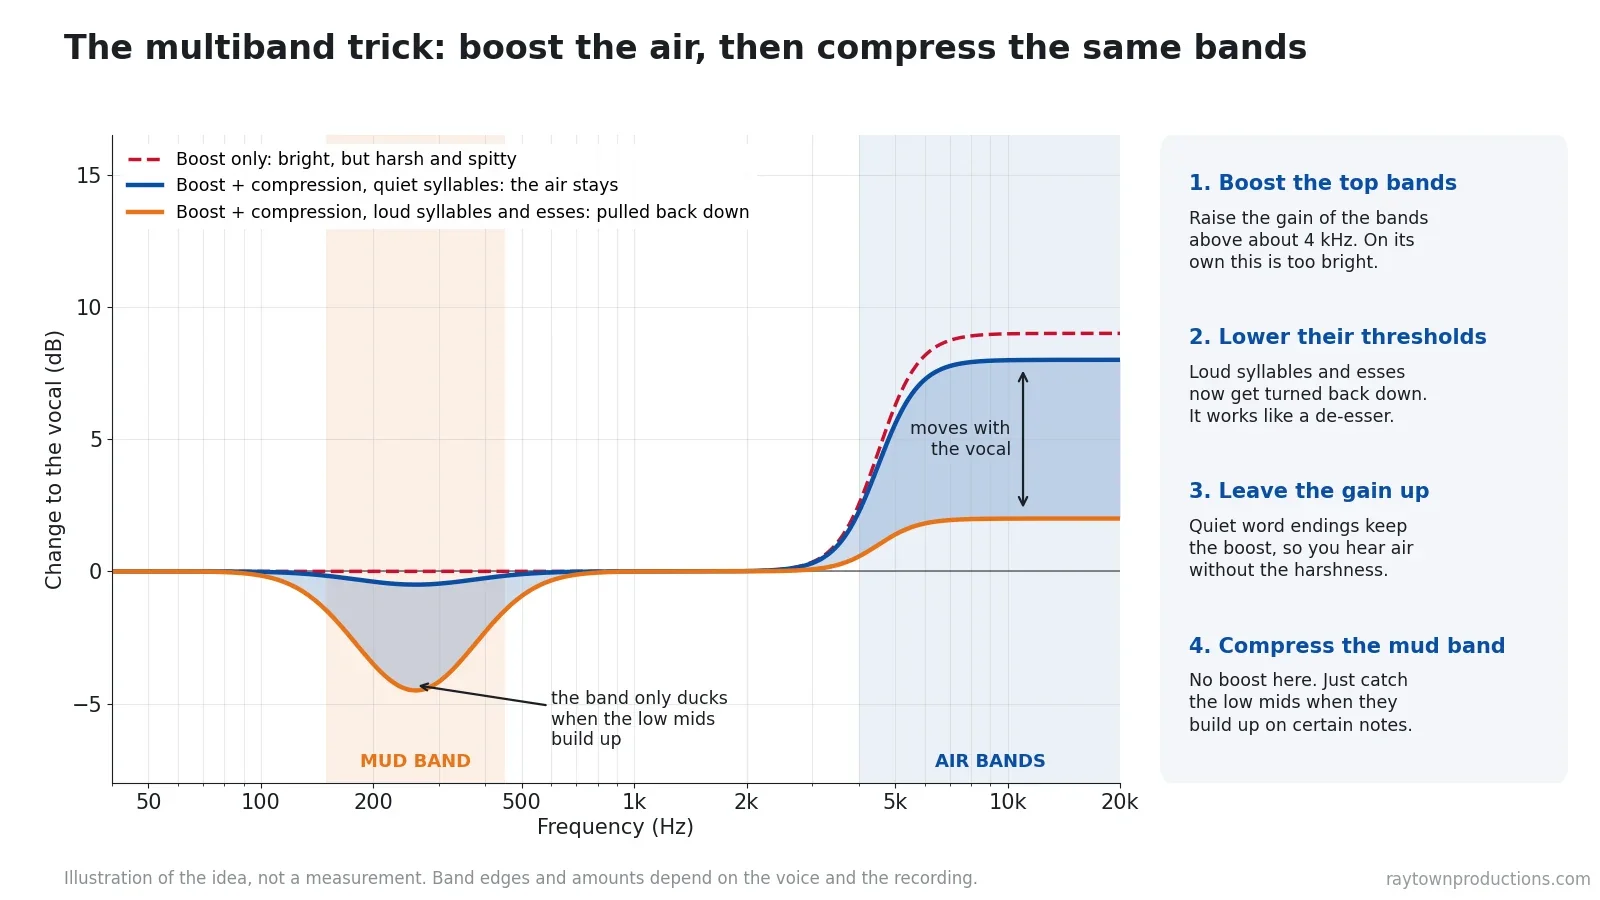
The result is a bright top end with a smooth polish, the sound you hear on a lot of modern vocal productions. It behaves like an EQ boost and a de-esser working together. The two lower bands do the opposite job with no boost at all: they scoop out the low-frequency buildup that shows up when the rapper changes pitch or tone.
Why here, before the main compressor? Because the tone balance changes from word to word, and I want that evened out before the next plugin measures the level. If you’re not sure which tool to reach for, I compare them in dynamic EQ vs. multiband compressor. Either one can do this job.
What Compressor Settings Make Rap Vocals In-Your-Face?
After the multiband I compress the vocal again, this time for attitude. I use the Waves CLA-76, an 1176-style compressor, because it makes a vocal sound aggressive in a way few others do. The settings from the video:
- Ratio: 4:1.
- Attack: very fast, but dialed back just a little so the transients get through. Those transients are the speed and bite of the delivery.
- Release: as fast as it goes.
- Gain reduction: about 3 to 5 dB on this song.
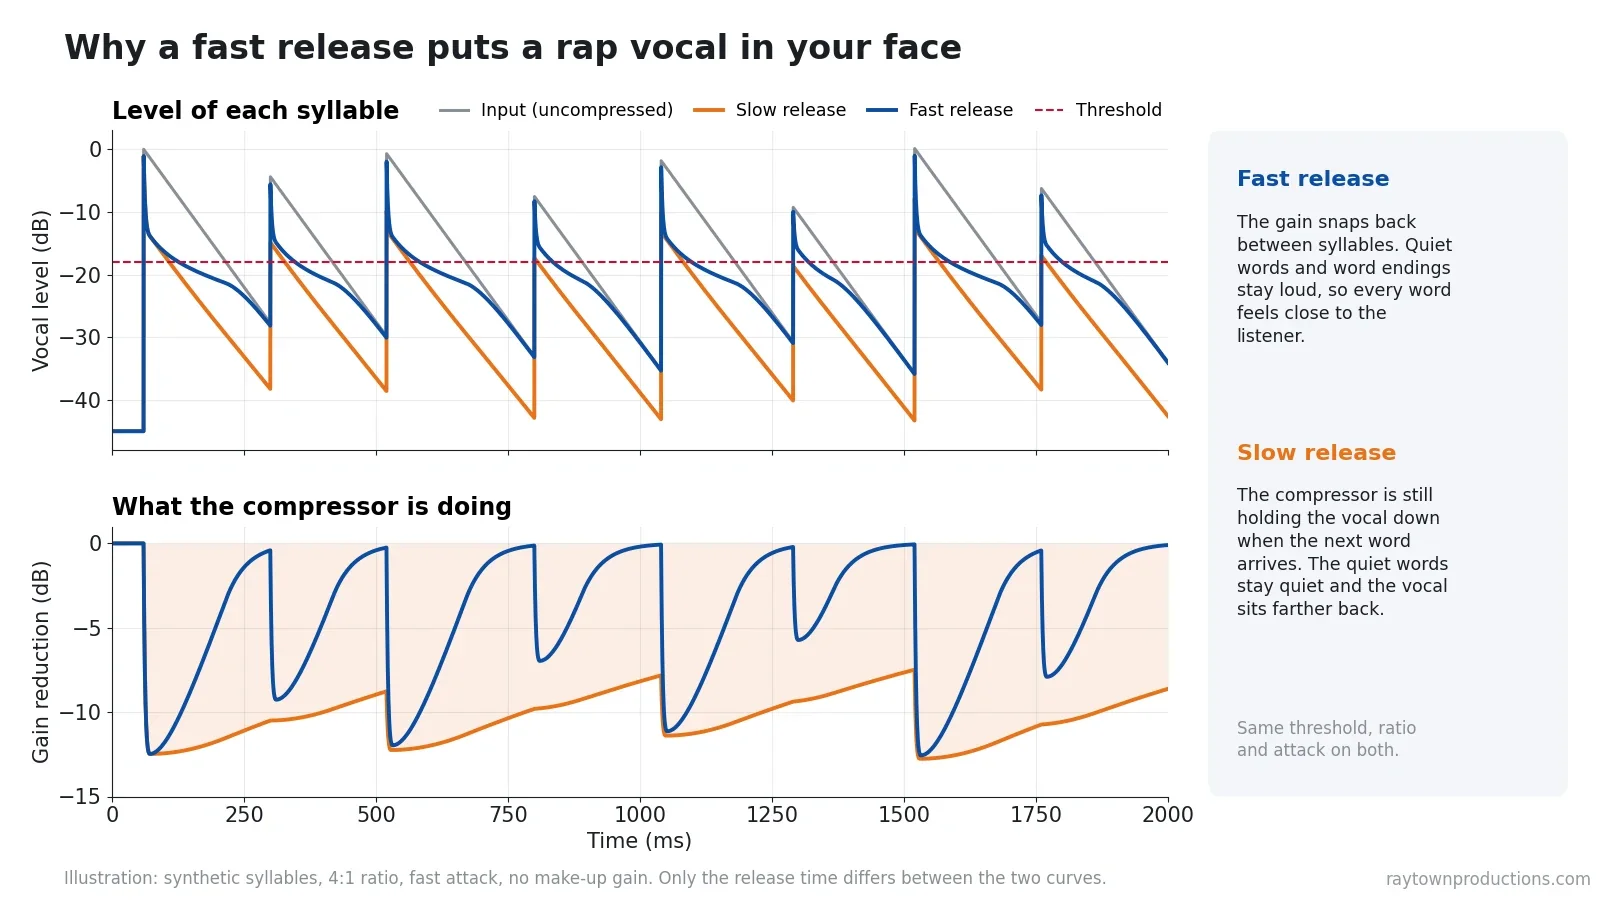
The release is the setting that matters most for rap. With a fast release, the compressor lets go between syllables, so the quiet words and the ends of words come back up to full level. Every word feels close to the listener. With a slow release, the compressor is still holding the vocal down when the next word arrives, and the vocal sounds pushed farther back in the mix.
1176-style knobs run backwards. On the CLA-76 the attack and release knobs go from 1 (slowest) to 7 (fastest). So “release as fast as possible” means the knob is turned all the way up, not down.
How much is too much? It depends on the song. You can go crazy with this and have 20 dB of gain reduction, and it can still sound good. For this particular song I didn’t want the vocal that aggressive, so 3 to 5 dB was enough. If attack, release and ratio are still fuzzy, my Compression 101 guide explains how compressors work.
Where Does the De-Esser Go in a Vocal Chain?
I always put a de-esser after my vocal compressor. Compression raises everything that was quiet, and consonants are part of that. The bright S, T and “ch” sounds are at their loudest right after the compressor, so that’s the place to catch them.
You can watch it work: the gain reduction meter should jump on the consonants and sit still on everything else. Set it so the esses stop poking out, then stop. If the rapper starts to sound like they have a lisp, you’ve gone too far.
Yes, the multiband earlier in the chain is already doing some de-essing. That’s on purpose. Two stages each doing a little sound smoother than one stage doing it all, and the second one only has to deal with what the compressor brought back up.

Learn my TOP Vocal Delay SECRETS!
How Do You Thicken a Rap Vocal?
Once the vocal is controlled, I add body. In the video I use Soundtoys Little AlterBoy, a voice manipulator with pitch, formant, drive and mix controls. I set it to generate an octave voice, which adds another voice to the track. You can also add distortion with the drive and change the formant for a different tone.
Turned all the way up it sounds crazy. The move is to dial the mix back until the extra voice is barely heard. You shouldn’t be able to pick it out, but when you bypass it the vocal gets smaller. It’s perfect for this type of song.
A saturation plugin with a mix knob fits in this same slot and does a similar job with harmonics instead of a second voice. Either way, the color stage goes after compression for a reason: saturation and pitch effects react to level, so feeding them a steady signal gives you the same amount of thickness on every word.
Then comes the second EQ. A thickener adds low-frequency mud, so I sweep for the spot where the vocal now sounds boomy, muddy or resonant and cut it. On this song that was around 288 Hz. Your number will be different, so find it by ear. This is also where I’d set the final presence or brightness, because nothing after this point changes the tone.
Why Put a Limiter or Clipper Last?
The last insert tightens everything up. I use the Waves L1 limiter and lower the threshold just until the whole delivery is consistent. It’s only taking off a few dB, and for much of the performance there’s barely any gain reduction at all.
It doesn’t look like much on the meter, but it brings the performance a little closer to the listener and smooths out the dynamics the earlier stages missed. It goes last because it’s the final safety net: whatever peaks the EQ, compressor and thickener created, this catches them.
A clean clipper works in this slot too. A limiter turns the level down around a peak, while a clipper simply shaves the top off the peak and leaves everything around it alone, so it can sound more aggressive and less squeezed on a hard delivery. I reach for the limiter on vocals myself, but try both and keep the one that keeps the consonants sharper.
Level-match before you judge. Every stage in this chain can make the vocal louder, and louder always sounds better at first. Bypass the chain, match the level by ear, and then decide whether it’s really an improvement.
Rap Vocal Chain Starting Settings
These are starting points, not presets. The numbers marked “video” are what I used on one song with one voice. Every voice and every recording needs something different, so set each stage by ear.
| # | Processor | Starting point | What to listen for |
|---|---|---|---|
| 1 | Cleanup EQ | High-pass around 80 Hz. Narrow cuts only on problems you can hear. No boosts. | Plosives and rumble disappear, and the voice doesn’t get thinner. |
| 2 | Multiband compressor | Top bands (roughly 4 kHz and up): raise the band gain, then lower the threshold until loud syllables get pulled back. Video: about +12 dB and +6 dB. Low bands: no boost, compress only when they build up. | Air without harsh esses. Low mids that stay even from note to note. |
| 3 | Main compressor (1176-style) | 4:1 ratio, fast attack backed off slightly, fastest release. Video: 3 to 5 dB of gain reduction. Aggressive styles can take much more. | The vocal moves forward and every word is audible. The consonants still have bite. |
| 4 | De-esser | Sweep to find the harsh range for that voice. Reduce only until the esses stop jumping out. | The meter moves on S and T sounds only. No lisp. |
| 5 | Thickener | Octave voice or saturation, with the mix low enough that it’s barely heard. | The vocal gets smaller when you bypass it, but you can’t hear the effect itself. |
| 6 | Tone EQ | Cut the mud the thickener added (video: around 288 Hz). Set final presence here if needed. | The boominess goes away and the body stays. |
| 7 | Limiter or clipper | Lower the threshold until only the loudest words are caught, a few dB at most. | A steadier, closer vocal with no audible pumping or distortion. |
| Sends | Delay, reverb, parallel | Tempo-synced delays, a short reverb with some pre-delay, filtered returns, levels kept low. | You notice the effects when you mute them, not while they play. |
Where Do Reverb and Delay Go?
When I first published this I promised a follow-up on the effects: reverb, delay, parallel vocal buses, and chorus and modulation. Here’s how they fit into the chain.
They go on sends, each on its own aux track, fed from the vocal after the insert chain. The dry vocal stays untouched and upfront, and the effects are blended in underneath it. That also means you can EQ, compress and automate each effect without touching the vocal.
- Slap delay: a short, single repeat tucked low. It adds thickness and a sense of space without sounding like an effect.
- Throw delay: a longer, tempo-synced delay for the ends of lines. Duck it with the dry vocal so the repeats only come up in the gaps.
- Reverb: short, with enough pre-delay that the vocal starts before the reverb does. Keep it low. Rap vocals usually want less reverb than you think.
- Parallel bus: a heavily compressed or distorted copy blended under the main vocal for energy on hooks.
- Chorus and modulation: a widener or chorus on a send for hooks, doubles and ad libs. Leave the lead verse mostly dry and centered.
High-pass and low-pass the effect returns so they don’t add mud or fight the consonants. Ducking the delays normally means wiring a compressor with a sidechain on the return.
This is where I use my own plugin, Clarity Delay, on rap and hip-hop vocals. It’s a hybrid delay and reverb with the ducking built in, so there’s no sidechain to wire up, and it’s incredible at keeping a hip-hop vocal up front while still adding depth: the repeats and the space sit behind the words instead of on top of them.
When Should You Change the Order?
This chain is a starting point, and good reasons to change it come up all the time:
- The compressor is pumping on low end: your cleanup isn’t doing enough. Raise the high-pass or cut more before the compressor.
- The de-esser is working too hard: the brightness is coming from a boost earlier in the chain. Back off the boost, or move some of it to the tone EQ after the de-esser.
- The saturation sounds different on every word: it’s seeing an uneven level. Make sure it sits after the compression.
- The vocal is already consistent: skip the limiter. Don’t add a stage because a diagram says so.
You can also break the rules on purpose. Putting an effect before the processing instead of after it changes how it behaves, and I show one example in put reverb first in your vocal chain. It’s a special effect, not an everyday setup, but it proves the point: the order is a tool.
A vocal chain only makes sense in context, so make your final decisions with the beat playing. To see this kind of chain used inside a complete session with the beat and 808s, watch my step-by-step rap song mix.
Is there something you’re struggling with in your vocal chain? Leave a comment below and I’ll help you out.
Plugins and Freebies Mentioned
- Waves CLA-76 (1176-style compressor)
- Waves DeEsser
- SoundToys Little AlterBoy
- Waves L1 Limiter
- Clarity Delay: my vocal delay and reverb plugin
- My FREE guide to the best free mixing and mastering plugins
Some of these are affiliate links. If you buy through them, Raytown Productions may earn a small commission at no extra cost to you. It helps keep these tutorials free.
Key takeaways
- Order: cleanup EQ, multiband, fast compressor, de-esser, thickener, tone EQ, limiter or clipper. Effects go on sends.
- The reason: every plugin reacts to what the one before it sends out, so fix first, then control, then color, then lock it in.
- Multiband trick: boost the air bands, then compress those same bands so the top end is bright but smooth. Use the low bands to catch mud.
- Fast release: on the main compressor, a fast release is what puts a rap vocal in your face. A slow release pushes it back.
- De-ess after compression, and EQ again after any thickener, because both stages create new problems.
- Every number here is a starting point. Set each stage by ear, with the beat playing.
Frequently asked questions
What order should plugins go in a rap vocal chain?
A reliable starting order is cleanup EQ, multiband compressor, a fast main compressor, de-esser, a thickener or saturation, tone EQ, then a limiter or clean clipper. Reverb and delay go on sends, not in the insert chain. Each plugin fixes something that would otherwise confuse the plugin after it. Treat the order as a starting point and move things when your ears tell you to.
Should EQ go before or after compression on rap vocals?
Both, because they do different jobs. Corrective EQ (a high-pass filter and cuts for rumble, mud and resonances) goes before the compressor so the compressor doesn’t react to problems. Tone-shaping EQ goes after the compression and saturation, where it cleans up what those stages added and sets the final brightness.
Where does the de-esser go in a vocal chain?
I put the de-esser right after the main vocal compressor. Compression brings up the quiet parts of a performance, and that includes the S and T sounds, so the sibilance is at its worst right after the compressor. That’s the easiest place to catch it.
Can I build this rap vocal chain with stock plugins?
Yes. The chain is about the type of processor and the order, not the brand. Any DAW’s stock EQ, multiband compressor, compressor, de-esser, saturation and limiter can fill these slots. The plugins I name are the ones I happened to use in the video.
Should reverb and delay go on the vocal track or on sends?
On sends. Putting reverb and delay on their own aux tracks leaves the dry vocal untouched and upfront, lets you EQ and compress the effects separately, and lets several vocal tracks share the same space. The one exception is when you want the effect to be processed with the vocal as a deliberate sound.
Want Your Rap Vocals Mixed for You?
I mix and master rap, hip-hop and pop songs for independent artists. Send me your vocals and beat and I’ll make the vocal sit upfront, thick and consistent. Or learn the whole process yourself in my courses.






Yo I really enjoy your tutorials but I’m seem to be having troubles with my vocals I use a kaotica eyeball and a nt-1000 my vocals always seem too boomy and dull even without the eyeball I need help lol!
Hey Arlanda! Thanks so much for checking out the blog. I have some suggestions for you. It could be a few things:
1) You need a pop filter in front of your microphone. Make sure you have a good quality pop filter at least 3 inches away – this keeps the plosives out of the microphone and reduces the very low end rumble (especially in condenser mics like the nt-1000).
2) You are too close to the microphone and the low end is exaggerated due to proximity effect. nt-1000 mics have a cardioid polarity pattern which has a strong proximity effect. Try backing away a few more inches from your microphone and this will help to reduce the low frequencies that sound more “chesty”.
Try those and let me know if either of those suggestions helped! Cheers!
What he said, and…try Waves Vitamin, or Soothe2 to add that extra bit of excitement, air and clarity. Proper pop and rap vocals have a very open airy top end that cuts through a mix nicely and helps the vocal to stand out.