






Make Better Sounding Records Without Breaking the Bank: A Budget Home Studio Guide
Quick summary
Better sounding records come from accuracy and attention to detail far more than from expensive gear. On a budget, spend first on acoustic treatment (bass traps in the corners, panels at the first reflection points) and on monitoring you can trust. Then put your effort into the source: fresh strings, tuned and properly set-up instruments, and a warmed-up voice. Getting rid of background noise costs nothing. Expensive microphones and preamps come last, because they only pay off once the room, the source and the noise floor are handled.
Updated : completely rewritten and expanded into a budget home-studio guide, with new diagrams, a spending-priority table, a studio headphone table, FAQs and a video. Originally published February 15, 2018.
What’s In This Article
- Where Does Money Actually Improve a Record?
- Why Is Room Treatment the Best First Upgrade?
- Where Do Bass Traps and Acoustic Panels Go?
- Should You Build or Buy Acoustic Panels?
- Can You Mix on Headphones If You Can’t Treat Your Room?
- Why Does the Source Matter More Than the Microphone?
- How Do You Get Rid of Background Noise in Home Recordings?
- What Should You Not Spend Money On Yet?
Key moments in the video
- 0:00: What to focus on as a new producer or home studio mixer
- 0:58: Basic mixing and producing concepts for beginners
- 1:10: Gear
- 2:01: Recording and engineering audio
- 2:26: Capturing good performances
- 3:33: Mixing skills
- 3:54: Song arrangement
- 4:20: Using references to calibrate your mix
- 4:52: Making an emotional connection
- 5:30: Quick recap
Enjoying the Video?
Get more home-studio tutorials, mixing breakdowns, and gear deep-dives every week.
Studio equipment is expensive, and every day some company tells us their product is the thing that will finally make our records sound better. It’s easy to fool yourself into thinking, “If I only had that $1,000 mic preamp…” or “I’d have the perfect vocal sound if I owned a Neumann U 87.” Almost all of those beliefs are false. I’ve been mixing and mastering music for over twenty years, and I promise you: great sounding songs get made on budget microphones and budget recording gear. The trick is paying attention to detail.
This guide covers what needs your attention (and your money) first, before any studio luxury can make a difference. The video above makes the same case for new producers.
Where Does Money Actually Improve a Record?
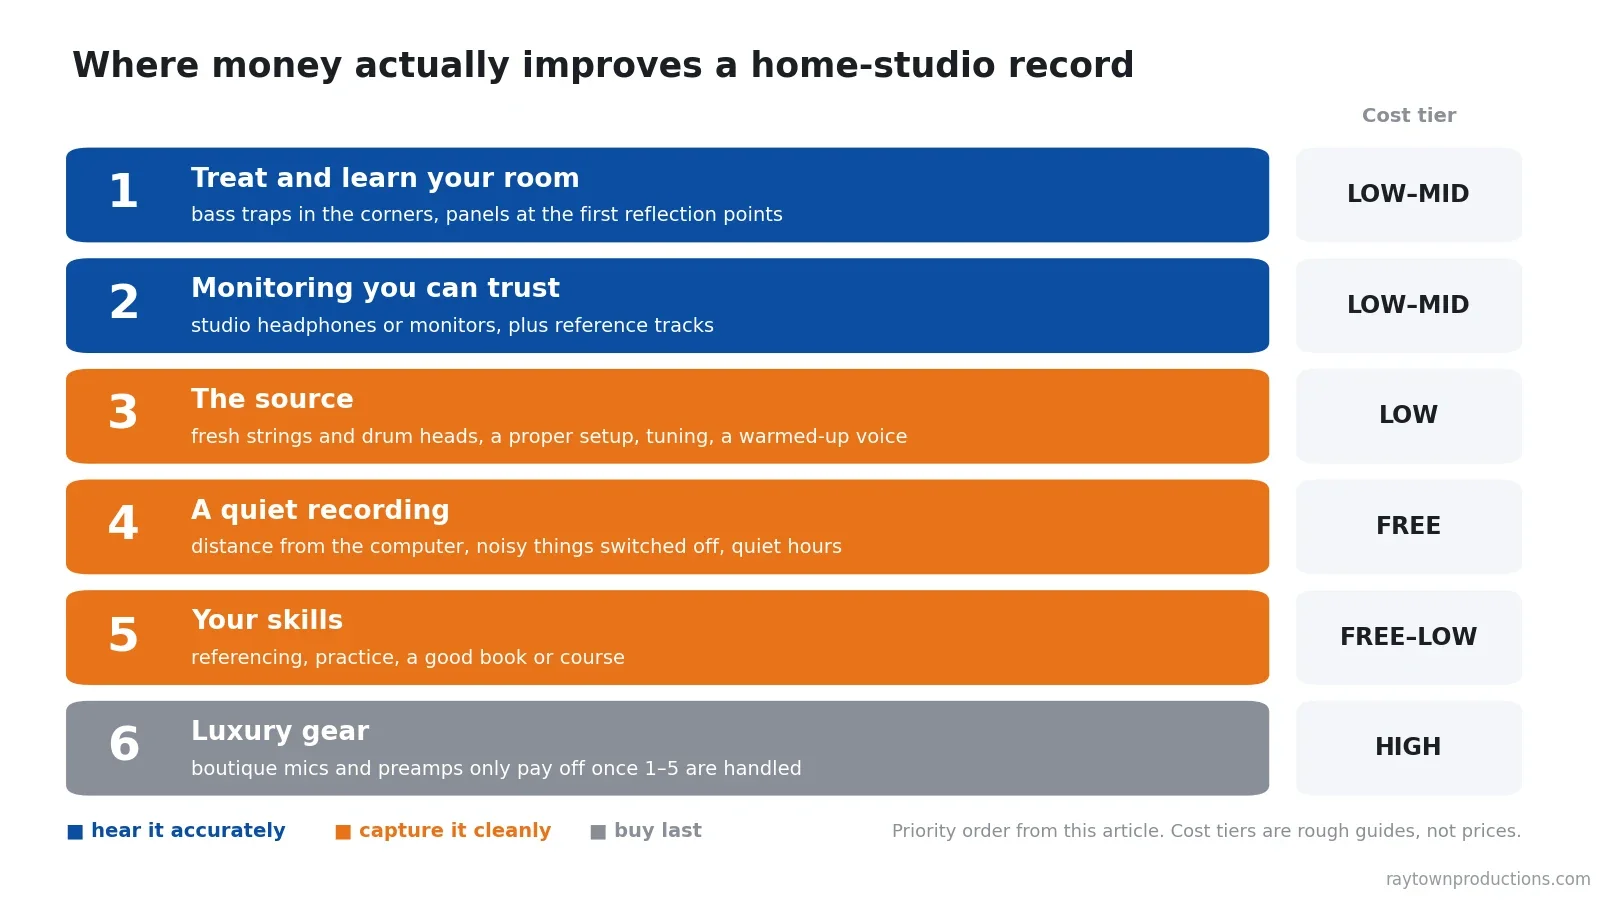
Money improves a record when it removes something that’s getting in the way: a room that lies to you, headphones that flatter everything, dead strings, a computer fan in the vocal mic. It does very little when it only swaps one working piece of gear for a fancier one. That gives a simple order of priorities:
| Priority | What to do | Cost tier | What it improves |
|---|---|---|---|
| 1. Room | Bass traps in the corners, panels at the first reflection points | Low (DIY) to mid (bought) | Recorded tone and every mix decision |
| 2. Monitoring | Studio headphones or monitors, plus reference tracks | Low to mid | How well your mixes translate |
| 3. Source | New strings and drum heads, setup, intonation, tuning, vocal warm-up | Low | The raw tone and the performance |
| 4. Noise | Distance from the computer, noisy things off, quiet hours | Free | Clean tracks that survive compression |
| 5. Skills | Referencing, practice, a good book or course | Free to low | Every record you make from now on |
| 6. Luxury gear | Boutique microphones and preamps | High | Fine detail, once 1–5 are done |
Why Is Room Treatment the Best First Upgrade?
Room treatment is paramount. If you want better sounding records, treating your room is number one, because every decision you make is affected by your room’s acoustics. The geometry of the room and the materials it’s made of change the sound inside it.
You can prove it in two minutes. Play bass-heavy music (or a low sine wave from a tone generator) in your recording space and walk around. In the corners the bass will be much louder. In some spots almost all of it will be gone. That’s completely normal, and it’s physics: sound waves bounce between the walls and either pile up or cancel each other out. These standing waves are called room modes, and their frequencies depend on the room’s dimensions. As a calculated example, a 12-foot dimension has its first two modes at roughly 47 Hz and 94 Hz.
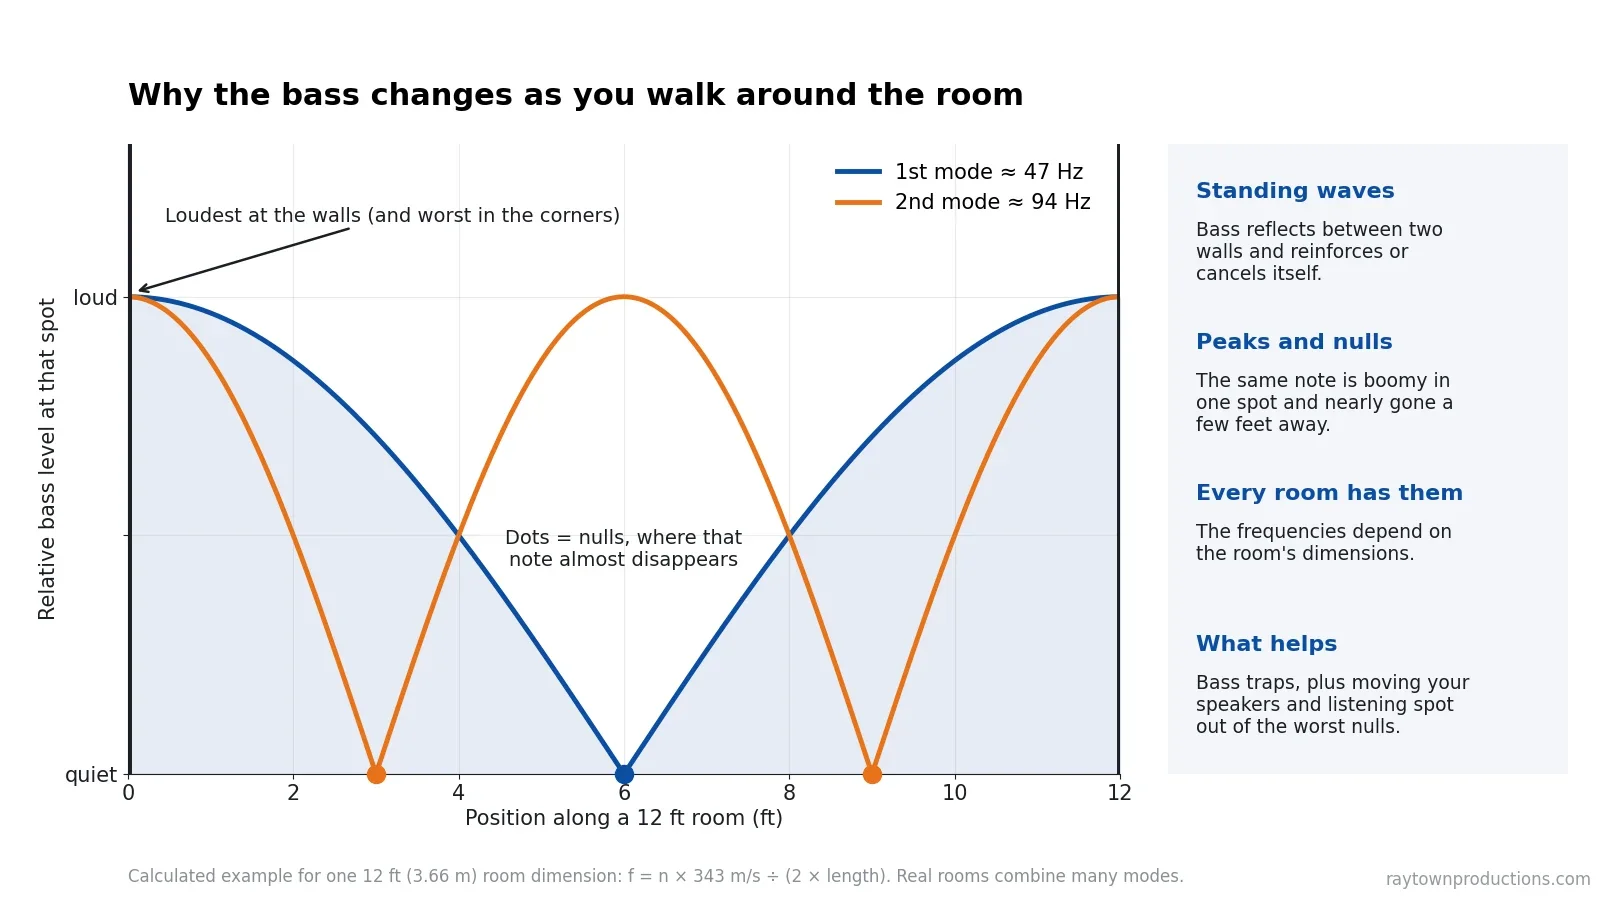
The effect is not subtle. When I tested my own studio before it was treated, I saw dips as deep as 30 dB at some frequencies. That dramatically affected my mixing: I couldn’t hear those frequencies properly, so I over-emphasized them. Then I’d play the mix on another system or in my car and it didn’t translate at all. If your mixes sound very different outside your studio, the room is the first suspect.
Acoustic treatment absorbs those reflections so they can’t cancel as strongly, which makes your speakers sound flatter and more accurate. I can’t emphasize this enough: it is the single most important thing you can do to your studio. In the original version of this article I said that putting $400 toward acoustic treatment gives you more value than any other major purchase, and the idea still holds. A few hundred dollars of treatment makes the room sound better for recording instruments and vocals and makes your speakers accurate enough to trust. (The one exception: if your computer is a relic from the early 2000s, fix that first.)
Learn your room by measuring it. Room EQ Wizard (REW) is free software, and paired with a measurement microphone it shows you exactly where your peaks and dips are, before and after you add treatment. Treat first, then consider correction software: here’s my start-to-finish test of Sonarworks room correction.
Where Do Bass Traps and Acoustic Panels Go?
Start with bass traps in the corners. That’s the most effective spot, because bass builds up there. Low frequencies need large, dense material to absorb them, so 4- or 6-inch thick panels across the corners are a great, cost-effective option. Even a roll of carpet stood in a corner is better than nothing.
Next, treat the first reflection points. A first reflection is the path where sound leaves a speaker, bounces off one surface (a wall or the ceiling) and reaches your ears. You can find these spots with a mirror: sit in your mixing or recording position and have a friend slide a mirror along the wall. Wherever you can see a speaker in the mirror is a first reflection point. Put a panel there. Don’t forget the reflection points on the ceiling and the rear wall.
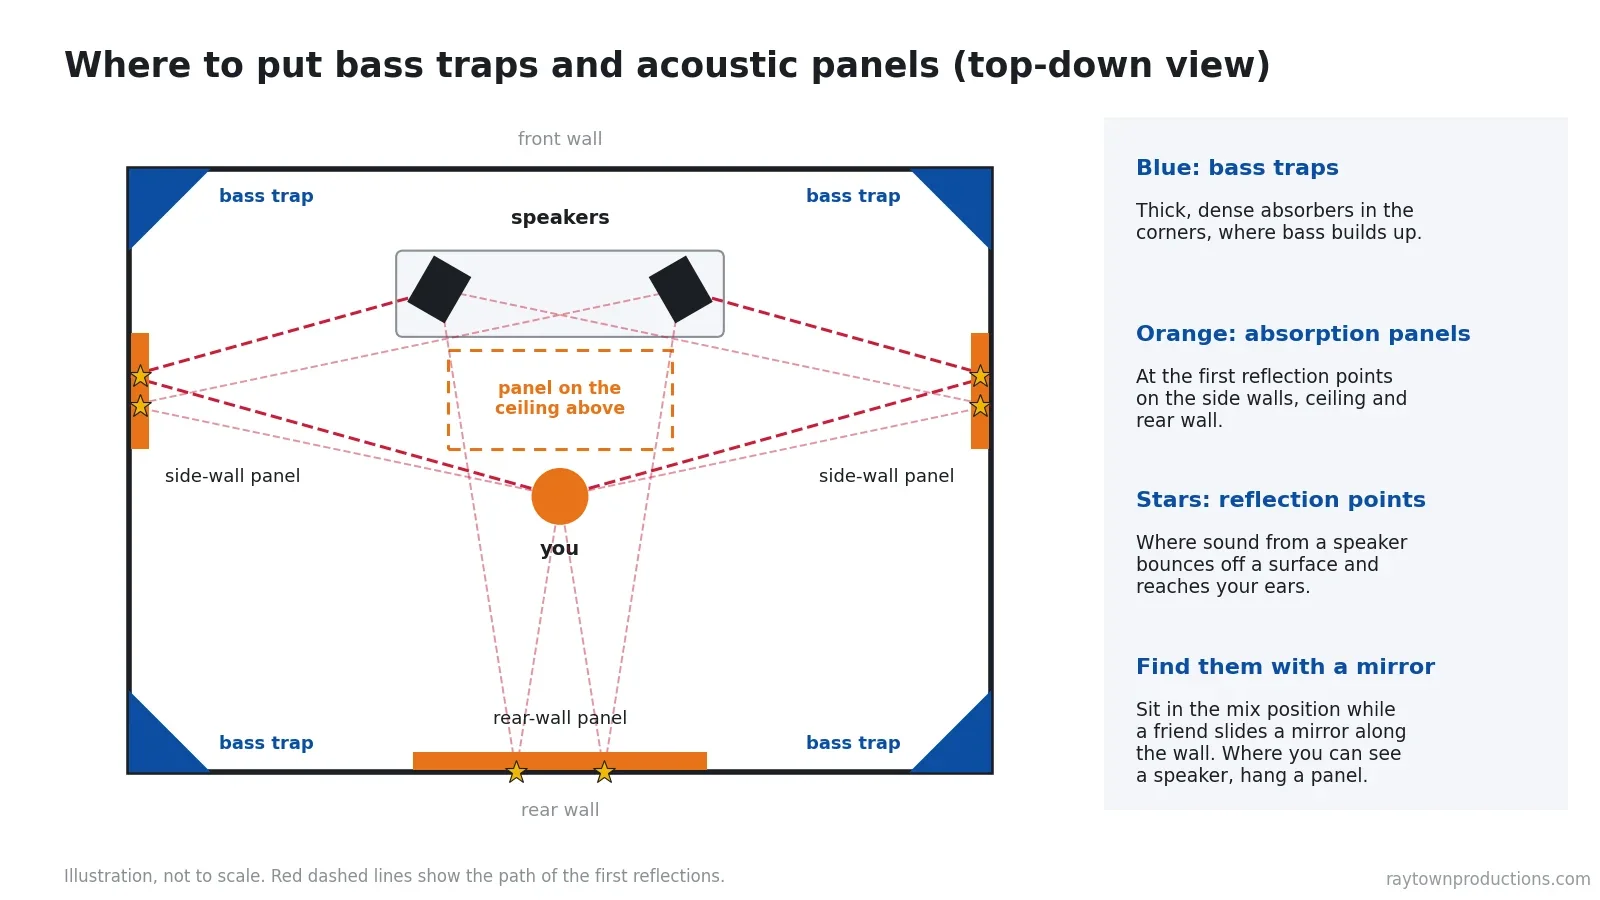
With flutter echo and bass build-up reduced, your mixes will sound cleaner and more balanced. Your desk is a reflective surface too, so once the walls are done, see my 3 ways to fix studio desk reflections.
Don’t go crazy with “egg carton” foam. I have some in my studio to tame flutter echo, and it’s great for that. But thin foam mostly absorbs the higher frequencies (roughly 1 kHz and up) and leaves the deeper frequencies untouched. Cover the whole room with it and you get a space that’s dead and unnatural on top and still boomy underneath, which skews how clear or bright your mix seems. Dense absorption panels are the fix.
Should You Build or Buy Acoustic Panels?
Building your own panels is the cheapest way to treat a room, and there’s a lot of good step-by-step information online:
- Quick fix: this DIY Perks tutorial makes absorption panels out of old towels. The video’s title puts the cost at $5.
- More professional look: this VO Tech Guru build uses MDF frames, mineral-wool insulation and felt. Materials were about $25 per panel when the video was made in 2016.
- Don’t feel like getting dirty? Companies like ATS Acoustics sell relatively inexpensive, high-quality panels ready to hang.
Material costs have changed since I first wrote this, so price the wood, insulation and fabric locally before you decide. Whichever route you take, go thick: thicker panels absorb lower frequencies, and an air gap behind a panel helps it reach lower still.
Home Studio Gear Recommendations Based on SCIENCE!
Can You Mix on Headphones If You Can’t Treat Your Room?
If putting up panels doesn’t work for your situation, mix on a decent pair of studio headphones. Don’t try to mix on consumer headphones (think Bose or Beats) unless the model is specifically designed for studio work. Consumer headphones typically have extra bass and top-end brightness to give music a sense of power. That gives your mix a false sense of power, and it won’t sound great on other speakers or headphones.
| Headphone | Design | Best used for |
|---|---|---|
| Sony MDR-7506 | Closed-back | The more affordable starting point; tracking and checking mixes |
| Audio-Technica ATH-M50x | Closed-back | Tracking and mixing |
| Beyerdynamic DT 770 Pro | Closed-back | Tracking and mixing |
| AKG K371 | Closed-back | Tracking and mixing |
| Beyerdynamic DT 880 Pro | Semi-open | Mixing |
| Sennheiser HD 650 | Open-back | Mixing and mastering |
One warning from experience: headphone mixes don’t translate well to other playback systems unless you frequently reference other mixes that you know sound great while you work. Referencing is how you keep your perspective, on headphones or speakers. Reference tracks are the first check on my final mix checklist for a reason. Mixing at a lower volume is another free habit worth trying.
I’d still recommend mixing on studio monitors if you can, because my mixes have always translated better with less effort that way. That doesn’t mean you can’t get great mixes on headphones: a number of very well-known producers and mixing engineers do excellent work on them. I even ran a blind shootout of headphone masters against studio-monitor masters to see how close they get. Try both, buy from a store with a good return policy, and send back anything that doesn’t help you make better decisions.
Why Does the Source Matter More Than the Microphone?
No amount of secret mixing tricks or expensive gear will make an out-of-tune or damaged instrument sound great. A basic workhorse mic like a Shure SM57 on a great-sounding instrument beats a boutique mic on a bad one every time. So before you ever push record:
- Replace the consumables. New guitar and bass strings, fresh drum heads.
- Tune constantly. Re-tune your guitar and bass every few minutes. New strings drift out of tune quickly until they’re fully stretched.
- Get the setup right. Guitars and basses should be properly intonated, with no string or fret buzz.
- Not sure how? Take it to a local guitar shop and have an expert do it. You’ll be happy you did.
These small details stack up fast across a whole session, and they take away from the feeling and emotion of the performance in a way no plugin can put back.
If you’re a vocalist, your body is the instrument. Warm up before you go to the mic. Vocal cords are sensitive, so cut back on smoking, or better, avoid it completely. Many singers also skip dairy before a session because it can leave the throat feeling coated with phlegm. Sip warm liquids and stay hydrated, which matters more the longer the session runs. And don’t overdo it: if your voice starts to feel dry or hoarse, stop recording. Take a long break, or rest your voice for the day and try again tomorrow. Past that point your tone and performance suffer, and you’re just capturing a sub-par take. If headphones are what’s throwing a singer off, here’s how to record vocals without headphones.
How Do You Get Rid of Background Noise in Home Recordings?
The noise floor creeps into your recordings if you don’t manage it. Small things like a computer fan or a dehumidifier can seem unnoticeable in the raw tracks, then become overwhelming in the mix, because compression and make-up gain turn the quiet parts up, noise included. The fix is free.
Record as far from your computer as possible. The fans that keep it cool make a surprising amount of noise, so don’t record a vocalist standing next to it. Run a longer mic cable and get some distance. You can also absorb some of the sound with towels or blankets around the computer, but computers overheat quickly, so never cover the vents or the fan inlets.
Turn off or unplug anything that makes noise before you hit record:
- Cell phones
- TVs
- Fans
- Air conditioner
- Furnace
- Dehumidifier
- Mini fridge
By all means turn the air conditioner, fridge and fans back on when the take is done: a hot, sweaty, slightly smelly studio is the last thing you and your clients want. Make a checklist of everything in your space that makes sound and run through it every time you record.
One rule for every studio: all phones on silent. Not vibrate. I’ve had so many great vocal takes ruined by a phone buzzing on a table.
What about outside noise? Noisy neighbors and traffic are a different problem. Acoustic panels won’t really reduce them; to keep sound out you need acoustic barriers built into the walls of the studio, which is very expensive and isn’t an option for most home studio owners. The only real option is to record when that noise is at a minimum. Good times are before and after lunch, and again in the early evening before it gets too late. For more ways to get drier, cleaner vocal recordings, see my 6 secrets for in-your-face rap vocals.
What Should You Not Spend Money On Yet?
Hold off on the expensive microphone and preamp. They’re luxuries, and their benefits are impossible to appreciate in an untreated room with a noisy, out-of-tune source. Don’t believe the hype around any single product, or that a $1,000 microphone will make your records better by itself.
The same goes for plugins. The stock plugins in your DAW and a handful of good free ones will take you a long way. My free plugin guide (linked below) lists my favorites, I’ve compared the best free clipping plugins, and the Basic version of my own clipper, HardStop, is free forever. If you want to spend a little on something, spend it on your skills: a good book or a course improves every record you make from now on.
Paying attention to detail, learning how your room sounds and treating it properly are the foundation. Without it, it doesn’t matter how expensive your gear is: your recordings won’t sound as good as those of someone who took care of the small things that add up across many tracks. Follow these steps and you’ll remove the distractions from your productions and clarify your mixes, which in the end makes it easier for listeners to connect with your music.
Gear and Freebies Mentioned
- My FREE Ultimate Home Studio Gear Guide
- My FREE guide to the best free plugins
- Sony MDR-7506 headphones
- Audio-Technica ATH-M50x headphones
- Beyerdynamic DT 770 Pro headphones
- AKG K371 headphones
- Beyerdynamic DT 880 Pro headphones
- Sennheiser HD 650 headphones
- ATS Acoustics absorption panels
- miniDSP UMIK-1 (my favorite measurement mic for room correction). Both it and the step-up miniDSP UMIK-2 plug in over USB; the UMIK-2 has a larger 1/2-inch capsule and lower noise.
- Shure SM57 microphone
- Mixing Secrets for the Small Studio (book)
- Sonarworks SoundID Reference (room and headphone correction)
- HardStop: my clipper plugin (Basic is free)
Some of these are affiliate links. If you buy through them, Raytown Productions may earn a small commission at no extra cost to you. It helps keep these tutorials free.
Key takeaways
- Treat the room first. Bass traps in the corners and panels at the first reflection points improve both your recordings and your mix decisions.
- Foam is not treatment. A little tames flutter echo; thick, dense panels do the real work.
- No treatment? Use studio headphones and reference great-sounding mixes constantly.
- Fix the source: new strings and heads, a proper setup, frequent tuning, and a warmed-up, rested voice.
- Kill the noise for free: get away from the computer, switch off anything that hums, silence the phones, and record at quiet times.
- Buy expensive mics and preamps last. They only matter once everything above is handled.
Frequently asked questions
What should I buy first for a home studio on a budget?
Acoustic treatment. Bass traps in the corners and absorption panels at the first reflection points improve both what your microphones capture and what you hear from your speakers, so every recording and mixing decision gets better. If you can’t treat the room, a pair of studio headphones and a habit of checking reference tracks is the next best first purchase.
Is acoustic foam enough to treat a room?
No. Thin foam mostly absorbs the upper mids and highs, so it can tame flutter echo but does very little in the bass, where small rooms have their biggest problems. Use a little foam for flutter if you need it, and rely on thick, dense panels and corner bass traps for everything else.
Can I mix on headphones instead of studio monitors?
Yes, as long as they are studio headphones and you constantly compare your mix against songs you know sound great. I find mixes translate with less effort on monitors in a treated room, but plenty of well-known engineers do excellent work on headphones. Avoid consumer headphones with boosted bass and treble.
Do I need an expensive microphone to make professional recordings?
No. Great-sounding songs are made on budget microphones all the time. A well-tuned instrument or a rested, warmed-up singer in a quiet, controlled room matters far more than the price of the mic. An expensive microphone only starts to pay off once the room, the source and the noise floor are already handled.
Will acoustic panels soundproof my room?
No. Acoustic panels control reflections inside the room; they don’t stop traffic or noisy neighbors from getting in. Real sound isolation has to be built into the walls, which is expensive. For most home studios the practical fix is to record at the quietest times of day.
Want Your Home Recordings to Sound Like a Record?
You don’t need a bigger gear budget; you need a great mix. I mix and master songs for independent artists and producers every week. Send me your tracks and I’ll make them release-ready. Or learn the whole process yourself in my courses.







Trackbacks/Pingbacks